
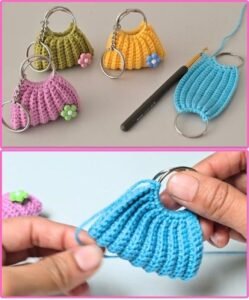
If you’re searching for a creative way to combine functionality with cuteness, this Amigurumi Bag Keychain – Step by Step Tutorial is exactly what you need. Whether you’re new to amigurumi or a seasoned crocheter looking for a quick and satisfying project, this guide will walk you through every stage. From selecting the right yarn to stitching the final embellishments, you’ll find all the help you need right here.
The Amigurumi Bag Keychain – Step by Step Tutorial is perfect for crafting a miniature accessory that’s great as a gift or a personal keepsake. It’s small enough to finish quickly and detailed enough to practice your crochet skills. Plus, it’s incredibly portable — both as a craft project and as a charming item to carry on your bag or keys.
In this article, we’ll cover how to crochet your mini bag keychain with clear and simple instructions. You’ll also find explanations of basic techniques, materials needed, tips for beginners, and common mistakes to avoid. By the end of this Amigurumi Bag Keychain – Step by Step Tutorial, you’ll be ready to make your own collection of tiny bags.
Materials and Tools You’ll Need
Before you begin with this Amigurumi Bag Keychain – Step by Step Tutorial, it’s important to gather the right supplies. Choosing the right materials will help ensure your bag turns out as adorable and sturdy as you hope.
Start with cotton yarn or acrylic yarn in your favorite colors. Cotton yarn provides structure, while acrylic yarn is soft and more forgiving. Lightweight or DK yarn is ideal for amigurumi, but you can experiment as long as you adjust your hook size accordingly.
Use a 2.5 mm to 3.5 mm crochet hook for a tighter stitch, which is essential in amigurumi projects. A smaller hook size helps prevent gaps in the fabric, keeping the stuffing hidden and the shape firm.
You’ll also need polyfill stuffing, yarn needle for weaving in ends, scissors, and a keychain ring or lobster clasp to attach your mini bag to keys or bags. Optional items include a small button or snap to close the flap and embellishments like embroidery thread, beads, or charms.
This project also requires basic amigurumi knowledge, such as creating a magic ring, single crochet, increasing, and decreasing. Don’t worry — we’ll walk through these in the next sections so that even beginners can follow along.
Lastly, be patient and have fun! Crafting an Amigurumi Bag Keychain is not only about the end product but also about enjoying the process. Relax, take your time, and watch your tiny masterpiece come to life.
Step-by-Step Instructions to Make the Base Bag
Let’s begin the actual work of this Amigurumi Bag Keychain – Step by Step Tutorial with the bag body. This forms the main structure and is usually made using simple rounds or rows, depending on the style you prefer.
Start with a magic ring and work 6 single crochets (sc) into the ring. Pull it tight and slip stitch to the first sc to join the round. This technique helps create a neat, closed center at the bottom of the bag.
In Round 2, increase by making 2 sc in each stitch (12 stitches total). This forms the base of the bag and ensures it’s flat and stable. Continue increasing by evenly spacing extra stitches over the next two rounds until you have the desired diameter.
Once the base is done, work the next several rounds without increasing to form the height of the bag. This creates a cylindrical shape, which is essential for the body of the mini bag. Keep your tension consistent and count stitches to avoid uneven edges.
When your bag reaches the desired height (usually around 10-15 rounds), fasten off if you plan to add a flap separately, or continue if it’s a single-piece design. If making a flap, you’ll start working in rows instead of rounds on one half of the bag.
To form the flap, crochet back and forth in single crochet, reducing a stitch on each end every couple of rows for a tapering effect. This gives the flap a curved or triangular shape that mimics a real bag closure.
Once you’re done, fasten off and weave in all ends using your yarn needle. Your base is now complete, and you’re ready to add the cute finishing touches that will bring your Amigurumi Bag Keychain to life.
Adding Details and Keychain Attachment
At this point in the Amigurumi Bag Keychain – Step by Step Tutorial, it’s time to make your mini bag stand out with finishing touches and secure the hardware.
To give your bag extra charm, you can crochet a tiny strap or handle using a chain of 15-20 stitches and attaching it to both sides of the bag. You can even create a crossbody-style strap for added style. Stitch it securely to prevent it from coming off.
Add a button or snap to close the flap. Sew it carefully to ensure it doesn’t tear through the stitches. You can also use a piece of Velcro or a decorative stitch to hold the flap closed.
Now attach the keychain hardware. Open the keyring or lobster clasp, and insert it into one side of the strap, the top of the bag, or a stitched loop designed for this purpose. Make sure the attachment is firm — you don’t want it to come loose over time.
If you want to personalize it further, consider embroidering initials or small flowers using contrasting yarn. These decorative elements make your bag unique and show off your creativity.
You can also add beads or sequins for sparkle, or a small tassel to hang alongside the keychain. Just make sure all additions are secure, especially if you plan to use it frequently.
Finally, give your creation a gentle tug to test its durability. Now your Amigurumi Bag Keychain is ready to clip onto your backpack, keys, or purse — a tiny, handmade treasure wherever you go.
Tips for Beginners and Common Mistakes
Creating an Amigurumi Bag Keychain is a wonderful beginner project, but there are a few common pitfalls to avoid. Let’s go over some helpful tips to keep your experience smooth and enjoyable.
First, always use a smaller hook than usual for the yarn weight. This tightens your stitches, which is crucial in amigurumi. Loose stitches can lead to stuffing showing through and a floppy shape.
Don’t forget to count your stitches in each round. It’s easy to accidentally increase or decrease when working in small rounds. Use a stitch marker to track the first stitch in every round.
When attaching the flap, strap, or decorations, always double-check positioning before sewing them on. Misaligned pieces can make your finished bag look uneven or unbalanced.
Avoid using yarn that splits easily, especially if you’re new to crochet. Smooth, tightly spun yarn is much easier to work with and results in a cleaner finish.
Another tip is to stuff lightly, if at all. Most keychains don’t need heavy stuffing — a flat or lightly padded look often works better and keeps the keychain light for daily use.
Finally, don’t rush! It might be tempting to finish quickly, but taking your time leads to a much more polished result. Enjoy the process and celebrate each completed piece of your Amigurumi Bag Keychain journey.
Creative Variations and Gift Ideas
Now that you’ve mastered the basics, this Amigurumi Bag Keychain – Step by Step Tutorial opens up many fun possibilities. Let’s explore some creative variations and gift ideas.
Try changing the shape of the bag — make a circular pouch, a square satchel, or even a tiny drawstring backpack. Each shape requires small pattern changes but makes your collection more diverse.
You can also experiment with color blocking or striped patterns to give the bag a trendy look. Switching colors between rounds is a great way to add interest without increasing difficulty.
Create seasonal themes, like a red-and-green holiday bag or a pastel Easter purse. These make perfect handmade gifts and can be used as festive keychains or tiny decorations.
If you’re gifting them, consider making sets of keychains in coordinating colors. Package them in a small box with a handwritten tag for a charming, personal touch.
You can even turn your Amigurumi Bag Keychain into a tiny coin pouch. Just leave the flap functional and use a snap or zipper to keep it closed. Practical and cute!
Lastly, these keychains are perfect for craft fairs or online shops. They’re quick to make, easy to customize, and people love miniature crochet items. Add your own tag or label for branding.
Frequently Asked Questions (FAQ)
Q: What type of yarn is best for an amigurumi bag keychain?
A: Cotton yarn is best due to its sturdiness and shape retention, but acrylic works well too. Choose a yarn that’s smooth and not too fuzzy to ensure clean stitches.
Q: Can I make the bag larger or smaller?
A: Yes, you can easily adjust the size by changing the number of rounds and using thicker or thinner yarn. Just make sure your hook size matches the yarn.
Q: Is this a good project for beginners?
A: Absolutely! This Amigurumi Bag Keychain – Step by Step Tutorial is perfect for beginners. It teaches essential techniques without being overwhelming.
Q: How long does it take to make one bag keychain?
A: Most people finish one in about 1-2 hours, depending on skill level and customization. It’s a fast and satisfying project!
Q: Do I need to stuff the bag?
A: Not necessarily. A light stuffing can add shape, but many prefer to leave it flat, especially if it’s purely decorative or used as a functional pouch.
Q: Can I wash the keychain?
A: Yes, but it’s best to hand wash gently with mild soap and let it air dry. Avoid machines to preserve the shape and any attached accessories.
Conclusion
We hope you’ve enjoyed this complete Amigurumi Bag Keychain – Step by Step Tutorial. You’ve learned everything from gathering materials, crafting the base, adding details, avoiding mistakes, and even exploring fun variations and gift ideas.
This project is not only fun and quick, but also a great way to express your creativity and create something functional and cute. Whether it’s your first amigurumi or just your latest obsession, this tiny bag is sure to bring joy.
If you tried this tutorial, please leave your honest opinion and suggestions. We’d love to hear your experience, see your creations, and help with any questions. Happy crocheting!