
Crochet Snowman Hat – Step by Step Tutorial is your ultimate guide to making a fun, festive accessory that’s perfect for winter and holiday cheer. Whether you’re new to crochet or looking for a cheerful seasonal project, this tutorial will walk you through every detail. Creating a crochet snowman hat is not only a joyful experience but also a great way to craft something adorable for kids, friends, or even as a handmade gift.
In this complete Crochet Snowman Hat – Step by Step Tutorial, we will cover everything from choosing the right yarn and hook size to shaping the snowman’s face and finishing the hat with details like a carrot nose or button eyes. The project blends basic stitches with creative embellishments, making it a satisfying and engaging crochet journey. By the end of this tutorial, you’ll have a charming snowman hat that looks straight out of a winter wonderland.
This pattern is also a great opportunity to practice your crochet skills like working in the round, changing yarn colors, and sewing on embellishments. The crochet snowman hat is beginner-friendly yet detailed enough to impress any crochet lover. With patience and creativity, you’ll bring your own snowman to life — one stitch at a time.
Materials Needed for Your Crochet Snowman Hat
To begin this Crochet Snowman Hat – Step by Step Tutorial, you’ll need a few essential materials. Most of these items are common in any crocheter’s toolkit. White yarn is the foundation of the snowman’s face and hat body. Choose a soft, worsted weight yarn that will be comfortable to wear, especially if it’s for children or babies.
Next, you’ll want some accent yarns: black for the eyes and mouth, orange for the carrot nose, and any color for a scarf or hatband. These accents will give personality to your crochet snowman hat, so don’t be afraid to get playful with color combinations. Consider using cotton or acrylic yarns for durability and easy washing.
You’ll also need a suitable hook, typically a size H/5.0 mm or I/5.5 mm, depending on your yarn. Always check your yarn’s label for hook recommendations, and adjust for your tension. A tighter stitch will give the hat structure, while a looser one will make it stretchier.
Additional supplies include a yarn needle for weaving in ends, scissors, and optional buttons or felt pieces for facial details. These little additions can make your crochet snowman hat even more special and fun. You might also need a stitch marker if you’re working in continuous rounds to help keep track of where your round begins.
If you’re making the hat for a child, consider adding safety eyes instead of buttons to avoid choking hazards. For adult versions, more detailed embellishments like a crocheted top hat or earmuffs can really personalize the final product. With these materials in hand, you’re ready to start stitching!
How to Start the Crochet Snowman Hat Base
Begin your Crochet Snowman Hat – Step by Step Tutorial by creating the base of the hat. You’ll start with a magic ring or chain 4 and join to form a ring. Work double crochet (dc) stitches into the ring to form the crown. This will be the top of the snowman’s head. Make sure your stitches are evenly spaced.
As you build out from the crown, you’ll work in rounds, increasing in each row to shape the dome of the hat. The increase pattern typically follows a formula: in round 2, place 2 dc in each stitch; in round 3, do 1 dc and then 2 dc in the next stitch; and so on. This creates a smooth and rounded top that fits comfortably on the head.
Continue increasing until the diameter reaches your desired head size — this is typically around 6 to 7 inches for a child’s hat or 8 inches for an adult. From there, you’ll stop increasing and simply crochet in the round to build the sides of the hat. This gives your crochet snowman hat its height and volume.
Once you have the desired height, it’s time to shape the brim. You can keep it simple with straight double crochet stitches or switch to single crochet for a tighter edge. You may also choose to add a brim in a contrasting color to simulate a snowman’s hat or scarf.
Be sure to try the hat on as you go or measure it frequently to ensure a good fit. Crocheting in the round can sometimes cause the hat to become tighter or looser depending on your tension. Blocking the finished piece gently with steam can also help shape it properly.
Your base is now ready! You’ve built the snowman’s “head” and are well on your way to decorating it. This is where the fun part begins — adding those magical snowman details!
Adding the Snowman Face and Features
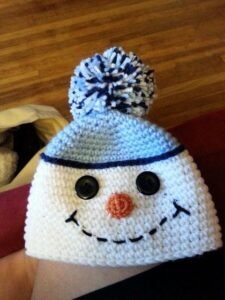
This section of the Crochet Snowman Hat – Step by Step Tutorial is where the personality really comes alive. Start by creating the eyes. Use black yarn to crochet two small circles, usually starting with a magic ring and a few single crochets. Stitch these onto the front of the hat, evenly spaced.
For the iconic carrot nose, use orange yarn. Make a small cone shape by increasing and decreasing stitches to form a 3D effect. Attach the nose slightly below the eyes in the center. This small feature instantly turns your white hat into a cheerful snowman.
Next, let’s work on the mouth. The mouth can be made from small black yarn circles stitched in a curved smile, or simply embroidered using a yarn needle. Either way, it’s important to place it far enough below the nose to create balance.
To make your crochet snowman hat even more festive, consider adding rosy cheeks using pink yarn or felt. You can crochet tiny circles or sew on patches for a sweet winter blush effect. This is especially charming on kids’ hats.
Don’t forget the scarf or hatband! Crochet a small band in a bright color and sew it around the bottom of the hat or create a scarf that drapes from the side. It adds warmth and style to the design. If you’re adventurous, you could even crochet earmuffs or a top hat to go on the snowman.
Secure all features well, especially if the hat is for a child. Use tight stitching and reinforce with sewing if needed. Now your snowman hat has a happy face, and you’re almost finished with the creative part of this Crochet Snowman Hat – Step by Step Tutorial.
Final Touches and Customization Tips
Now that your crochet snowman hat is complete, it’s time for those little extras that make each piece one-of-a-kind. Adding unique details not only enhances the design but also showcases your personal style and creativity.
One fun addition is using pom-poms. Attach a large pom-pom to the top of the hat for a traditional winter look. You can use a yarn pom-pom maker or make one by hand using cardboard. Choose colors that contrast with the white to stand out.
You can also personalize the hat with initials or holiday-themed appliqués. Add a crocheted snowflake, a mini wreath, or holly berries to give your snowman a seasonal twist. These small additions are easy to sew on and make great decorative touches.
If you’re planning to gift or sell these hats, think about packaging them with care. A hand-written tag or a small care instruction note adds a thoughtful touch that recipients appreciate. Handmade items carry love in every stitch, and packaging reflects that.
Another great tip is to line the inside of the hat with fleece fabric for extra warmth, especially for colder climates. This helps prevent wind from passing through the stitches and makes the hat extra cozy for children and babies.
You might also consider making matching accessories like mittens or scarves to go along with your crochet snowman hat. Sets are especially charming for winter photo shoots or Christmas gifts. Don’t be afraid to experiment!
Finally, always take photos of your creations! Share your work with friends, family, or on social media to inspire others. Your creativity could spark joy and maybe even inspire someone else to follow this Crochet Snowman Hat – Step by Step Tutorial.
FAQ – Frequently Asked Questions About Crochet Snowman Hat
Q: Is this Crochet Snowman Hat suitable for beginners?
Yes! This Crochet Snowman Hat – Step by Step Tutorial is beginner-friendly. If you know how to single and double crochet, you can follow the steps easily. Embellishments may require basic sewing skills, but nothing too advanced.
Q: How long does it take to make a crochet snowman hat?
Depending on your skill level, it may take between 3 to 6 hours. Beginners may need more time, especially when adding decorative features. Experienced crocheters can often complete it in one sitting.
Q: What type of yarn should I use?
Use soft worsted weight yarn for best results. Acrylic or cotton yarns are both suitable and machine-washable. Choose colors based on your snowman design: white for the base, black for eyes, orange for the nose, and colorful yarns for accents.
Q: Can I make the hat in different sizes?
Absolutely! You can adjust the hat size by increasing or decreasing the number of rounds and using a larger or smaller hook. Measure the intended head circumference and follow a standard size guide for best results.
Q: Are the decorations safe for babies?
If you’re making this for a baby, avoid using small buttons or any detachable parts. Instead, crochet the eyes, nose, and mouth directly into the hat or use baby-safe materials like embroidered features.
Q: Can I sell the hats I make using this pattern?
Yes, you are free to sell your finished items! Just make sure to credit your original inspiration and create quality products with secure stitching and finishing.
Conclusion
In this Crochet Snowman Hat – Step by Step Tutorial, we’ve covered everything you need to know to create a cozy and cute snowman-themed hat. From gathering materials to building the base and adding delightful facial features, you’ve now learned all the steps necessary to bring your snowman hat to life.
This project is perfect for holiday seasons, winter outfits, or meaningful handmade gifts. With a little yarn and creativity, you can spread warmth and joy through your crochet.
If you followed this tutorial, we’d love to hear from you! Please leave your honest opinion below, share your results, or suggest what kind of crochet project you’d love to see next. Your feedback helps improve future tutorials and builds a stronger crafting community. Happy crocheting!