
If you’re looking to add a touch of handmade charm to your holiday decorations, this reindeer amigurumi – step by step tutorial is exactly what you need. This delightful crochet reindeer is perfect for gifting, decorating, or just enjoying as a cute little companion. Whether you’re a beginner or an experienced crocheter, this guide will walk you through everything you need to know to create your very own reindeer amigurumi.
Reindeer amigurumi – step by step tutorial is a popular search term among crochet enthusiasts during the holiday season. This is not just because reindeer are symbolic of Christmas cheer, but also because amigurumi projects are both fun and rewarding. Amigurumi, the Japanese art of knitting or crocheting small stuffed yarn creatures, allows for incredible creativity and personal touches. This reindeer amigurumi will be no exception, offering you the chance to make something adorable, soft, and unique.
Before we dive into the detailed steps, let’s talk about the benefits of creating your own reindeer amigurumi. It’s a relaxing, mindful activity that helps reduce stress and fosters creativity. Plus, you’ll end up with a handmade item that’s full of character and warmth. In this step by step tutorial, you’ll learn how to crochet every part of the reindeer – from its antlers to its little legs – in a structured and accessible way.
Materials You’ll Need for Your Reindeer Amigurumi
To start your reindeer amigurumi – step by step tutorial, you’ll need to gather some basic materials. These are easy to find and affordable, especially if you’re already into crochet or crafts. The yarn is the star here – go for soft, medium-weight yarn in classic reindeer colors: brown for the body, beige for the antlers, black for the hooves, and a splash of red for the nose if you’re going for a Rudolph look.
Next, you’ll need a crochet hook that matches the weight of your yarn – usually a 2.5mm to 3.5mm hook is ideal for amigurumi. You’ll also need a tapestry needle to sew the parts together, stitch markers to keep track of your rounds, scissors, and some stuffing material like polyester fiberfill. Safety eyes or black embroidery thread can be used for the eyes.
Once you have your materials ready, make sure your space is well-lit and cozy. Having a clean, quiet area can make a big difference in your focus and enjoyment of the process. Keep a small container nearby to hold tiny pieces like the eyes or any buttons you may use for decoration.
Always remember to crochet tightly when making amigurumi. Loose stitches can result in visible holes, which can let the stuffing peek through. A tighter tension creates a smoother, more polished finish. If you’re new to amigurumi, take some time to practice making tight single crochet stitches before you start assembling your reindeer amigurumi.
Another useful tip is to crochet all the body parts before assembling. That way, you can see how everything fits together and make adjustments if needed. Once all the pieces are done, you can start attaching them one by one with a tapestry needle, beginning with the larger body parts and working your way to the smaller details.
Finally, don’t forget to personalize your reindeer. Add a tiny scarf, a bell, or even a miniature Santa hat. This is your creation, and a little customization can make it truly special and gift-worthy.
Crocheting the Reindeer Body
The body is the base of your reindeer amigurumi, and it’s typically worked in a continuous spiral using single crochet stitches. Start with a magic ring and build up rounds by increasing evenly to form a rounded shape. This will be the torso that supports the other pieces.
Use brown yarn for the main body. Keep checking that your stitches are even and that the piece is stuffing-friendly. As you continue building the body upward, remember to occasionally stuff it lightly to maintain shape. It’s easier to do this gradually than all at once at the end.
When you reach the desired height, start decreasing your stitches evenly to close the body. Don’t forget to add the final amount of stuffing before you close it completely. The body should be firm but squishy, like a plush toy.
Next, you’ll crochet the reindeer’s head in a similar way – beginning with a magic ring, increasing to create a rounded top, and then tapering off for the neck. Use the same brown yarn for consistency. The head is where the most personality shines, so take your time with shaping and stuffing.
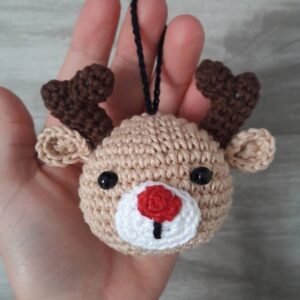
Attach safety eyes evenly spaced on the face before you close the head. If you’re adding a red nose, now’s the time to sew it on or crochet a tiny red ball. A bit of blush or pink embroidery thread can be used for rosy cheeks to give it a festive, friendly look.
Use a long tail to sew the head securely onto the body. Make sure it’s centered and firmly attached. This gives your reindeer amigurumi its finished shape and the sturdy structure needed to hold the rest of the limbs.
Creating the Legs, Arms, and Antlers
Now that you’ve finished the core of your reindeer amigurumi, it’s time to move on to the limbs and antlers. These smaller parts add lots of character to the reindeer and should be symmetrical and neat.
Start with the legs – use black yarn for the hooves and switch to brown after a few rounds. Work in spirals as before, creating a tube-like shape that you will stuff lightly. Make four of these – two arms and two legs – and sew them to the bottom and sides of the body.
Make sure to position the legs evenly so your reindeer stands or sits correctly. The arms can be slightly angled to give your reindeer a welcoming or playful pose. You can even add a mini gift or candy cane into the arms if you want to go the extra festive mile.
The antlers are usually made using beige or cream-colored yarn and are more intricate. Begin with a base and branch out using smaller crocheted tubes that you attach to the main stem. Antlers can be sewn onto the top of the head once complete, giving the reindeer its iconic look.
Take care to make both antlers symmetrical and well-shaped. Slight variations are okay – they make your reindeer amigurumi feel more handmade and special. Be sure to sew them firmly, as they’ll be top-heavy and could droop if not attached properly.
Don’t forget to weave in all your yarn ends neatly. This gives the project a cleaner look and prevents unraveling. A touch of fabric glue on the knots (optional) can help reinforce the pieces for extra durability.
Adding Personality and Final Touches
At this stage, your reindeer amigurumi – step by step tutorial is nearly complete, and it’s time to give your reindeer a bit of personality. One of the joys of amigurumi is how expressive you can make your creations with just a few details.
You can add accessories like a tiny scarf using leftover yarn. A mini scarf not only looks adorable but adds a cozy, finished feel. A green and red color combination enhances the Christmas theme beautifully.
Embroider a small smile or mouth if you like. A gentle curve in black thread under the nose can transform the reindeer into a joyful or sleepy character. This is optional, but it does give your amigurumi a friendly touch.
Add a bell, button, or bow under the neck as a collar detail. This is a charming way to personalize your reindeer and gives it a store-bought, polished look even though it’s homemade. Just ensure any small pieces are securely sewn on if the toy is meant for children.
If you want your reindeer amigurumi to hang as an ornament, add a small loop at the top of the head using yarn or ribbon. It will look beautiful on a Christmas tree or as a bag charm.
Finally, give your finished reindeer a gentle shaping. Move the stuffing around, adjust the limbs, and smooth out the yarn. A well-shaped amigurumi looks more professional and is a joy to display or give as a gift.
Take pictures of your finished project to share with friends or save as inspiration. Every reindeer will have its own unique look, and it’s fun to see how slight changes in stitches or decoration make each one different.
FAQ About Reindeer Amigurumi
What is reindeer amigurumi?
Reindeer amigurumi is a crocheted stuffed reindeer made using the Japanese amigurumi technique. It involves creating the toy in separate pieces and assembling them into a soft, handmade doll.
Is this tutorial suitable for beginners?
Yes, this reindeer amigurumi – step by step tutorial is written for all levels. As long as you know basic crochet stitches like single crochet and can work in rounds, you’ll be able to follow along.
How long does it take to make one reindeer amigurumi?
Depending on your skill level, it can take between 4 to 8 hours. Beginners may take a bit longer, especially when working on the antlers and assembling the pieces.
What yarn is best for amigurumi?
A medium-weight cotton or acrylic yarn works best. It holds shape well and is easy to crochet tightly, which is important for stuffed toys.
Can I customize the size of the reindeer?
Absolutely! By changing the hook size and yarn weight, you can scale the pattern up or down to make a larger or smaller reindeer.
Are safety eyes necessary?
No, you can use black embroidery thread to create eyes if you prefer. This is especially recommended for toys intended for very young children.
Conclusion
We hope this reindeer amigurumi – step by step tutorial helped you learn how to make your own adorable crochet reindeer. From gathering your materials to adding the final touches, every part of this project is filled with creativity and joy. Handmade crafts like these bring warmth to the holidays and provide a satisfying way to express your artistic side.
If you followed along and created your own reindeer, we’d love to hear about it! Please leave your honest opinion in the comments and feel free to share any suggestions or tips you discovered during the process. Happy crocheting and may your holiday be filled with handmade happiness!