
If you’ve ever wondered how to crochet a pumpkin basket with lid – step by step tutorial, you’ve come to the right place. This delightful fall-themed crochet project is not only decorative but also functional, making it a perfect addition to your seasonal decor. Whether you’re planning for Halloween, Thanksgiving, or just love cozy, rustic vibes, this crochet pumpkin basket will surely bring warmth and charm to your space.
This pumpkin basket with a lid is perfect for storing candies, trinkets, or even crochet supplies. The best part? It’s beginner-friendly and doesn’t require advanced crochet techniques to complete. With just a few basic stitches and a little time, you can create a beautiful handmade item that will impress your friends and family.
Throughout this how to crochet a pumpkin basket with lid – step by step tutorial, we will guide you with easy-to-follow instructions, practical tips, and inspiration. From choosing the right yarn and hook to finishing off with a snug lid and cute stem, this guide will help you create a stunning piece from start to finish. Let’s grab your yarn and hook and get started on this fun autumn project!
Materials You’ll Need for Crocheting a Pumpkin Basket
Before diving into how to crochet a pumpkin basket with lid – step by step tutorial, let’s talk about the tools and materials you’ll need. Having the right supplies on hand can make the crafting process much smoother and more enjoyable.
First, you’ll need yarn in seasonal colors—typically a vibrant orange for the pumpkin body, brown or green for the stem, and optional cream or yellow for decorative details. Choose a sturdy worsted weight or chunky yarn to give your basket structure and durability.
Next, pick a crochet hook that matches the weight of your yarn. For worsted weight yarn, a 5.0 mm (H-8) hook is usually ideal. Using a slightly smaller hook than recommended can also help keep your stitches tight, ensuring the basket holds its shape.
You’ll also need a yarn needle for weaving in ends, stitch markers to help count your rounds, and scissors. If you want extra support, consider using plastic canvas or interfacing inside the base of the basket to keep it firm and steady.
Optional accessories include felt leaves, buttons, or ribbons to decorate the lid. These extras can make your pumpkin basket even more festive and personalized.
Having all your tools organized and ready before starting will help you focus on the creative process. Now that we’ve gathered our supplies, let’s move on to crafting the base of our pumpkin basket.
Creating the Base of the Pumpkin Basket
In this section of the how to crochet a pumpkin basket with lid – step by step tutorial, we begin by working on the bottom base of the pumpkin. This will form the sturdy foundation of your basket.
Start with a magic ring and crochet six single crochets (SC) into it. Pull the ring tight and join with a slip stitch. This is your first round. In the second round, you will make two SC into each stitch, ending with twelve stitches total.
Continue increasing evenly in the following rounds by adding one more single crochet between each increase. For example, round three will be: SC in the first stitch, then two SC in the next, and repeat. This gradual increase will create a smooth, circular base.
Keep increasing until your circle reaches your desired basket diameter. For a small pumpkin basket, you might stop at 48 or 60 stitches. Make sure your base lies flat and doesn’t ripple or curl; adjust your tension if necessary.
Once your base is complete, work a round in the back loops only. This creates a defined edge and begins building up the sides of the basket. From here, you’ll stop increasing and continue crocheting evenly in rounds.
The depth of your basket depends on how many rounds you continue to add. For a medium-sized basket, around 10–12 rounds should give enough depth. Feel free to adjust based on your needs!
Shaping the Pumpkin and Adding Texture
Now we’ll continue the how to crochet a pumpkin basket with lid – step by step tutorial by focusing on texture and pumpkin-like shaping. These details bring the basket to life and give it that classic ribbed pumpkin look.
To create the pumpkin ribs, alternate rounds using front post double crochets (FPDC) and regular double crochets (DC). This combination creates raised lines and mimics the grooves on a real pumpkin.
Start your round with a chain 2 (does not count as a stitch), then do one FPDC around the first stitch, followed by one regular DC in the next. Repeat this pattern around the basket.
On the next round, crochet the stitches as they appear: FPDC on top of FPDC and DC on top of DC. This will enhance the texture and create visible ridges around the basket body.
Repeat this ribbed pattern for as many rounds as needed to achieve the desired height. Remember to end on a full round to ensure symmetry.
To finish the basket’s top edge neatly, do a final round of single crochet stitches in both loops. This helps maintain the structure and provides a firm rim for the lid to rest on.
Once the basket body is done, fasten off and weave in any loose yarn tails using a yarn needle. Your basket base is now complete, and it’s time to move on to the lid!
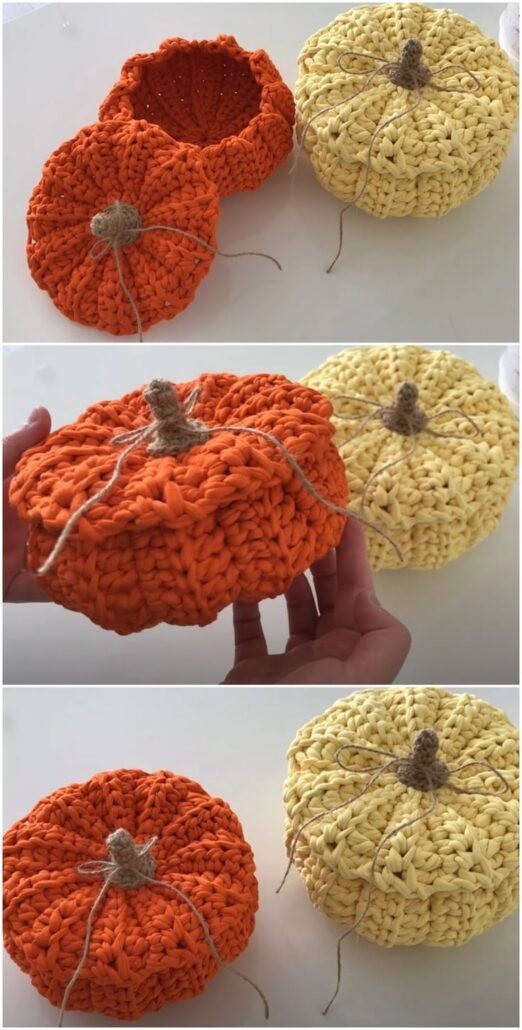
Making the Lid and Pumpkin Stem
This part of the how to crochet a pumpkin basket with lid – step by step tutorial focuses on crafting the lid and the stem, turning your basket into a realistic and adorable pumpkin.
To make the lid, begin with a magic ring and six SC. Follow the same increasing method as used in the basket base, gradually expanding in each round.
The lid should match the diameter of the basket’s opening, so stop increasing when it aligns perfectly. You can check this by placing it over the top to test the fit.
Once you have the desired size, continue with 1–2 rounds of SC without increases to give the lid a slight dome shape. This makes it look more natural and helps it sit snugly on the basket.
Now let’s create the stem! Using brown or green yarn, start with a magic ring and six SC. Then crochet a few more rounds (without increasing) to make a small cylinder.
You can stuff the stem lightly with a bit of yarn or fiberfill to help it stand upright. Then, sew the stem onto the center of the lid using your yarn needle and matching yarn.
Optional: add small green leaves or curly vines around the stem to enhance the pumpkin look. You can crochet these separately and attach them with a few stitches.
Final Touches and Creative Ideas
You’re almost done with this how to crochet a pumpkin basket with lid – step by step tutorial! Let’s explore some finishing touches and creative ways to use or gift your pumpkin basket.
Use a contrasting color to embroider details like vertical lines on the pumpkin surface to emphasize the ribbing even more. Small accents can make a big difference in the final look.
Add felt or crocheted leaves for extra decoration. You can even use glitter yarn for a more whimsical touch. If you love personalizing your crafts, sew initials or messages on the inside of the lid.
These baskets make wonderful seasonal gifts. Fill them with homemade cookies, wrapped candies, or tiny gifts and give them to friends, teachers, or coworkers during the fall season.
You can also use your pumpkin basket as a festive centerpiece. Place a flameless candle inside or some cinnamon-scented potpourri to add both fragrance and ambiance.
If you’re a market seller, these pumpkin baskets can be a hot seasonal item. Consider making different sizes or sets of three for appealing fall displays.
Store them safely after the season by placing some tissue paper inside to maintain their shape and keep them in a cool, dry place to prevent dust or damage.
FAQ – Frequently Asked Questions
1. Is this pumpkin basket pattern beginner-friendly?
Yes! The pattern uses basic stitches like single crochet and double crochet. Some experience with post stitches is helpful, but the tutorial explains everything clearly.
2. How long does it take to crochet the pumpkin basket?
Depending on your skill level, it may take anywhere from 3 to 6 hours to complete. Taking breaks in between makes the process more enjoyable.
3. Can I make the basket in different sizes?
Absolutely. Just increase more rounds at the base and body to make a larger basket, or stop earlier for a mini version. Adjust the lid accordingly to match.
4. What yarn is best for this project?
Sturdy yarns like cotton or acrylic in worsted or bulky weight work best to maintain the basket’s shape and durability.
5. How do I clean the pumpkin basket?
Spot clean with a damp cloth. If necessary, hand wash gently and reshape while drying. Avoid machine washing as it may distort the shape.
6. Can I use this basket for storage year-round?
Yes! Though it’s perfect for fall, you can use it year-round to store small items. Change the colors to match different seasons or holidays.
Conclusion
Now that you’ve completed this how to crochet a pumpkin basket with lid – step by step tutorial, you’ve created a fun, festive piece that brings both charm and practicality. From forming the base to shaping the lid and stem, this project offers a great opportunity to grow your crochet skills while making something beautiful and useful.
We hope this tutorial helped you learn how to create a cozy, textured basket that fits perfectly into your autumn decor. Whether it’s for decoration, gifting, or storing little treasures, your pumpkin basket is sure to be loved.
If you enjoyed this guide, please leave your honest opinion and feel free to suggest ideas for future tutorials. Your feedback helps us create better and more helpful content for you. Happy crocheting! 🎃🧶