
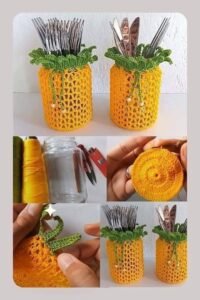
Creating your own crochet cutlery holder – step by step tutorial is a fun and rewarding way to add charm and personality to your dining table. A crochet cutlery holder is not just practical—it’s also a beautiful decorative item that can be customized to match any style or occasion. Whether you are preparing for a family dinner, a holiday celebration, or simply want to organize your utensils more elegantly, making one yourself is an enjoyable and creative project.
This crochet cutlery holder – step by step tutorial will guide you through the process from start to finish, ensuring that even beginners can follow along with ease. Crochet projects like this require only a few basic materials and stitches, making them a great option for crafters of all skill levels. With a little patience and creativity, you can produce a functional and beautiful piece that will impress your guests and bring a handmade touch to your meals.
One of the greatest advantages of making a crochet cutlery holder is the flexibility in design. You can choose colors that complement your tableware, add decorative borders, or even personalize each holder for specific guests. Whether you prefer a minimalist look or an intricate pattern, this guide will help you create something truly special. Let’s begin by looking at the materials and tools you’ll need before starting your project.
Materials and Tools for Crochet Cutlery Holder
Before starting your crochet cutlery holder – step by step tutorial, it’s important to have all your materials and tools ready. This preparation ensures a smooth process without interruptions once you begin crocheting.
The main material you’ll need is yarn. Cotton yarn is highly recommended for crochet cutlery holders because it’s durable, washable, and holds its shape well. You can choose from a wide variety of colors depending on the look you want to achieve.
You’ll also need a crochet hook suited to your yarn weight. Check the yarn label for the recommended hook size to ensure a proper fit and stitch definition. A medium-sized hook is usually perfect for projects like this.
Other useful tools include scissors for cutting yarn, a yarn needle for weaving in ends, and stitch markers to help keep track of your pattern. These accessories will make your work easier and more organized.
If you want to add decorative touches, consider ribbons, buttons, or lace trims. These can be sewn onto the finished holder to enhance its look and add a personalized touch.
With your materials gathered, you’ll be ready to move on to creating the base of your crochet cutlery holder.
Creating the Base of the Crochet Cutlery Holder
The base is the foundation of the crochet cutlery holder – step by step tutorial and will determine the size and structure of your final piece. Start by deciding on the measurements based on your utensils. Most cutlery holders are rectangular or square, but you can adjust the dimensions to suit your needs.
Begin with a chain stitch that matches the desired width of your holder. The chain will act as the starting edge for your work, so make sure it’s even and consistent.
Once your foundation chain is ready, work in rows using basic stitches like single crochet or half double crochet. These stitches create a dense fabric that holds its shape and supports the weight of your cutlery.
Continue crocheting rows until you reach the length you want for the base. Keep your tension even to ensure a neat and professional appearance.
If you’d like a more textured base, you can experiment with different stitch patterns, such as the moss stitch or waffle stitch, which add thickness and interest to the design.
When the base is complete, secure your last stitch and leave a long tail for sewing if you plan to fold and stitch the sides later.
Building the Pocket for the Cutlery
The pocket is the defining feature of a crochet cutlery holder – step by step tutorial, as it keeps your utensils neatly in place. To create it, you’ll use part of your base and fold it upward to form an open pouch.
Lay your crocheted base flat and fold one end toward the center, leaving enough space above the fold to display the top of the utensils. This creates a balanced and practical design.
Secure the sides of the folded portion by stitching them together with the yarn needle and matching yarn. Make sure the stitches are strong enough to hold cutlery without stretching or coming apart.
For a decorative edge, you can crochet along the open top of the pocket using a shell stitch or picot edging. This adds a charming finish to your holder.
If you want multiple sections inside your holder, you can add vertical stitches from the base to the top of the pocket, creating individual compartments for forks, knives, and spoons.
Once the pocket is in place, you can move on to adding decorative details that make your piece stand out.
Adding Decorative and Functional Details
This is the stage in the crochet cutlery holder – step by step tutorial where you can let your creativity shine. Decorative touches not only enhance the beauty of your holder but also make it unique.
Consider adding a contrasting border around the entire piece. A simple single crochet border in a different color can make the design pop.
Sewing on small buttons or wooden beads can give your cutlery holder a rustic or vintage feel. Just make sure any embellishments are securely attached and won’t interfere with the utensils.
If you want to match your cutlery holder to a special occasion, choose themed colors or add appliqués. For example, red and green yarn for Christmas or pastel shades for spring celebrations.
Another idea is to weave a thin ribbon through the top edge of the pocket. This not only adds visual appeal but also allows you to tie the holder closed if needed.
You can also personalize each holder by crocheting initials or small motifs, making them wonderful keepsakes for guests.
Once your decorative details are complete, your cutlery holder is ready for use or gifting.
FAQ – Frequently Asked Questions
1. What type of yarn is best for a crochet cutlery holder?
Cotton yarn is the best choice because it’s sturdy, easy to clean, and holds its shape well.
2. Can beginners make a crochet cutlery holder?
Yes, this project is simple enough for beginners, especially when using basic stitches like single crochet.
3. How do I wash a crochet cutlery holder?
Most cotton yarns can be machine washed on a gentle cycle, but always check the yarn label for care instructions.
4. Can I make different sizes for different utensils?
Absolutely—simply adjust your foundation chain and number of rows to create the desired size.
5. How long does it take to make one holder?
Depending on your skill level, it can take anywhere from 1 to 3 hours to complete a single holder.
6. Is it possible to use leftover yarn for this project?
Yes, this is a great way to use up small amounts of yarn from other projects.
Conclusion
We’ve now covered a complete crochet cutlery holder – step by step tutorial, from selecting materials to creating the base, building the pocket, and adding decorative details. This project is both practical and creative, giving you a chance to enhance your table setting with something handmade and personal.
By following these steps, you can create a unique cutlery holder that reflects your style and adds a special touch to any meal. Whether you make it for yourself, as a gift, or for a special event, it’s a delightful project that’s sure to impress.
I’d love to hear your honest feedback on this tutorial and any suggestions you might have for future guides. Share your thoughts, and let’s keep making beautiful, functional crochet pieces together.