
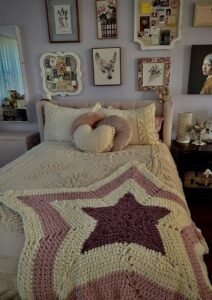
Learning crochet star blanket – step by step tutorial is a delightful way to create a unique and eye-catching blanket that brings warmth and personality to your home. This design stands out from traditional rectangular blankets due to its beautiful star shape, which can be customized with colors and patterns to suit any style or occasion. Whether you’re making it for yourself, as a baby gift, or as a decorative throw, this project offers endless creative possibilities.
The process of crochet star blanket – step by step tutorial may look challenging at first, but it’s surprisingly approachable once you understand the basic techniques. It’s a fantastic project for practicing stitch consistency and working in the round, both of which are essential skills for many crochet designs. The repetitive nature of the pattern makes it meditative, and the end result is both functional and visually stunning.
One of the great things about crochet star blanket – step by step tutorial is its versatility. You can make it small for a stroller or large enough for a bed, adjust the number of points in your star, and play with color changes to create bold contrasts or subtle gradients. With just some yarn, a hook, and patience, you’ll have a project that not only keeps you cozy but also serves as a beautiful statement piece in any room.
Materials and Tools Needed
To start your crochet star blanket – step by step tutorial, you’ll need to gather the right materials to ensure your project turns out just as you envision.
First, choose your yarn. Medium-weight yarn is ideal for this pattern as it offers the perfect balance of structure and softness. Acrylic yarns are popular for their durability, while cotton yarns provide a natural and breathable option.
Next, select a crochet hook that matches your yarn’s recommended size, usually between 4.0 mm and 5.5 mm for medium-weight yarn. This helps keep your stitches consistent and your blanket uniform.
You will also need a yarn needle for weaving in ends neatly once your blanket is complete. This small tool makes finishing work much cleaner.
A pair of sharp scissors is essential for cutting your yarn cleanly and precisely.
If you plan to include multiple colors, consider preparing all your yarn ahead of time so you can easily transition between shades without interrupting your flow.
Finally, ensure you have a comfortable, well-lit workspace. Good lighting is particularly important for distinguishing stitches, especially when working with darker yarns.
Creating the Foundation of the Star
The first stage in crochet star blanket – step by step tutorial is setting up the foundation that will define the shape of your star.
Begin by making a magic ring, which allows you to pull the center tightly closed for a neat start. If you prefer, you can chain four and join with a slip stitch to form a small loop.
Work a series of double crochets into your ring, followed by chain spaces that will later form the star’s points. Typically, you’ll alternate between sets of double crochets and chain stitches to create the initial framework.
Once your first round is complete, you’ll start building the points by increasing stitches in certain spaces. This gradual increase is what gives the blanket its distinctive star shape.
It’s important to keep your tension consistent throughout these rounds, as uneven tension can cause the star points to warp or curl.
By the end of this stage, you should have a small but recognizable star shape at the center of your work, ready to be expanded into a full blanket.
Expanding the Star Pattern
The next step in crochet star blanket – step by step tutorial is expanding your star until it reaches the desired size.
You’ll continue working in the round, adding stitches to each point and side to keep the star’s symmetry. The key here is to place increases in the same spot each round to maintain sharp, even points.
Color changes can be introduced at any stage to add visual interest. Some crafters like to change colors every few rounds for a striped effect, while others use a gradient yarn for a seamless transition.
As the blanket grows, be mindful of your stitch count in each round. Missing an increase or adding extra stitches can distort the shape.
If you notice any curling or unevenness, you can gently block the blanket as you go to help it lay flat.
This stage can be quite relaxing, as the pattern becomes repetitive, allowing you to focus on the rhythm of the stitches while watching your blanket take shape.
Finishing and Edging the Blanket
In the final stage of crochet star blanket – step by step tutorial, you’ll focus on finishing your work neatly and adding any optional edging.
Once your blanket has reached the desired size, complete your last round and fasten off your yarn securely.
Use your yarn needle to weave in all loose ends, making sure they’re hidden within the stitches so they don’t come undone over time.
For an elegant touch, consider adding a decorative edging. A simple single crochet border can give your star blanket a clean, polished look, while a scalloped or picot edge can add a playful detail.
Blocking your blanket at this stage helps it keep its shape, especially if the points have curled slightly during the process. Lightly dampen the blanket and pin it into place, letting it dry completely before use.
Once finished, your crochet star blanket is ready to be enjoyed or gifted, serving as a cozy and unique handmade treasure.
FAQ – Frequently Asked Questions
1. Is this project suitable for beginners?
Yes, as long as you’re comfortable with basic stitches and working in the round, you can complete this project successfully.
2. How large should the finished star blanket be?
The size is up to you. Baby blankets are often around 36 inches in diameter, while throws can be 60 inches or larger.
3. What yarn works best for this pattern?
Medium-weight acrylic yarn is a great choice for durability, but cotton yarn can work well for a lighter feel.
4. Can I make a star blanket with more or fewer points?
Yes, you can adjust the number of points by modifying the foundation round and increases.
5. How can I prevent the blanket from curling?
Maintaining even tension and blocking your blanket after completion can help prevent curling.
6. Is it possible to use leftover yarn for this project?
Absolutely. The star design works beautifully with multiple colors, making it perfect for using yarn scraps.
Conclusion
By following crochet star blanket – step by step tutorial, you’ve learned how to select your materials, create the foundation, expand the star pattern, and finish with a polished edge. This project combines beauty and functionality, making it a rewarding choice for crochet enthusiasts of all skill levels.
Whether you make a vibrant, colorful blanket or a simple, elegant piece, the star shape will stand out as a unique and heartfelt creation. Your handmade blanket will not only bring warmth but also carry the joy of your creative effort.
I’d love to hear your honest feedback about this tutorial and your suggestions for future crochet guides. Your thoughts help keep our crafting community inspiring and full of fresh ideas.