
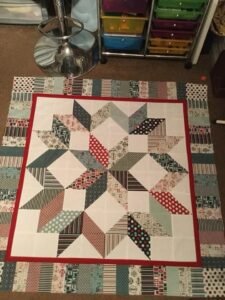
Learning the carpenter’s star quilt pattern – step by step tutorial is an exciting journey for quilters of all skill levels. This classic design is loved for its bold geometric layout and its ability to showcase beautiful fabric combinations. The carpenter’s star is a timeless quilt pattern that blends symmetry, precision, and creativity into one breathtaking piece. Whether you’re creating it for your own home, as a gift, or even as a showpiece, the process is both rewarding and deeply satisfying.
The carpenter’s star quilt pattern – step by step tutorial might look complex at first glance, but once you break it down into smaller units, it becomes much more approachable. The design is constructed from simple shapes, mainly squares and triangles, arranged to form the illusion of overlapping diamond shapes. The result is a stunning, multi-layered star that appears to radiate from the center. The beauty of this quilt lies not only in its striking appearance but also in the creative freedom it gives to play with color placement and fabric patterns.
One of the great things about following a carpenter’s star quilt pattern – step by step tutorial is its adaptability. You can make it large enough to be a bedspread or small enough to serve as a wall hanging. By adjusting the size of the blocks, you can easily customize the quilt dimensions. Whether you choose soft, muted colors for a traditional look or bright, bold hues for a modern twist, the carpenter’s star is a versatile pattern that will always impress.
Materials and Tools Needed
Before you start your carpenter’s star quilt pattern – step by step tutorial, gathering the right materials is essential for a smooth and enjoyable quilting process.
You will need high-quality quilting cotton in your chosen colors. Most carpenter’s star designs look best with at least three to four contrasting fabrics to highlight the star’s intricate shapes.
A reliable rotary cutter and a self-healing cutting mat are must-haves for precise cuts. Accurate cutting is key to ensuring all your pieces fit together perfectly.
A clear quilting ruler will help you measure and cut both squares and triangles with precision, which is crucial for keeping your star crisp and symmetrical.
Thread should match or complement your fabrics. Good-quality cotton thread is ideal for both piecing and quilting.
A sewing machine with a quarter-inch foot attachment will make your seam allowances consistent, an important factor in maintaining the star’s shape.
Finally, have an iron and ironing board ready to press your seams as you sew. Pressing keeps your quilt top flat and makes assembly much easier.
Cutting and Preparing the Fabric
The first major step in carpenter’s star quilt pattern – step by step tutorial is cutting and preparing your fabric pieces.
Start by determining the size of your finished quilt and working backward to calculate the size of each square and triangle. Precision here will make the piecing process much smoother later on.
Cut large squares first, then sub-cut them into triangles as needed. The carpenter’s star relies heavily on half-square triangles (HSTs), so be prepared to make quite a few.
Using a rotary cutter and ruler, cut each piece with steady, even pressure to ensure clean edges that will line up perfectly when sewn together.
Organize your cut pieces into labeled stacks according to color and shape. This will save time and prevent mix-ups when you start piecing the quilt top.
If you’re using directional prints, take extra care to align the fabric so the patterns face the desired direction within the quilt.
Once all your pieces are cut and organized, you’re ready to move on to assembling the star blocks that make up this beautiful design.
Assembling the Carpenter’s Star
This is the most exciting part of the carpenter’s star quilt pattern – step by step tutorial: watching your star come together.
Begin by making the half-square triangles. Sew two fabric squares right sides together, draw a diagonal line across one, and stitch on either side of the line. Cut along the line, press the seams, and you’ll have two HSTs.
Arrange your HSTs and solid squares according to the carpenter’s star layout. This typically involves eight large diamond-shaped sections that come together to form the star.
Work on one quadrant at a time, sewing rows together and pressing seams as you go. Keeping seams pressed in alternating directions will help them nest neatly at the intersections.
Once all quadrants are sewn, join them to form the complete star. Take your time matching points for a polished, professional look.
When the star is fully assembled, add any background fabric or borders needed to bring the quilt top to your desired size.
Quilting and Finishing
The final stage of the carpenter’s star quilt pattern – step by step tutorial is quilting and binding your masterpiece.
Layer your quilt top with batting and backing fabric, making sure all layers are smooth and free of wrinkles.
Baste the layers together using safety pins, basting spray, or large basting stitches to keep them in place while quilting.
Choose a quilting design that complements the star. Straight-line quilting can emphasize the geometric pattern, while free-motion quilting can add texture and flow.
Once quilted, trim away any excess batting and backing to square up the edges.
Attach the binding by sewing it to the front of the quilt, then folding it over to the back and stitching it down by hand or machine.
Give your finished quilt a final press, and admire the beautiful work you’ve created.
FAQ – Frequently Asked Questions
1. Is the carpenter’s star quilt pattern good for beginners?
Yes, but it requires attention to detail and accurate cutting. Beginners should take their time with each step.
2. What size should I make my blocks?
It depends on your desired quilt size. Common block sizes range from 6 to 12 inches.
3. Can I make this quilt entirely from scraps?
Absolutely. The star design works wonderfully with a variety of fabrics and colors.
4. How can I make sure my points align perfectly?
Accurate cutting, consistent seam allowances, and careful pressing are key to matching points.
5. What’s the best quilting design for a carpenter’s star?
Straight-line quilting along the star’s lines enhances its geometric beauty, but free-motion quilting can add a creative touch.
6. How long does it take to complete this quilt?
Time varies depending on skill level and quilt size, but expect anywhere from a few days to several weeks.
Conclusion
By following this carpenter’s star quilt pattern – step by step tutorial, you’ve learned how to choose fabrics, cut and prepare pieces, assemble the intricate star, and finish your quilt with precision. This classic design offers both a challenge and an opportunity to create something truly stunning.
Whether you go for a traditional color palette or something bold and modern, the carpenter’s star will always be a showstopper. The time and care you put into each stage will shine through in the finished piece.
I would love to hear your honest thoughts about this tutorial and your suggestions for future quilting guides. Your feedback helps keep our creative community growing and full of inspiration.