
Creating a cup coaster “Capybara” 🦦 – step by step tutorial is a fun and charming project for crafters who love combining practicality with a touch of whimsy. This delightful coaster design features the gentle and friendly capybara, making it both functional and adorable. Whether you want to protect your table surfaces or surprise a friend with a unique handmade gift, this project is a wonderful choice for beginners and experienced makers alike.
When working through the cup coaster “Capybara” 🦦 – step by step tutorial, you’ll discover how simple materials can be transformed into a high-quality, reusable item that brightens up any coffee table. The capybara theme gives the coaster a playful personality, while the step-by-step approach ensures you can follow along without feeling overwhelmed. Plus, this type of craft allows you to experiment with different textures, colors, and details to make each coaster unique.
One of the best things about the cup coaster “Capybara” 🦦 – step by step tutorial is that it’s versatile. You can use crochet, felt, fabric applique, or other crafting techniques to bring your coaster to life. This flexibility makes it a great project to adapt to your skills and tools. By the end, you’ll have a coaster that’s not only cute but also durable and easy to maintain, perfect for everyday use or special occasions.
Materials and Tools You Will Need
Before starting your cup coaster “Capybara” 🦦 – step by step tutorial, make sure you have all your materials ready for a smooth crafting session.
First, choose the primary material for your coaster. Cotton yarn, felt sheets, or sturdy fabric are popular options because they are both absorbent and heat-resistant.
Next, gather your crafting tools. This might include a crochet hook if you’re crocheting, fabric scissors if you’re sewing, or a hot glue gun if you’re assembling felt pieces.
You will also need a yarn needle or embroidery needle for finishing touches and sewing on any facial details for the capybara design.
If you want to give your coaster a personalized touch, prepare embroidery thread or fabric paint for the eyes, nose, and mouth of the capybara.
Lastly, keep a ruler or measuring tape handy to ensure all coasters are consistent in size, giving a polished look to your set.
Designing Your Capybara Coaster
The design stage is where the cup coaster “Capybara” 🦦 – step by step tutorial comes to life with creativity and personal style.
Start by sketching or visualizing your capybara design. Keep it simple and rounded to capture the soft, friendly look of the animal.
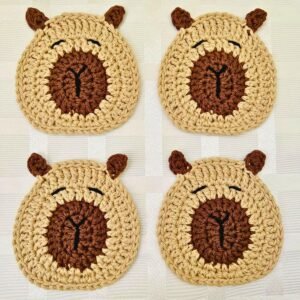
Decide on the colors you want to use. Natural shades like beige, brown, or light tan give a realistic feel, while pastel tones add a whimsical touch.
Consider adding small embellishments such as tiny felt ears or a pink blush on the cheeks for extra charm.
Make sure your design is proportionate to fit an average-sized cup or mug comfortably without spilling over.
If you’re making multiple coasters, decide whether you want them all identical or slightly different for variety.
Once you have your plan, you can start translating your vision into the chosen crafting technique—whether cutting, sewing, crocheting, or gluing.
Step-by-Step Crafting Process
Now it’s time to follow the cup coaster “Capybara” 🦦 – step by step tutorial and turn your materials into an adorable, functional piece.
If crocheting, start with a magic ring and work in rounds to create the coaster’s base, keeping it flat and even. Increase stitches evenly to maintain a smooth circle.
For a felt or fabric coaster, cut two identical circles for the base and one smaller piece for the capybara’s face shape.
Attach the facial piece to the base with small stitches or fabric glue, ensuring it’s centered.
Add the eyes, nose, and mouth using embroidery thread, fabric paint, or small felt cutouts. Position them carefully to give your capybara a gentle, happy expression.
Finish the edges neatly by either sewing the two base pieces together or adding a crochet border around the felt/fabric to reinforce durability.
Repeat the process for additional coasters, ensuring consistent quality and size.
Finishing Touches and Care
The last stage of the cup coaster “Capybara” 🦦 – step by step tutorial focuses on making your coaster long-lasting and easy to care for.
Inspect your coaster for loose threads, uneven edges, or any glue that needs trimming for a clean look.
If you’ve crocheted the coaster, block it by lightly dampening and shaping it, then letting it dry flat to maintain the perfect form.
For fabric or felt versions, press them gently with an iron on a low setting to smooth wrinkles and set the shape.
Store your coasters in a dry, clean place to avoid dust buildup, especially if you plan to gift them later.
When cleaning, hand wash fabric and felt coasters in lukewarm water with mild soap, while crocheted cotton coasters can often be machine washed on a gentle cycle.
With proper care, your handmade capybara coaster will stay vibrant and functional for many years, adding charm to every coffee or tea break.
FAQ – Frequently Asked Questions
1. Is this pattern beginner-friendly?
Yes, this tutorial is suitable for beginners, especially if you choose the felt or fabric method. Crochet may require basic stitch knowledge.
2. How long does it take to make one coaster?
It depends on your crafting method, but typically between 30 minutes and 2 hours per coaster.
3. Can I make the coaster larger for teapots or pitchers?
Absolutely! Simply increase the base size while keeping the capybara design proportional.
4. Which material is best for durability?
Cotton yarn and felt are both excellent. Cotton offers easy washing, while felt is sturdy and keeps its shape.
5. Can I sell the coasters I make from this tutorial?
Yes, handmade coasters are popular at craft fairs and online marketplaces, but always credit original inspiration if following an exact pattern.
6. Can I add a waterproof layer to the coaster?
Yes, sewing or gluing a thin waterproof backing can protect surfaces from moisture.
Conclusion
By following this cup coaster “Capybara” 🦦 – step by step tutorial, you’ve learned how to design, craft, and finish a charming and practical item. From gathering materials to perfecting the final stitches or cuts, each stage lets you express creativity while making something useful.
This project is ideal for gifting, selling, or simply adding a unique piece to your own home. With care and imagination, each coaster can carry its own personality while keeping your tables safe.
I’d love to hear your thoughts and suggestions about this tutorial. Your feedback helps inspire future crafting projects and keeps our creative community thriving.