
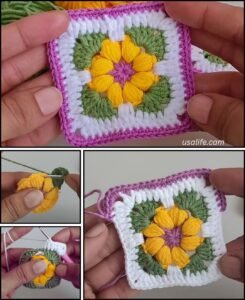
Learning how to crochet a classic granny square – step by step tutorial is a timeless skill that every crochet enthusiast should know. This versatile pattern has been loved for generations because it is simple to learn, quick to make, and perfect for a wide variety of projects. From cozy blankets to vibrant scarves and stylish bags, the classic granny square offers endless creative possibilities while allowing you to practice and improve your crochet techniques.
When following this how to crochet a classic granny square – step by step tutorial, you’ll see that the pattern is built from the center outward, creating a beautiful and symmetrical design. It’s a wonderful starting point for beginners who want to gain confidence in working with yarn and a crochet hook, but it also provides experienced crafters with a relaxing, almost meditative, project. The beauty of the granny square is that it can be as simple or as colorful as you wish.
The how to crochet a classic granny square – step by step tutorial also teaches you how to experiment with colors, textures, and different yarn weights to produce completely unique results. Once you understand the basic steps, you can adapt the square to match any style—modern, vintage, minimal, or vibrant. Whether you want to make a single statement piece or hundreds of connected squares for a large project, this classic pattern is your perfect crochet companion.
Materials and Tools You Will Need
Before starting the how to crochet a classic granny square – step by step tutorial, it’s important to prepare all the necessary materials.
Begin by selecting your yarn. Medium-weight yarn (often labeled as worsted weight) is ideal for beginners because it is easy to work with and shows the stitches clearly.
Next, choose the right crochet hook size for your yarn, usually recommended on the yarn label. Using the right hook size will help ensure that your stitches are neat and consistent.
You’ll also need a pair of sharp scissors to cut the yarn when changing colors or finishing your work.
A yarn needle is essential for weaving in the loose ends after your granny square is complete, helping your work look tidy and professional.
If you plan to use multiple colors, arrange them in the order you want to work. Having everything organized beforehand makes the process more enjoyable and efficient.
Starting Your Classic Granny Square
The first stage of the how to crochet a classic granny square – step by step tutorial focuses on creating the center of the square.
Begin with a slip knot and chain four stitches. Join the chain into a ring by slip stitching into the first chain stitch. This forms the foundation for your granny square.
Once the ring is made, chain three stitches. This counts as your first double crochet stitch in the first round.
Work two more double crochet stitches into the center of the ring. This forms your first cluster of stitches.
Chain two to create the first corner of your granny square, then work three more double crochet stitches into the ring.
Continue this process—three double crochet stitches followed by a chain of two—until you have four corners in total.
Join with a slip stitch to the top of the starting chain three to complete the first round.
Building the Next Rounds
Now that the center is complete, the how to crochet a classic granny square – step by step tutorial moves into building the square outward.
For the second round, slip stitch across to the first corner space, then chain three. This acts as your first double crochet stitch.
Work two more double crochet stitches into the corner space, then chain two for the corner.
Add three more double crochet stitches into the same corner space, creating a complete corner cluster.
Move to the next corner space and repeat the same process: three double crochets, chain two, and three more double crochets.
Continue around the square, forming each corner the same way until you reach the starting point.
Slip stitch into the top of the starting chain three to finish the round, then cut your yarn or change colors if desired.
Adding Color and Variation
One of the most enjoyable parts of the how to crochet a classic granny square – step by step tutorial is adding colors.
You can choose to change colors at the start of each round for a bold and vibrant look, or keep the same color throughout for a more classic style.
When changing colors, fasten off the old color and join the new one in any corner space with a slip stitch.
Remember to always chain three at the start of a new round to count as your first double crochet.
Work the new color following the same pattern—three double crochets, chain two for corners, and three double crochets into the next space.
Adding color variation not only makes your granny squares more eye-catching but also helps you use up leftover yarn from other projects.
FAQ – Frequently Asked Questions
1. Is this pattern good for absolute beginners?
Yes! The classic granny square is often the first pattern new crocheters learn because it uses basic stitches and a repetitive structure.
2. How long does it take to make one granny square?
On average, a single square can be completed in 20 to 40 minutes, depending on your skill level and the size you choose.
3. Can I make my granny squares bigger?
Absolutely! Simply continue adding rounds until your square reaches the desired size.
4. Which yarn is best for granny squares?
Worsted weight acrylic or cotton yarn is ideal, but you can experiment with other yarn weights for different effects.
5. How do I connect multiple granny squares?
You can sew them together with a yarn needle or join them with crochet techniques like slip stitch or single crochet.
6. Can I wash my granny square projects in the machine?
Most acrylic yarns are machine washable, but always check the yarn label for specific care instructions.
Conclusion
By following this how to crochet a classic granny square – step by step tutorial, you’ve learned how to create a timeless crochet pattern from start to finish. From preparing your materials to building rounds and adding colorful variations, you now have the skills to create endless crochet projects.
The granny square is more than just a pattern—it’s a building block for creativity. You can turn your squares into blankets, garments, or decorative items, making it a truly versatile craft.
I’d love to hear your thoughts and suggestions about this tutorial. Share your experience, and let’s keep the joy of crochet alive for future generations.