
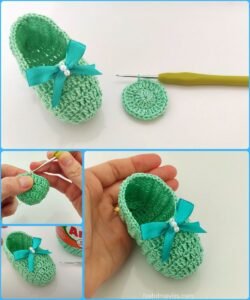
If you’ve ever wanted to create something cozy, personal, and practical, this easy to make crochet slipper – Step by Step Tutorial will guide you through the entire process from start to finish. Whether you’re making them for yourself, as a gift for a loved one, or even to sell, crochet slippers are a timeless handmade item. Not only do they keep your feet warm during cold evenings, but they also showcase your creativity and skills in a unique way. In this guide, you’ll learn how to select the right yarn, master the stitches, and create a perfect fit.
When starting your first easy to make crochet slipper – Step by Step Tutorial, it’s important to understand that slipper-making is both an art and a practical craft. You’ll be combining comfort, durability, and style in a single project. From choosing colors that match your personality to deciding on stitch patterns that give texture and charm, each decision will influence your final result. The beauty of crochet is that you can adjust as you go, making each pair of slippers completely unique.
By following this easy to make crochet slipper – Step by Step Tutorial, you’ll develop not only the slippers but also your crochet skills. Even if you’re a beginner, this project is achievable with patience and practice. The detailed steps ensure that you can complete the project successfully while enjoying the creative process. Plus, once you master this design, you’ll have the foundation to explore more advanced slipper patterns in the future.
Materials You Will Need for Crochet Slippers
The first step in this easy to make crochet slipper – Step by Step Tutorial is gathering your materials. Choosing the right supplies is crucial because it will determine how comfortable and durable your slippers will be. The yarn you choose should be soft yet sturdy, ideally a blend that’s both warm and easy to maintain. Many crafters prefer acrylic or wool blends, which provide a good balance of softness and structure.
In addition to yarn, you’ll need the appropriate crochet hook size, which usually depends on your yarn’s thickness. A larger hook creates looser stitches, which can make your slippers stretchier, while a smaller hook results in a denser, warmer fabric. Pay attention to the pattern’s recommendations, but don’t be afraid to make small adjustments if you know your tension runs tighter or looser.
You’ll also need scissors for cutting yarn and a yarn needle for sewing parts together and weaving in ends. If you want extra comfort, you might consider adding a soft sole or fabric lining inside your slippers. These optional additions can make your crochet slippers feel more luxurious and last longer, especially if you plan to wear them often.
Another tip in this easy to make crochet slipper – Step by Step Tutorial is to have stitch markers on hand. These will help you keep track of where each round begins and ends, which is particularly useful for beginners. Slippers are often worked in the round, and without markers, it’s easy to lose your place.
Lastly, prepare a comfortable and well-lit workspace. Having your tools and yarn neatly arranged will make the process smoother and more enjoyable. When you’re relaxed and organized, your stitches will be more consistent, and you’ll find yourself working more efficiently.
Step-by-Step Crochet Instructions
The foundation of this easy to make crochet slipper – Step by Step Tutorial starts with creating the sole. Most slipper patterns begin here because it determines the size and fit. You’ll usually start with a chain stitch foundation, followed by rounds of single crochet or half double crochet to create a sturdy base. The number of stitches depends on the foot size you’re aiming for.
Once the sole is complete, you’ll move on to the body of the slipper. This involves working in rounds or rows to build up the sides. A common stitch for this stage is the double crochet, which adds height quickly while remaining flexible. You’ll want to try the slipper on occasionally to ensure a snug yet comfortable fit.
Shaping the toe is the next critical step in this easy to make crochet slipper – Step by Step Tutorial. This typically involves decreasing stitches gradually to create a rounded front. If you prefer a different look, you can experiment with other shapes, such as a square toe, but the round toe is the most common and beginner-friendly option.
After shaping the toe, you can add decorative touches such as a ribbed cuff. The cuff can be created using front post and back post stitches, giving your slipper a stretchy, sock-like finish. Not only does this make the slippers look polished, but it also helps them stay on your feet more securely.
For those wanting to personalize their slippers further, this is the time to add embellishments. Buttons, pom-poms, or even small crochet flowers can make your slippers unique. Just remember that anything added should be securely attached to avoid discomfort or damage during use.
Once your slippers are complete, weave in all yarn ends using your yarn needle. Try them on to check for comfort, and if needed, make small adjustments. The beauty of crochet is that it’s forgiving—you can undo and redo sections without wasting materials.
Tips for Customizing Your Crochet Slippers
One of the joys of following an easy to make crochet slipper – Step by Step Tutorial is the flexibility to make the project your own. Changing yarn colors is a simple way to add personality. You can go for a solid, classic color or experiment with stripes and patterns for a more playful look.
You can also modify the stitches used. While many slipper patterns stick to basic stitches, adding texture with puff stitches, bobbles, or shell patterns can give your slippers a more decorative appearance. Keep in mind that heavily textured stitches might make the slippers thicker and warmer, which is perfect for winter.
If you want your slippers to be extra cozy, consider lining them with fleece or another soft fabric. This requires basic sewing skills but can make a huge difference in warmth and comfort. It’s a thoughtful touch, especially if you’re making them as a gift.
Sizing is another area where customization comes into play. By adjusting the starting chain length or the number of rounds, you can create slippers for any foot size—from toddlers to adults. This makes crochet slippers a versatile project suitable for the whole family.
You can even adapt your easy to make crochet slipper – Step by Step Tutorial to include non-slip soles. Applying fabric paint or sewing on a rubber sole can make them safer to wear on smooth surfaces. This is particularly helpful if the slippers are for children or elderly individuals.
Finally, think about seasonal variations. Lighter yarns and open stitches work well for spring and summer slippers, while thick, dense stitches are ideal for colder months. With a few simple changes, this single pattern can be adapted for year-round use.
Common Mistakes and How to Avoid Them
When following an easy to make crochet slipper – Step by Step Tutorial, beginners often face a few common challenges. One frequent issue is inconsistent tension, which can make one slipper larger than the other. The solution is to practice maintaining even tension throughout your work, and to take breaks to relax your hands.
Another mistake is miscounting stitches, especially when working in the round. This can lead to an uneven shape. Using stitch markers and counting at the end of each round can help you stay on track.
Some crafters choose the wrong yarn weight for the pattern. Using yarn that’s too thick or thin will alter the size and drape of the slippers. Always check the yarn label and match it to the pattern’s recommendations for best results.
Skipping the fitting step is also a common oversight. Trying the slipper on at various stages ensures a perfect fit and allows you to make adjustments early on. Waiting until the slipper is complete might mean having to unravel large sections to fix sizing issues.
Neglecting to secure yarn ends properly can cause the slippers to unravel with use. Always weave in ends securely and trim excess yarn to prevent this problem. It’s a small step that greatly affects the slippers’ durability.
Lastly, rushing through the project can lead to sloppy stitches and uneven edges. Crochet is meant to be enjoyed, so take your time and focus on each step. The end result will be much more satisfying.
FAQ
Q: How long does it take to make a pair of crochet slippers?
A: It depends on your skill level, but most people can finish a pair in 4–6 hours.
Q: What is the best yarn for crochet slippers?
A: Wool blends or acrylic yarns are ideal because they are warm, durable, and easy to care for.
Q: Can I make crochet slippers without a pattern?
A: Yes, experienced crocheters can freestyle slippers, but beginners benefit from following a structured tutorial.
Q: How do I make my slippers non-slip?
A: Apply fabric paint dots to the soles or sew on non-slip fabric or rubber patches.
Q: Are crochet slippers washable?
A: Yes, but always check the yarn label for washing instructions. Hand washing is usually recommended for longevity.
Q: Can I sell crochet slippers made from this tutorial?
A: Yes, handmade crochet slippers are popular at craft fairs and online, especially if they are customized.
Conclusion
In this easy to make crochet slipper – Step by Step Tutorial, we’ve covered everything from gathering materials to adding the final decorative touches. You’ve learned how to crochet soles, shape toes, create cuffs, and customize your slippers to suit your style. By following these steps, you can create a warm, comfortable, and unique pair of slippers that you’ll be proud to wear or gift.
I hope this guide inspires you to pick up your hook and start creating. If you’ve tried this tutorial, please share your honest opinion and suggestions—I’d love to hear your feedback!