
If you are looking for an easy to make crochet square – Step by Step Tutorial, you’ve come to the right place. Crochet squares are one of the most versatile patterns in the crochet world. They can be used for blankets, pillows, table runners, bags, and even clothing pieces. Whether you are a beginner or an experienced crafter, mastering a basic crochet square is a must-have skill in your crochet journey. In this guide, you’ll learn exactly how to create a neat, well-shaped square, with clear steps and tips to make your work easier and more enjoyable.
Working on an easy to make crochet square – Step by Step Tutorial allows you to practice fundamental stitches while creating something practical and beautiful. Squares can be made in various styles, from the classic granny square to modern solid squares, and you can experiment with colors, textures, and yarn types. The best part is that each square works up quickly, so you can make many and join them together for larger projects. This tutorial will break the process down into manageable steps, ensuring that even beginners can follow along without feeling overwhelmed.
Before we begin the easy to make crochet square – Step by Step Tutorial, it’s important to remember that consistency is key. Maintaining an even tension, counting stitches correctly, and blocking your finished squares can make a big difference in the final look. In the following sections, we will go through the materials needed, the step-by-step instructions for making your square, creative variations, and tips to avoid common mistakes. By the end, you’ll be ready to create perfect squares for any project.
Materials Needed for Your Crochet Square
To start the easy to make crochet square – Step by Step Tutorial, you’ll need the right materials. The type of yarn you choose will affect the look and feel of your finished square. Cotton yarn gives a clean, sturdy finish, while acrylic yarn offers softness and warmth. For beginners, a medium-weight yarn is ideal, as it is easier to handle and shows stitches clearly.
Your crochet hook size should match the yarn’s recommendation, typically found on the yarn label. Using the correct hook size ensures that your stitches are neither too loose nor too tight. For most medium-weight yarns, a 4mm to 5mm hook works well for crochet squares. Having a few extra hooks in different sizes can be helpful if you want to experiment with tension.
You will also need a pair of sharp scissors to cut your yarn and a yarn needle for weaving in ends. Weaving in ends neatly will give your square a professional look and help it last longer. A stitch marker can be useful, especially for beginners, to keep track of rounds or stitches.
If you plan to make multiple squares for a larger project, it’s a good idea to keep a notebook or digital note of your stitch count and pattern. This helps maintain consistency across all squares, ensuring they fit together perfectly when joined.
Having a comfortable and well-lit workspace will make a big difference in your crochet experience. Natural light is ideal for seeing stitches clearly, but a good desk lamp can work just as well for evening projects.
Lastly, keep your yarn organized. Tangles can be frustrating and slow you down, so winding your yarn into a ball or cake before starting can make the process smoother.
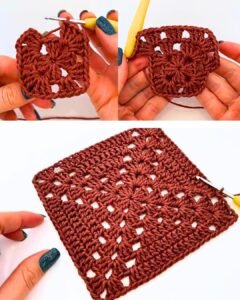
Step-by-Step Instructions for Crocheting a Square
The first step in the easy to make crochet square – Step by Step Tutorial is creating the foundation. Many crochet squares start with a small loop, often made using a magic ring. This allows you to pull the center tight for a neat finish. If you prefer, you can chain four and join with a slip stitch to form a ring.
Once your ring is ready, you’ll begin working the first round. Depending on your chosen style, you might start with double crochet stitches for a classic granny square or single crochet stitches for a solid square. The key is to evenly space your stitches so that the square forms correctly.
After the first round, you’ll build your square by working in rounds or rows, increasing at each corner. In granny squares, this is typically done by working multiple stitches into the same corner space. For solid squares, you’ll increase by adding extra stitches at the corners while keeping the sides straight.
As you work through the rounds, be mindful of your stitch count. Skipping or adding stitches unintentionally can distort the square’s shape. Using a stitch marker to mark the first stitch of each round can help keep track of your place.
When your square reaches the desired size, finish by fastening off your yarn. Leave a long tail for weaving in, as this will help secure the edges. Use a yarn needle to weave in the ends carefully, hiding them within the stitches.
Blocking your finished square can make a big difference. Lightly wet the square, pin it to a blocking mat, and let it dry. This evens out the stitches and ensures a perfect shape for joining with other squares.
Creative Variations and Design Ideas
One of the best things about the easy to make crochet square – Step by Step Tutorial is the endless possibilities for customization. You can change yarn colors at the end of any round to create stripes, patterns, or even intricate motifs. Color changes can give your squares a completely different personality.
You can also experiment with stitch patterns. Instead of sticking to basic double crochets, try adding puff stitches, bobble stitches, or textured patterns to your square. These techniques add dimension and visual interest, making your project more unique.
Another creative option is making themed squares. For example, you could use pastel colors for a baby blanket, bold primary colors for a children’s play mat, or elegant neutrals for home décor. Themed squares make your project feel cohesive while still allowing for variety.
Playing with yarn textures is another way to create unique designs. Combining smooth and textured yarns within one square can produce a striking effect. Just remember to keep yarn weights similar for even tension.
For larger projects, consider making a sampler blanket with different square patterns. This is an excellent way to learn new stitches while creating a one-of-a-kind piece. Each square can showcase a different technique or color combination.
Lastly, think about adding embellishments. Embroider small flowers, sew on buttons, or crochet appliqués to attach to your squares. These extra touches can turn a simple square into a work of art.
Common Mistakes and How to Avoid Them
When working through the easy to make crochet square – Step by Step Tutorial, beginners often encounter a few common issues. One is having a square that curls or twists. This usually means your tension is too tight or your stitch count is off. Relaxing your grip on the yarn and double-checking your count at the end of each round can help.
Another problem is uneven sides. This happens when increases at the corners are inconsistent. Always place the same number of stitches in each corner space to maintain symmetry.
Some crocheters find that their squares are different sizes, even when following the same pattern. This is often due to changes in tension or using different yarn batches. To avoid this, try to work in a consistent environment and with the same yarn type and brand.
Color changes can be tricky, especially if not done cleanly. To make smooth transitions, change colors in the last step of a stitch and weave in the ends immediately to keep your work neat.
Skipping blocking is another mistake that can affect the final look. Blocking ensures all your squares are the same shape and size, making joining them much easier and more professional.
Lastly, rushing through your work can lead to mistakes. Crochet is a craft that rewards patience and attention to detail, so take your time to enjoy each step.
FAQ
Q: How long does it take to make a crochet square?
A: Depending on the size and pattern, it can take anywhere from 20 minutes to an hour.
Q: Can beginners follow this tutorial?
A: Yes, the easy to make crochet square – Step by Step Tutorial is beginner-friendly and uses basic stitches.
Q: What’s the best yarn for crochet squares?
A: Medium-weight cotton or acrylic yarn is ideal for most projects.
Q: How do I join my squares together?
A: You can use slip stitches, whip stitch, or a join-as-you-go method for connecting squares.
Q: Do I need to block my squares?
A: While not mandatory, blocking helps ensure all squares are uniform in size and shape.
Q: Can I make squares in different sizes for the same project?
A: Yes, but you’ll need to plan the layout carefully so they fit together.
Conclusion
In this easy to make crochet square – Step by Step Tutorial, you’ve learned everything from choosing materials to creating, customizing, and perfecting your squares. With these steps, you can make squares for countless projects, whether for home décor, gifts, or personal use.
Remember, practice and patience are your best tools for achieving beautiful results. I’d love to hear your honest opinion and suggestions—share your thoughts and let me know how your crochet squares turned out!