
If you have ever wanted to create a practical and stylish storage solution, this 🧵 How to Make a Box Pouch – Step by Step Tutorial will guide you through the process from start to finish. A box pouch is a versatile and compact bag that can be used for storing makeup, stationery, sewing tools, or even as a small travel organizer. Learning how to make one yourself not only saves money but also allows you to customize it to your preferred size, color, and fabric. In this tutorial, we will break down each stage so that even beginners can follow along with ease.
One of the best things about this 🧵 How to Make a Box Pouch – Step by Step Tutorial is that it requires only a few basic sewing skills. You do not need to be an expert to create something functional and beautiful. This project is perfect for using up fabric scraps or trying out bold patterns you may not use in larger projects. By the end, you’ll have a personalized pouch that reflects your unique style while serving a practical purpose in your daily life.
This 🧵 How to Make a Box Pouch – Step by Step Tutorial will cover everything from choosing the right materials to the final touches that make your pouch look professionally finished. Whether you are making it as a gift or for personal use, this guide will ensure your box pouch turns out perfectly. Let’s dive into the details and bring your creative idea to life.
Choosing Materials for Your Box Pouch
The first step in learning 🧵 How to Make a Box Pouch – Step by Step Tutorial is selecting the right materials. Your choice of fabric will determine the durability, flexibility, and style of the finished pouch. Cotton fabric is one of the most popular options because it is easy to sew, comes in endless patterns, and is machine washable. For a more luxurious feel, you could opt for linen, canvas, or even faux leather.
When choosing fabric, think about the pouch’s purpose. For example, if you’re planning to store makeup or toiletries, choose a waterproof or laminated fabric for the lining. This will help protect the pouch from spills and make it easy to clean. On the other hand, if the pouch will be used for sewing tools, a sturdy cotton or denim lining may be the best choice.
The zipper is another key material for your box pouch. Select a zipper that matches or contrasts with your fabric depending on the look you want to achieve. Nylon coil zippers are flexible and easy to sew, making them ideal for beginners. The length of the zipper should be slightly longer than the width of the pouch so it can open fully.
You will also need interfacing, which is essential to give your pouch structure. Interfacing can be fusible (iron-on) or sew-in, and the choice will depend on your fabric type and sewing preference. Fusible interfacing is quicker to work with, but sew-in can offer a softer, more natural drape.
Don’t forget basic sewing supplies like matching thread, scissors or rotary cutters, sewing pins or clips, and a ruler or measuring tape. A sewing machine is the most efficient tool for this project, but it can also be done by hand with patience and precision. These materials will ensure your project runs smoothly from start to finish.
Finally, consider decorative touches such as fabric labels, tassels, or ribbon pulls for the zipper. These small additions can elevate the overall look of your pouch and make it unique. Once your materials are ready, you can begin the exciting process of constructing your box pouch.
Cutting and Preparing the Fabric
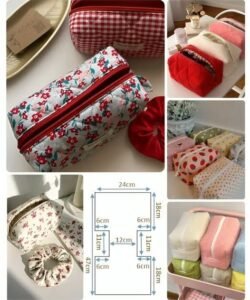
In this section of the 🧵 How to Make a Box Pouch – Step by Step Tutorial, we will cut and prepare our fabric pieces. Begin by deciding on the dimensions of your pouch. A common size for a medium pouch is 10 inches wide, 6 inches tall, and 4 inches deep. This size is perfect for most uses, but you can adjust it based on your needs.
Using your chosen measurements, cut two rectangles of outer fabric, two rectangles of lining fabric, and two rectangles of interfacing. Ensure your cuts are precise so that the pieces align perfectly when sewing. Accurate cutting will make the assembly process easier and result in a more professional finish.
Next, iron the interfacing onto the wrong side of your outer fabric pieces. This step is essential for giving your pouch structure and helping it maintain its box shape. Follow the manufacturer’s instructions for the interfacing, using the recommended heat setting to avoid damaging the fabric.
If you plan to add any decorative elements like embroidery, appliqué, or printed patches, now is the time to do so. It is much easier to decorate flat pieces of fabric than to add embellishments after the pouch is assembled. This is also a good stage to attach a fabric label if you want to brand your work.
Once the interfacing is in place and any decorations are added, lay out your fabric pieces to ensure everything is ready for assembly. Keep the lining pieces separate from the outer fabric so you can easily identify them during sewing. Double-check that your zipper is the correct length for the pouch width.
Preparing your materials thoroughly will make the rest of the sewing process faster and more enjoyable. Taking the time to measure, cut, and iron carefully will help you achieve a polished, professional-looking box pouch in the final result.
Sewing the Box Pouch
Now we move on to the heart of the 🧵 How to Make a Box Pouch – Step by Step Tutorial: sewing the pouch together. Start by placing one piece of outer fabric right side up, positioning the zipper face down along the top edge, and placing a lining piece on top, right side down. This creates a “fabric sandwich” with the zipper in the middle.
Pin or clip the layers together and sew along the zipper edge using a zipper foot on your sewing machine. Take your time to sew slowly and evenly, keeping the seam straight. Once sewn, flip the fabric pieces so that the right sides are facing out and press gently to flatten the seam.
Repeat this process for the other side of the zipper with the remaining fabric pieces. After both sides are attached, topstitch along each side of the zipper. This step not only makes the pouch look more finished but also keeps the fabric from getting caught in the zipper teeth.
Next, open the zipper halfway to ensure you can turn the pouch right side out later. With the outer fabric pieces right sides together and the lining pieces right sides together, sew around the edges, leaving a small opening in the lining for turning. Be sure to backstitch at the beginning and end for durability.
To create the box shape, pinch each corner of the pouch and measure a few inches from the tip, marking a straight line across. Sew along this line and trim the excess fabric. Repeat for all four corners. This step gives your pouch its signature structured look.
Once the corners are sewn, turn the pouch right side out through the opening in the lining. Stitch the lining opening closed, push it inside the pouch, and give the entire piece a final press to smooth out any wrinkles. Your handmade box pouch is now ready to use.
Customizing and Using Your Box Pouch
The beauty of the 🧵 How to Make a Box Pouch – Step by Step Tutorial is that it can be customized in countless ways. You can experiment with different fabrics, sizes, and embellishments to suit your style or the intended recipient. For example, you could make a small version for storing jewelry or a larger one for knitting supplies.
Color combinations can drastically change the look of your pouch. Bold, contrasting fabrics can make a playful statement, while neutral tones create a classic and elegant style. Adding unique zipper pulls, charms, or leather tags can further personalize your creation.
You can also play with functional modifications. Adding interior pockets can help organize small items, while exterior pockets provide extra storage space. Using waterproof lining makes the pouch ideal for carrying toiletries or cosmetics.
These pouches also make wonderful handmade gifts. Fill them with small items like stationery, makeup, or craft supplies for a thoughtful and practical present. Because they are lightweight and compact, they are also great for travel, easily fitting into luggage or handbags.
For crafters who sell their work, box pouches can be a popular product. They are relatively quick to make and can be sold in different sizes and designs to appeal to a wide audience. Just remember to keep your workmanship consistent to maintain a professional reputation.
No matter how you choose to customize it, your box pouch will be a reflection of your creativity and craftsmanship. Once you master the basic construction, the possibilities are endless.
FAQ About 🧵 How to Make a Box Pouch – Step by Step Tutorial
Q: Can I make a box pouch without a sewing machine?
A: Yes, you can sew it by hand using a backstitch for strength, but it will take more time and effort compared to using a sewing machine.
Q: What type of fabric is best for beginners?
A: Lightweight cotton is the easiest to work with, as it’s simple to cut, sew, and press.
Q: How do I make my pouch more structured?
A: Use medium to heavy-weight interfacing or add a layer of fusible fleece for extra structure.
Q: Can I wash my handmade box pouch?
A: Yes, but the method depends on your fabric choice. Cotton can usually be machine-washed, while more delicate or laminated fabrics may require hand washing.
Q: What size zipper should I use?
A: Choose a zipper that is at least 1–2 inches longer than the pouch width for easier sewing and better access.
Q: Is it possible to make a box pouch without lining?
A: Yes, but lining gives a cleaner finish and makes the pouch more durable.
Conclusion
In this 🧵 How to Make a Box Pouch – Step by Step Tutorial, we explored every stage of creating your own box pouch, from choosing materials to customizing the final product. With just a few basic sewing skills, you can create a versatile, stylish, and practical item that suits your needs or makes a thoughtful handmade gift.
Whether you keep it simple or add unique touches, the process is both enjoyable and rewarding.
I’d love to hear your thoughts—share your honest opinion and suggestions so we can keep improving and inspiring each other in our creative journeys.