
If you’ve ever wondered 🧵 how to make a zippered shoulder bag with an outside pocket – step by step tutorial, you’re in the right place. This project is perfect for anyone who enjoys sewing and wants to create a functional yet stylish accessory. By following a clear process, you can transform fabric, a zipper, and some basic sewing skills into a beautiful shoulder bag you’ll be proud to carry. The best part is that you can personalize the size, style, and fabric to match your own taste.
A zippered shoulder bag is not only a practical choice for everyday use, but it’s also a great gift idea. Adding an outside pocket increases its functionality, giving you a convenient space for quick-access items like your phone, keys, or travel cards. With this tutorial, you’ll learn every stage of the process — from cutting your fabric to adding the final touches — so you can confidently create your own bag at home.
This step-by-step tutorial is designed to be beginner-friendly while still offering helpful tips for more experienced sewers. We’ll go over materials, preparation, assembly, and finishing, ensuring that every detail is covered. Whether you’re making your first bag or looking to refine your sewing techniques, this guide will help you create a sturdy and attractive shoulder bag that you can use for years to come.
Choosing the Right Materials for Your Zippered Shoulder Bag
Before starting your 🧵 how to make a zippered shoulder bag with an outside pocket – step by step tutorial, you need to gather the right materials. Choosing high-quality supplies will make the process easier and result in a more durable bag. The main components you’ll need are outer fabric, lining fabric, a zipper, interfacing, thread, and basic sewing tools. Your choice of fabric will determine the overall style of your bag — cotton canvas for a casual look, faux leather for a chic design, or quilting cotton for a colorful, patterned finish.
Selecting a sturdy zipper is essential, as it will be the main closure for your bag. Make sure it’s the right length for your bag design or slightly longer, as you can trim it to fit. For the outside pocket, a shorter zipper or simple open pocket style can work well, depending on your preference. A matching or contrasting zipper color can add a fun design detail.
Interfacing is another key material that shouldn’t be overlooked. Adding interfacing to your fabric pieces will help the bag keep its shape and stand up better to daily use. Fusible interfacing is the easiest option for beginners, as it can be ironed directly onto the wrong side of your fabric. Be sure to match your thread color to your fabric or choose a bold contrasting color for a decorative touch.
In addition to your main materials, you’ll need sewing essentials like scissors or a rotary cutter, pins or clips, and a sewing machine. If you’re planning to carry heavier items in your shoulder bag, consider using stronger thread, such as polyester, to ensure the seams hold up over time. Once your materials are ready, you can move on to preparing your fabric pieces for assembly.
One last tip: before you begin cutting your fabric, always wash and press it first. This will prevent shrinkage and help you work with smooth, wrinkle-free pieces. Proper preparation now will save you frustration later and help your finished bag look more professional.
Finally, remember that the more carefully you prepare your materials, the smoother the sewing process will be. Take your time during this stage, and you’ll set yourself up for success.
Cutting and Preparing the Fabric Pieces
The next step in our 🧵 how to make a zippered shoulder bag with an outside pocket – step by step tutorial is to cut your fabric pieces. Accurate cutting ensures that all parts of the bag fit together correctly. Start by deciding on the dimensions of your bag — a common size is around 12 inches wide by 10 inches tall, but you can adjust this based on your needs. You’ll need two pieces of outer fabric, two pieces of lining fabric, and two pieces of interfacing cut to the same dimensions.
For the outside pocket, cut an additional piece of fabric the same width as your bag but shorter in height. If you’re using a zipper for the pocket, also cut a matching zipper opening strip. Don’t forget to cut the strap pieces — these should be long enough to wear comfortably over your shoulder, typically between 25 and 30 inches, depending on your preference.
Once your fabric pieces are cut, fuse the interfacing to the wrong side of the outer fabric. This step is important for giving your bag structure and durability. Make sure you follow the manufacturer’s instructions for applying interfacing, using the correct heat setting on your iron.
Mark any placement lines for the outside pocket and zipper openings using fabric chalk or a disappearing fabric pen. These markings will help guide your sewing and ensure that all components are aligned properly. Being precise at this stage will prevent problems later in the assembly process.
If your outer fabric frays easily, consider finishing the raw edges with a zigzag stitch or using pinking shears to prevent unraveling. This extra step will improve the longevity of your bag and keep the inside looking neat. Prepared fabric pieces will make the sewing stage much more enjoyable.
Take your time with this stage — accurate cutting and careful preparation will make the difference between a bag that looks homemade and one that looks professionally crafted.
Sewing the Outside Pocket and Zipper
Now comes the exciting part of the 🧵 how to make a zippered shoulder bag with an outside pocket – step by step tutorial — adding the outside pocket. If you’re including a zipper pocket, start by aligning the pocket fabric with the zipper opening strip. Sew around the opening, then carefully cut the center line and small diagonal slits at each end. Turn the fabric through the opening and press it flat.
Place your zipper under the opening and pin or clip it in place. Sew around the opening with a zipper foot, making sure your stitching is straight and even. This step adds a professional look to your bag and ensures the zipper operates smoothly. Once the zipper is in place, sew the remaining sides of the pocket fabric to enclose the pocket.
If you prefer an open-style pocket, simply fold the top edge of the pocket fabric under twice, press, and stitch it down. Then, sew the pocket piece onto the front panel of your bag, stitching along the sides and bottom while leaving the top open.
Whichever style you choose, take care to ensure your pocket is aligned properly on the outer fabric. A crooked pocket will be noticeable and can make the whole bag appear uneven. Double-check your measurements before sewing.
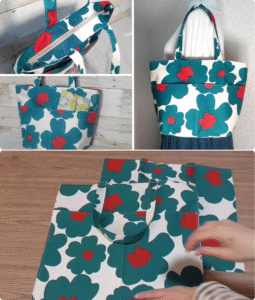
This outside pocket is one of the key features that makes the bag more functional. It allows you to store small items you want to access quickly, without having to open the main zipper. Once the pocket is complete, you can move on to assembling the bag body.
Having a well-sewn pocket will not only make your bag more useful but also give it a more polished and finished appearance.
Assembling and Finishing the Shoulder Bag
In this stage of the 🧵 how to make a zippered shoulder bag with an outside pocket – step by step tutorial, you’ll bring all the pieces together. Start by sewing the outer fabric panels right sides together, leaving the top edge open. Repeat the same process for the lining pieces, but leave a small opening at the bottom for turning the bag right side out later.
For the main zipper, place it face down on the top edge of the outer fabric, then place the lining fabric on top, right side facing the outer fabric. Sew along the top edge using a zipper foot. Repeat for the other side of the zipper with the remaining outer and lining pieces. Press the fabric away from the zipper and topstitch for a clean look.
Once the zipper and main panels are attached, align the outer bag and lining pieces right sides together, matching the seams. Sew around the entire perimeter, leaving the zipper halfway open so you can turn the bag later. After sewing, box the bottom corners by aligning the side seam with the bottom seam and sewing across, which gives the bag depth.
Turn the bag right side out through the opening in the lining. Push out the corners neatly, then sew the lining opening closed, either by hand or with a machine. Give the entire bag a final press to smooth out wrinkles and set the stitches.
Attach the shoulder strap by sewing each end securely to the top sides of the bag. If you’re making an adjustable strap, add the hardware before attaching. Reinforce the stitching at the strap points for extra durability.
Congratulations — your bag is complete! You now have a stylish and functional zippered shoulder bag with an outside pocket, ready to use or gift.
FAQ
Q: Can I make this bag without a zipper?
A: Yes, you can use a magnetic snap or button closure instead, but a zipper offers more security.
Q: What is the best fabric for this project?
A: Sturdy fabrics like cotton canvas, denim, or faux leather work well. Quilting cotton can be used for lighter bags.
Q: How do I make the strap adjustable?
A: Use a strap adjuster buckle and extra strap length to create an adjustable feature.
Q: Can I wash my handmade bag?
A: Most fabric bags can be hand-washed or machine-washed on a gentle cycle, but always check your fabric type.
Q: How can I make the bag more structured?
A: Use heavier interfacing or add a layer of foam stabilizer to give the bag more body.
Q: Is this project suitable for beginners?
A: Yes, especially if you follow the step-by-step tutorial carefully and take your time.
Conclusion
In this guide on 🧵 how to make a zippered shoulder bag with an outside pocket – step by step tutorial, we’ve covered everything from choosing materials and cutting fabric to sewing the pocket, adding the zipper, and assembling the final bag.
With patience and attention to detail, you can create a bag that is both beautiful and functional.
I hope this tutorial inspires you to try making your own shoulder bag. Please share your honest opinion and suggestions — your feedback helps improve future projects and tutorials.