
Creating a Round quilted toiletry bag – Step by Step Tutorial is a delightful and practical project for anyone who enjoys sewing and quilting. This round quilted toiletry bag is perfect for storing personal care items, cosmetics, or travel essentials. With this tutorial, you’ll learn how to combine quilting techniques with functional design to produce a durable and stylish bag that is both aesthetically pleasing and useful.
A round quilted toiletry bag offers a unique alternative to the traditional rectangular bags. Its circular shape not only stands out visually but also provides ample storage space while maintaining a compact footprint. This tutorial emphasizes a detailed, step-by-step approach so that beginners and experienced quilters alike can follow along and create a high-quality finished product.
Making a round quilted toiletry bag involves careful selection of materials, accurate measurements, and precise stitching. Choosing the right fabric, batting, and zipper is critical to ensure durability and ease of use. This project combines creativity with technical skills, allowing you to personalize your bag with colors, patterns, and textures that reflect your style.
Materials and Tools Needed
Before starting your Round quilted toiletry bag – Step by Step Tutorial, gather all the necessary materials. High-quality cotton fabric is ideal for the exterior and lining due to its durability and ease of quilting. Choose contrasting colors or patterns to create a visually appealing design.
Batting is essential to provide structure and cushioning for the bag. Lightweight or medium-weight batting works best to maintain the round shape without adding bulk.
A coordinating zipper is necessary for the opening. Ensure the zipper length matches the circumference of your bag’s top edge, and select a sturdy type to withstand repeated use.
Additional tools include sewing needles, thread matching your fabric, a rotary cutter or fabric scissors, pins or clips, and a ruler or measuring tape. These tools make assembly easier and more precise.
Optional embellishments include fabric appliqués, decorative stitches, or embroidery. Adding personal touches enhances the visual appeal of your round quilted toiletry bag and makes it unique.
Finally, set up a comfortable workspace with good lighting. Working in an organized environment helps maintain accuracy and makes the sewing process more enjoyable.
Preparing and Quilting the Fabric
To start the Round quilted toiletry bag – Step by Step Tutorial, cut your fabric and batting into circular pieces for the base and top of the bag. Ensure all circles are of equal size to maintain symmetry.
Layer the fabric and batting correctly, with the right sides of the fabric facing outward. Pin or clip the layers together securely to prevent shifting while quilting.
Quilt the layers together using a simple stitch pattern, such as diagonal lines, concentric circles, or free-motion quilting. Consistent quilting ensures the bag maintains its shape and adds durability.
Trim any excess batting and fabric to ensure smooth edges. Accuracy during this step helps the final assembly proceed smoothly.
If desired, add decorative stitching or embroidery to the quilted pieces. These embellishments make your round quilted toiletry bag visually striking while maintaining its functionality.
Repeat the quilting process for all circular components, including the base and the top panel. Properly prepared pieces simplify later assembly and result in a professional finish.
Constructing the Bag Body
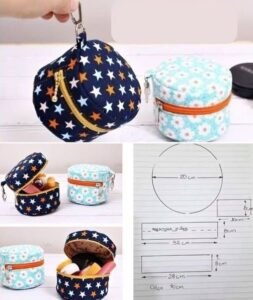
Once the quilted pieces are ready, the next step in the Round quilted toiletry bag – Step by Step Tutorial is assembling the cylindrical body. Cut a long strip of fabric and batting to form the sidewalls of the bag, ensuring the length matches the circumference of your circular base.
Attach the side strip to the base by pinning evenly around the edge. Sew slowly and carefully, maintaining even seam allowances. This step ensures a secure foundation for the bag.
After attaching the base, connect the other edge of the side strip to the top circular panel. Align the edges carefully to prevent gaps or uneven stitching.
Install the zipper along the top edge, making sure it opens and closes smoothly. Pin the zipper in place before sewing to maintain proper alignment.
Reinforce all seams with topstitching or double stitching for durability. This is especially important for a functional accessory like a round quilted toiletry bag that may carry heavier items.
Finally, check for loose threads or uneven edges, trimming or reinforcing as needed. Proper assembly ensures your bag is both functional and attractive.
Adding Finishing Touches
After constructing the main body of your Round quilted toiletry bag – Step by Step Tutorial, add any desired finishing touches. Fold the raw edges of the zipper tape inward and stitch for a clean, professional appearance.
Optional decorative elements, such as fabric appliqués, embroidery, or colorful stitching, can enhance the bag’s visual appeal. Personalization makes your bag unique and gives it character.
If your bag requires additional structure, consider adding interfacing or lightweight padding to the sides. This improves shape retention while keeping the bag flexible.
Attach a small handle or loop if desired, which makes the bag easier to carry or hang. Securely sew this element for durability.
Finally, press the bag lightly with an iron to smooth seams and flatten edges. Avoid high heat that could damage batting or fabric.
Regular inspection and minor adjustments help maintain the bag’s shape and appearance over time. A well-maintained round quilted toiletry bag remains functional and stylish for years.
FAQ About Round Quilted Toiletry Bags
Q: What fabrics work best for a round quilted toiletry bag?
A: Cotton fabrics with medium-weight batting are ideal for durability and ease of quilting.
Q: Can beginners make this bag?
A: Yes, following this Step by Step Tutorial makes it accessible even for beginners with basic sewing skills.
Q: How do I attach the zipper neatly?
A: Pin the zipper in place, then sew slowly and evenly along the edge, securing both ends.
Q: Can I decorate the bag?
A: Yes, add appliqués, embroidery, or decorative stitching to personalize your bag.
Q: How do I maintain the bag’s shape?
A: Proper quilting, careful assembly, and optional padding help preserve the cylindrical shape.
Q: Is this bag suitable for travel?
A: Absolutely. Its compact, structured design makes it perfect for organizing toiletries while traveling.
Conclusion
Making a Round quilted toiletry bag – Step by Step Tutorial is a rewarding project that combines functionality with creativity. By carefully selecting materials, mastering quilting techniques, assembling the bag correctly, and adding finishing touches, you can create a durable and stylish accessory.
Personalizing your bag through colors, stitching patterns, and decorations ensures a unique and practical item suitable for daily use or travel.
Share your experience, leave suggestions, and inspire others to craft their own round quilted toiletry bag for an elegant and functional handmade accessory.