
Crochet Chic: Craft Your Own Stylish Scallop Shell Bag! – Step by Step Tutorial is the perfect guide for anyone who wants to combine fashion, functionality, and creativity in one beautiful project. This bag is a stunning example of how crochet can create a unique accessory that reflects your personal style. Whether you’re new to crochet or already an experienced maker, this project will guide you through each stage, from selecting the right yarn to adding the final finishing touches. The scallop shell pattern gives the bag a distinctive texture and elegance that works for casual outings, beach days, or even special occasions.
Crochet is more than just a hobby—it’s an art form that allows you to create pieces that are both practical and expressive. With this Step by Step Tutorial, you will not only learn the basic stitches but also how to shape them into the intricate scallop design. The beauty of this bag lies in its versatility: you can choose different yarn colors, add lining for extra durability, or adjust the strap length to suit your needs. Following this guide, you will be able to craft a bag that is truly yours, from start to finish.
The Stylish Scallop Shell Bag offers a perfect opportunity to experiment with textures and patterns. The shell stitches create a three-dimensional effect that makes the bag visually interesting and fashion-forward. It’s also a highly customizable design—you can make it larger for a beach tote or smaller for an elegant evening clutch. By the end of this tutorial, you will have not just a bag, but a handmade accessory that combines chic style with the satisfaction of creating something beautiful with your own hands.
Choosing the Right Materials for Your Scallop Shell Bag
When starting the Crochet Chic: Craft Your Own Stylish Scallop Shell Bag! – Step by Step Tutorial, the first step is to gather the right materials. Choosing a high-quality yarn is essential. Cotton yarn is a great choice for its durability, shape retention, and soft texture. It also holds stitch definition very well, making your scallop shells stand out beautifully. For a more luxurious look, consider using bamboo or silk blends that add a subtle sheen to the final product.
Your crochet hook size will depend on the yarn weight you select. For most scallop shell bags, a 3.5 mm to 4.5 mm hook works best, creating a dense yet flexible fabric. A sturdy crochet hook will make the process more comfortable, especially since shell stitches can be repetitive and require consistent tension. Don’t forget to have a pair of sharp scissors on hand for trimming ends neatly.
A good quality lining fabric can elevate your bag’s durability and style. While the crochet exterior is the star, lining ensures your bag retains its shape and prevents smaller items from poking through the stitches. You’ll also need a tapestry needle for weaving in ends and attaching handles or straps. Opt for a needle with a large eye and a blunt tip to avoid splitting the yarn.
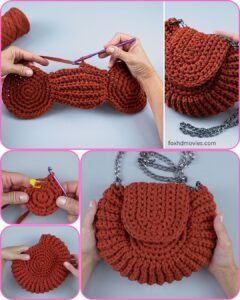
Handles and straps can be made from the same crochet stitches or purchased ready-made in leather or chain styles for added sophistication. Decorative elements like tassels, beads, or small charms can be attached later to give your bag a personal touch. Always consider your own style and the occasions you plan to use the bag for before deciding on these extras.
Color selection plays a big role in the final aesthetic. Neutral tones create a timeless look, while bright or pastel colors can make your bag stand out as a fun statement piece. You can even experiment with color-changing yarn for a gradient effect in your scallop shells. Think about how your chosen shades will pair with your wardrobe to ensure maximum versatility.
Finally, make sure you have a comfortable workspace with good lighting. This will help you see your stitches clearly and avoid mistakes. A small basket or organizer for your supplies will keep everything in reach and make the crochet process smoother and more enjoyable.
Mastering the Scallop Shell Stitch
The heart of this Crochet Chic: Craft Your Own Stylish Scallop Shell Bag! – Step by Step Tutorial is the scallop shell stitch. This pattern involves creating multiple stitches into a single stitch space to form a rounded, fan-like shape. The repetition of these fans creates the textured, layered appearance that makes this bag so distinctive.
To start, you’ll need a solid foundation chain that matches the width of your desired bag. The stitch count should be a multiple that fits the scallop shell pattern repeat, often a multiple of six plus one. This ensures the pattern aligns perfectly without awkward gaps or half-shells at the edges.
Each scallop is usually formed by working several double crochet stitches into one stitch, followed by skipping a few stitches to create spacing. The next row is offset so that the shells sit between those of the previous row, creating a staggered, scale-like texture. Maintaining even tension is key to making your shells uniform in size and shape.
Practice a small swatch before starting the bag to get comfortable with the stitch rhythm. This also lets you test your yarn choice, hook size, and tension. You may find that a slightly looser or tighter tension changes the drape and structure of your shells, so adjust accordingly.
Once you’ve mastered the stitch, you can start working the bag’s body in continuous rows or rounds, depending on your design choice. Working in the round can eliminate seams, giving your bag a cleaner finish. This method also ensures the pattern flows uninterrupted around the bag.
Adding small variations to the scallop shell stitch, such as alternating stitch heights or using two colors, can create a more dynamic design. Experimenting with these details can make your bag one-of-a-kind while still following the main tutorial steps.
Shaping and Assembling the Bag
Shaping your Stylish Scallop Shell Bag depends on the type of bag you want to create. For a tote-style bag, you will continue working the scallop shells evenly until reaching your desired height. If you want a rounded or pouch shape, you’ll need to start decreasing stitches gradually toward the top.
Once the body is complete, you can add a sturdy base. A reinforced bottom, created with tighter stitches or even a fabric insert, helps the bag hold its shape and prevents sagging when filled. This is especially important for larger bags that will carry heavier items.
Joining the sides can be done with slip stitches, whip stitch, or single crochet. Each method gives a different look and level of durability. Make sure to align the shells neatly so the pattern flows seamlessly from front to back.
If you’re adding lining, this is the time to sew it in. Cut your fabric slightly smaller than the bag’s dimensions to avoid bulging. Hand stitch or machine sew the lining, ensuring it’s securely attached but not visible from the outside. This step adds both polish and practicality to your creation.
Handles or straps can be crocheted using simple stitches like single crochet for strength, or you can attach pre-made handles for a more professional look. Secure them firmly to withstand daily use. Adjustable straps can add versatility, allowing the bag to be worn over the shoulder or cross-body.
Finishing touches, like adding a button, zipper, or magnetic snap closure, help keep your belongings secure. Small embellishments like fringe, embroidery, or charms can be added to reflect your personal style. Always ensure these additions complement rather than overwhelm the scallop shell pattern.
Care and Styling Tips for Your Crochet Bag
A handmade Scallop Shell Bag deserves proper care to keep it looking chic for years. Because crochet bags are often made from delicate fibers, hand washing in cool water with a mild detergent is the safest cleaning method. Avoid wringing or twisting the bag; instead, gently press out water and reshape it before laying it flat to dry.
If your bag has a lining, spot cleaning is often sufficient. This prevents unnecessary wear to the crochet stitches. For bags used at the beach or outdoors, shake out any sand or debris promptly and avoid prolonged exposure to direct sunlight, which can fade colors over time.
When not in use, store your bag in a dust cover or pillowcase to protect it from dust and snags. Avoid hanging it by the straps for long periods, as this can stretch the material. Laying it flat helps maintain its shape.
Styling your Stylish Scallop Shell Bag is a joy because it pairs beautifully with many outfits. For casual wear, it adds a touch of handmade charm to jeans and a T-shirt. For beach days, its airy texture and shell pattern fit perfectly with sundresses and swimsuits. For evening outings, a smaller version in metallic or dark yarn can be a sophisticated accessory.
Because the bag is customizable, you can create multiple versions to match different seasons. Light pastels work well for spring, bold brights for summer, earthy tones for autumn, and rich jewel tones for winter. This flexibility ensures your crochet bag remains a staple in your wardrobe year-round.
A well-crafted crochet bag is more than an accessory—it’s a conversation piece. People often admire handmade items, and your scallop shell bag will showcase your skill and creativity while being a functional part of your daily life.
FAQ – Crochet Chic: Craft Your Own Stylish Scallop Shell Bag! – Step by Step Tutorial
1. Is the scallop shell bag suitable for beginners?
Yes, this project is beginner-friendly if you have basic crochet skills like chain, single crochet, and double crochet. The scallop shell stitch is repetitive, so once you learn it, the rest flows easily.
2. How long does it take to make the bag?
Depending on your skill level and the size of the bag, it can take anywhere from a few days to a week of casual crocheting.
3. Can I use any type of yarn?
Cotton yarn is recommended for durability and stitch definition, but you can experiment with blends like bamboo or acrylic for different textures and looks.
4. Do I need to line the bag?
Lining is optional but recommended, especially if you plan to carry small items that might slip through the crochet stitches.
5. How do I adjust the bag size?
Simply increase or decrease your starting chain and work more or fewer rows of scallop shells to achieve the desired size.
6. Can I wash my scallop shell bag in the machine?
Hand washing is safer to preserve the shape and texture of your crochet work. If machine washing is necessary, use a mesh laundry bag on a gentle cycle.
Conclusion
In this Crochet Chic: Craft Your Own Stylish Scallop Shell Bag! – Step by Step Tutorial, we explored everything from selecting materials to mastering the scallop shell stitch, assembling the bag, and caring for it.
By following these steps, you can create a bag that is both fashionable and functional, tailored to your unique style.
I’d love to hear your honest thoughts—share your feedback and suggestions so we can continue inspiring each other in our crochet journeys.