
Creating a crochet keychain in the shape of a dog – Step by Step Tutorial is a fun and rewarding project that allows you to combine creativity, practicality, and the love for handmade crafts. This type of crochet accessory has gained a lot of popularity because it makes the perfect small gift, a charming personal item, or even a product to sell at craft fairs. Many people enjoy making crochet dog keychains because they are quick projects, portable, and can be customized to look like a specific dog breed or even a beloved pet.
The charm of a crochet keychain lies in its simplicity and uniqueness. Unlike large crochet projects that may take days or weeks to complete, a keychain can be finished in just a few hours. Adding the detail of shaping it into a dog makes it extra special, as dog lovers will find it both adorable and meaningful. Each stitch carries personality, and the final piece is not just a keychain but a small keepsake that represents companionship and warmth.
This crochet keychain in the shape of a dog – Step by Step Tutorial will guide you through the process of choosing the right yarn, mastering the stitches, and assembling all the details that bring the little dog to life. By following the steps carefully, even beginners in crochet will be able to complete this project successfully. Let’s dive into the process and learn how to make this delightful keychain.
Materials and Tools You Need
To begin the crochet keychain in the shape of a dog – Step by Step Tutorial, it is important to prepare all your materials and tools in advance. Having everything ready will make the process smoother and more enjoyable. For this project, you will need yarn, a crochet hook, stuffing, a keychain ring, and some small accessories for details.
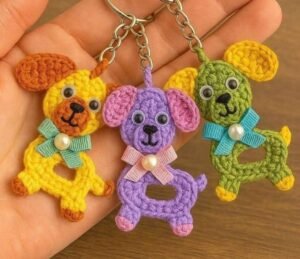
Choose yarn that is soft but durable. Cotton yarn is often preferred because it holds its shape well and is easy to work with, but acrylic yarn also works for beginners. Select colors that match the type of dog you want to make, such as brown, black, white, or even a mix of shades to give your dog character.
The size of the crochet hook will depend on the yarn you choose. Typically, smaller hooks, like 2.5mm to 3.5mm, are used to keep the stitches tight so that the stuffing doesn’t show through. This tight stitch is key to achieving a neat and professional look for your dog-shaped keychain.
Stuffing material is also essential. Use fiberfill or any soft stuffing that can fill the small parts of your crochet dog without making it too bulky. This will help give the keychain a smooth and cuddly appearance.
You will also need a keychain ring or clasp. This metal piece will connect the crochet dog to your keys, bag, or backpack. Be sure to choose one that is sturdy and matches the size of your project. Small embroidery needles and scissors will also be needed for sewing parts together and weaving in ends.
Finally, you may want to add details like small plastic eyes, a tiny button for the nose, or embroidered features using black thread. These little additions will bring your crochet dog to life and give it a unique expression.
Step by Step Crochet Instructions
Now that the materials are prepared, let’s follow the crochet keychain in the shape of a dog – Step by Step Tutorial instructions. Begin with a magic ring, which is the foundation of many amigurumi-style crochet projects. This will create the starting circle for your dog’s head. Work several single crochet stitches into the ring, then pull it tight to close.
As you continue, increase stitches gradually to form a round shape for the head. After reaching the desired width, maintain the stitch count to build height, then decrease stitches to close the head. Remember to add stuffing before fully closing the shape.
Next, crochet the body using a similar technique, but make it slightly smaller to keep the proportions cute. Attach the body to the head with a few neat stitches, ensuring it is securely fastened. Stuff the body lightly to maintain its shape.
For the ears, crochet two small flat pieces or rounded triangles depending on the breed you want to represent. Sew them symmetrically on each side of the head. The ears are a key feature that will make your crochet dog instantly recognizable.
The legs can be created by crocheting four small tubes or ovals, stuffing them lightly, and sewing them to the bottom of the body. They should be small enough to look balanced but large enough to give your dog personality.
Finally, crochet a small tail. A short chain with a few rows of single crochet works well. Sew the tail to the back of the dog to complete its basic form.
Adding Details and Finishing Touches
At this stage of the crochet keychain in the shape of a dog – Step by Step Tutorial, your dog is complete in shape but still needs personality. This is where details and finishing touches play an important role.
Use safety eyes or embroidery thread to create the eyes. Safety eyes are easy to attach and give the dog a playful look, but if you prefer a softer finish, simple embroidered stitches work perfectly. Position the eyes evenly to ensure a cute expression.
For the nose and mouth, you can embroider them with black yarn or thread. Some crafters also use small beads or buttons as noses. Choose the method that fits your style and ensures durability, especially if the keychain will be frequently handled.
You can add a small collar made from a contrasting color yarn or a thin ribbon. This gives the crochet dog an extra decorative element and makes it look even more like a real pet. Adding a bow or charm can also personalize the design further.
Once all details are added, it’s time to attach the dog to the keychain ring. Use a sturdy yarn thread or jump ring to secure the crochet dog tightly to the metal ring. This step is crucial to ensure the dog does not detach with use.
Check all stitches and seams to make sure they are secure. Keychains are used daily, so durability is as important as appearance. Reinforcing stitches in high-stress areas will make your crochet dog last longer.
When everything is complete, admire your work. You now have a handmade crochet dog keychain that is unique and full of character.
Tips for Personalizing Your Dog Keychain
One of the most enjoyable aspects of the crochet keychain in the shape of a dog – Step by Step Tutorial is the opportunity to personalize it. By changing yarn colors, ear shapes, and facial features, you can create different breeds or even design a miniature version of your own pet.
Experiment with yarn textures to give your dog a different appearance. For example, fuzzy yarn can create a fluffy look, while smooth cotton gives a sleek style. This allows you to make a variety of keychains that all look distinct.
Play with expressions by adjusting the eye placement. Closer eyes give a cute, youthful look, while wider-set eyes create a more playful and animated feel. Small changes can drastically alter the dog’s personality.
If making several, try designing a collection of dog breeds such as pugs, dachshunds, or terriers. These make wonderful gifts or items to sell because dog lovers often enjoy collecting items that resemble their favorite breed.
Adding accessories like scarves, bows, or miniature hats can also make each keychain stand out. These small additions allow you to tailor the crochet keychain for special occasions like birthdays or holidays.
Finally, practice makes perfect. The more crochet dog keychains you create, the faster and more creative you will become, refining your style and making each piece unique.
FAQ About Crochet Dog Keychains
1. How long does it take to make a crochet keychain in the shape of a dog?
Most people can finish a keychain in 2–4 hours, depending on skill level and the complexity of the details.
2. Can beginners follow this tutorial?
Yes, this step by step tutorial is designed to be beginner-friendly, using basic stitches and clear instructions.
3. What type of yarn is best for dog keychains?
Cotton yarn is recommended because it holds its shape well, but acrylic yarn is also suitable for beginners.
4. Do I need special tools to make the keychain?
No, just standard crochet tools like a hook, yarn, stuffing, scissors, and a keychain ring are enough.
5. Can I wash a crochet dog keychain?
Yes, but hand washing is best to avoid damaging the stuffing or small details like safety eyes.
6. Can I sell crochet dog keychains?
Absolutely. They make great handmade products to sell at craft fairs, online shops, or as custom orders.
7. How do I make the keychain look like a specific breed?
Adjust ear shape, yarn color, and small details like muzzle length to mimic the features of a chosen breed.
8. Is stuffing necessary for small keychains?
Yes, stuffing helps maintain the shape and gives the crochet dog a soft, appealing look.
9. Can I make the keychain bigger?
Of course. By using thicker yarn and a larger hook, you can scale up the pattern to create a larger plush version.
10. How can I make the keychain more durable?
Use tight stitches, secure all seams carefully, and reinforce the attachment to the keychain ring.
Conclusion
In this crochet keychain in the shape of a dog – Step by Step Tutorial, we explored everything from materials and tools to crochet instructions, finishing touches, personalization, and common questions.
With patience and creativity, you can transform yarn into a delightful dog-shaped keychain that is both practical and adorable.
Now it’s your turn to try making one yourself. Enjoy the process, experiment with colors and styles, and share your finished piece with friends and family. Don’t forget to leave your honest opinion and suggestions on this tutorial so we can continue improving and inspiring more crochet creations together.