
The Sawtooth Star Quilt Block – Step by Step Tutorial is one of the most popular guides for beginner and experienced quilters alike. This timeless block has been a favorite for centuries, often appearing in both traditional and modern quilts. Its design, featuring a central square surrounded by star points, makes it a versatile choice for anyone wanting to create a quilt that is both simple and elegant. With this tutorial, you will learn not only how to make the block but also how to adapt it to fit different projects.
When working with the Sawtooth Star Quilt Block, quilters often find that it provides the perfect balance between creativity and precision. The clean lines and geometric shapes allow room for personalization through color choices and fabric patterns. Many people love this block because it looks more complex than it actually is. With just a few simple techniques, you can create a star that adds charm to your quilt without requiring advanced skills.
This step by step tutorial will guide you through all the details, from cutting fabric accurately to piecing the block together with precision. By the end, you will be able to confidently create your own Sawtooth Star Quilt Block and incorporate it into larger quilting projects. Whether you are a beginner eager to practice your skills or an advanced quilter looking for a classic pattern, this guide will serve as a helpful resource for you.
Understanding the Sawtooth Star Quilt Block
The Sawtooth Star Quilt Block is a classic pattern that dates back to early American quilting traditions. Its design resembles a radiant star, making it a symbol of guidance, light, and creativity. Many quilters appreciate this block because it is adaptable for both small and large projects, from pillows to bed-size quilts.
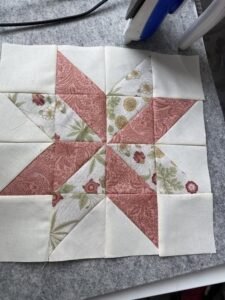
To truly understand the Sawtooth Star Quilt Block – Step by Step Tutorial, it’s important to recognize the block’s structure. The star is formed using a central square, four flying geese units, and four corner squares. These simple components combine to create a visually striking design. Once you master the flying geese technique, you can create endless variations of this block.
Color selection also plays a huge role in the final appearance of the Sawtooth Star. A contrasting center square can make the star stand out, while complementary fabrics can give it a softer, more subtle look. Quilters often experiment with bold colors or patterned fabrics to highlight the star points and create unique effects.
Another reason quilters love this block is its scalability. You can adjust the block size to fit your project by changing the measurements of the center square and flying geese units. This flexibility allows the Sawtooth Star to be used in table runners, wall hangings, or even full quilt tops.
The Sawtooth Star Quilt Block – Step by Step Tutorial is not only about sewing but also about planning. Proper preparation, from fabric choice to accurate cutting, ensures that your finished block looks sharp and symmetrical. This preparation makes a big difference, especially when creating multiple blocks for a larger quilt.
Learning this block is like building a foundation for your quilting journey. Once you understand its structure and techniques, you will find it easier to approach other quilt blocks and patterns with confidence.
Materials and Preparation
Before starting the Sawtooth Star Quilt Block – Step by Step Tutorial, gather the necessary materials. Having everything prepared will make the process smoother and more enjoyable. At a minimum, you will need fabric, a rotary cutter, a cutting mat, a ruler, thread, and a sewing machine. For beginners, using cotton fabric is ideal because it is easy to cut and sew.
Choose at least two different fabrics: one for the star points and one for the background. Adding a contrasting fabric for the center square can make your star more eye-catching. Pre-washing your fabric is also recommended to prevent shrinkage or color bleeding after your quilt is finished.
Cutting is one of the most important steps in quilting. For the Sawtooth Star Quilt Block, you will need to cut a large square for the center, smaller squares for the corners, and rectangles or squares to create the flying geese units. Accuracy here is essential, as even small errors can affect how the block fits together.
A rotary cutter and ruler will help ensure clean, straight cuts. Many quilters also prefer to label their pieces before sewing to avoid confusion. Keeping your work organized reduces mistakes and saves time later.
Once your fabric is cut, check your sewing machine. Use a quarter-inch seam allowance, as this is standard in quilting. You may also want to use a walking foot, which helps feed the fabric evenly through the machine. Having the right setup will give you cleaner and more consistent results.
Finally, prepare your workspace. A clean and well-lit area makes sewing easier and more enjoyable. Keeping your tools nearby will help you stay focused on the process and prevent unnecessary interruptions.
Step by Step Tutorial for the Sawtooth Star
Now that you have prepared everything, it’s time to follow the Sawtooth Star Quilt Block – Step by Step Tutorial. The block may look complex, but when broken down into steps, it becomes quite manageable.
Step 1: Start with the center square. This is the heart of your star. Place it on your workspace and make sure its edges are perfectly straight. The size of this square will determine the overall block size, so double-check your measurements.
Step 2: Create the flying geese units. To do this, sew two small squares onto a rectangle, forming triangular star points. This step is the key to the Sawtooth Star’s design. Press your seams carefully to keep the pieces flat. Making all four flying geese units at once helps maintain consistency.
Step 3: Add the corner squares. Place one square in each corner around the center piece. These will frame the star and complete the block’s structure. The balance between these corner pieces and the star points is what gives the Sawtooth Star its symmetry.
Step 4: Assemble the block row by row. Sew together one row with a corner square, a flying geese unit, and another corner square. Do the same for the bottom row. Then sew the top row, the center row, and the bottom row together. Press seams flat as you go.
Step 5: Square up the block. After sewing, measure your block to ensure it is the correct size. Trim any excess fabric if needed. A squared block will fit better into larger quilting projects.
Step 6: Repeat the process to create more blocks if you are making a full quilt. The Sawtooth Star Quilt Block – Step by Step Tutorial can be applied multiple times, allowing you to create a quilt top filled with stars.
Tips for Perfecting Your Sawtooth Star
Even though the Sawtooth Star Quilt Block is beginner-friendly, a few tips can help you achieve more professional results. Paying attention to details makes a big difference in quilting.
First, always press your seams after each step. Pressing keeps the fabric flat and prevents bulk at the intersections. Using a hot iron with steam can make your blocks look much sharper.
Second, use chain piecing if you are making multiple blocks. This technique saves time by sewing several pieces in a continuous line without cutting the thread in between. It keeps your workflow smooth and efficient.
Third, accuracy is more important than speed. Take your time with cutting and sewing to avoid mistakes. Rushing can lead to uneven edges or mismatched seams, which will affect the block’s overall appearance.
Fourth, consider experimenting with fabric placement. By switching the colors of the center square or star points, you can create unique variations of the Sawtooth Star. This creativity allows you to put your personal touch on a traditional design.
Fifth, always measure your blocks as you go. A small error in one block can become a big issue when piecing together an entire quilt. Consistency in size ensures that your quilt top comes together smoothly.
Lastly, enjoy the process. Quilting is not only about the finished product but also about the creativity and relaxation it provides. Celebrate each block you complete as part of your quilting journey.
FAQ about the Sawtooth Star Quilt Block
What is the best fabric for making the Sawtooth Star Quilt Block?
Cotton fabric is the most recommended because it is easy to cut, sew, and press. Beginners especially benefit from using cotton.
Can I make the Sawtooth Star without a sewing machine?
Yes, it is possible to sew by hand, but it will take longer. Using a sewing machine makes the process faster and more precise.
What size should my Sawtooth Star Quilt Block be?
The size depends on your project. Common sizes range from 6 inches to 12 inches, but you can adjust the measurements as needed.
How do I prevent my flying geese units from becoming uneven?
Careful cutting and accurate seam allowances are the keys. Pressing the seams after each step also helps maintain clean edges.
Can I use patterned fabric for the star points?
Yes, patterned fabric can add interest to the block. However, make sure the pattern contrasts well with the background fabric so the star remains visible.
How many Sawtooth Star blocks do I need for a quilt?
The number depends on the quilt size. For a lap quilt, you might need 12 to 20 blocks, while a bed-size quilt may require 30 or more.
Conclusion
In this Sawtooth Star Quilt Block – Step by Step Tutorial, you learned how to create one of the most timeless and versatile quilt blocks. From understanding its structure to preparing your fabric and assembling the block, each step builds your confidence as a quilter. The Sawtooth Star is not only beautiful but also practical for a wide range of quilting projects.
I hope this tutorial inspires you to try making your own Sawtooth Star Quilt Block and experiment with colors, fabrics, and sizes. Quilting is a rewarding craft that allows endless creativity.
If you found this guide helpful, please leave your sincere opinion and share your suggestions. Your feedback helps improve future tutorials and supports the quilting community.