
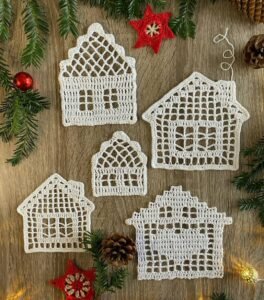
Creating a crochet house to hang on a Christmas tree – step by step tutorial is a charming and creative way to add a handmade touch to your holiday decorations. Many people love adding personalized ornaments to their trees, and crochet projects are an excellent choice for crafters who enjoy working with yarn. The idea of designing a tiny house that can be displayed on the tree combines tradition, warmth, and creativity. It is not just an ornament but also a symbol of home, comfort, and family gatherings during the holiday season.
When you follow a crochet house to hang on a Christmas tree – step by step tutorial, you will see that the process is simple yet enjoyable. With just a few materials like yarn, a crochet hook, and some optional decorative elements, you can create a beautiful piece that reflects your personality. Whether you want a rustic, colorful, or minimalist style, this project can be adapted to fit your theme. Beginners and advanced crocheters alike can enjoy the project since it offers both easy stitches and room for creativity.
This ornament can also become a thoughtful handmade gift. By following the crochet house to hang on a Christmas tree – step by step tutorial, you can craft multiple houses for friends and family. Each one can be made unique by changing colors, adding embroidery, or attaching beads and buttons. This makes the crochet house not only a decoration but also a keepsake that can be cherished for many Christmas seasons to come.
Materials and Tools Needed
To begin the crochet house to hang on a Christmas tree – step by step tutorial, you will need some basic materials that are easy to find. Yarn is the primary material, and you can choose cotton for a clean look or acrylic for a more cozy and fluffy appearance. Selecting festive colors such as red, green, white, and gold will instantly give your project a holiday spirit. Neutral tones like beige and brown are also perfect for creating a more rustic little house.
The crochet hook size will depend on the yarn you choose. Most tutorials recommend a size between 2.5mm to 4mm for ornaments since smaller hooks create tighter stitches, giving the structure more firmness. Tighter stitches help the little house keep its shape when hanging on the Christmas tree. Along with the hook, you should have scissors and a yarn needle for weaving in the ends and attaching extra details.
Optional decorative materials can take your house ornament to the next level. Tiny buttons can become windows, ribbons can be used as loops to hang the house, and embroidery thread can add personalized details like a door or snowy roof. Stuffing material such as cotton or fiberfill is also useful if you want your crochet house to be three-dimensional and more solid. These small additions make the project versatile and fun to customize.
Having all the materials ready before you start the crochet house to hang on a Christmas tree – step by step tutorial ensures a smooth crafting experience. Preparing your yarn, hook, and decorations in advance will help you focus entirely on the creative process without interruptions. This preparation stage is part of the joy of crafting because it builds anticipation and excitement for the final result.
Another important detail to consider is the type of yarn texture. Smooth yarn is easier for beginners to handle since it glides better and helps stitches look even. Textured yarns like boucle or glitter yarn can be added later for decorative accents such as snow or rooftop sparkle. Choosing the right yarn contributes not only to the appearance of the house but also to how enjoyable the project feels while crocheting.
Finally, don’t forget to plan how you want the house to look. You can sketch a simple design to decide whether you want a classic rectangular house, a small cottage, or a modern minimalist home. By doing this before following the crochet house to hang on a Christmas tree – step by step tutorial, you set a clear vision for your ornament.
Step by Step Instructions
The first step in the crochet house to hang on a Christmas tree – step by step tutorial is creating the base. Begin with a chain that determines the width of your house. For a small ornament, chaining between 12 to 18 stitches is enough. This chain will form the bottom row of your house. After the foundation chain, work single crochet stitches across to build up the height of the house. Continue until you reach the desired height, usually about 12 to 15 rows.
The next step is forming the roof. Once the base of the house is complete, you can decrease stitches gradually on each row to shape the triangular roof. For example, by skipping a stitch at the beginning of each row, you will create a slanted edge. This forms the roofline naturally and gives the house its characteristic shape. Using a different color yarn, like red or brown, makes the roof stand out.
To add doors and windows, you can crochet small squares or rectangles separately and sew them onto the house base. Another option is to embroider them using a yarn needle and contrasting thread. This allows endless customization: you can make round windows, striped doors, or even holiday-themed decorations like stars and snowflakes. Following this step in the crochet house to hang on a Christmas tree – step by step tutorial brings your house to life with personality and charm.
If you want your crochet house to be three-dimensional, crochet two identical panels of the house and sew them together, leaving a small opening at the top. Fill the inside with cotton or fiberfill, then close it securely. This creates a stuffed ornament that looks fuller on the tree. Adding stuffing also helps the house keep its shape over time.
The final touch is attaching a loop for hanging. You can crochet a simple chain and sew it to the top of the roof, or use a ribbon for extra decoration. The loop should be strong enough to hold the weight of the ornament but small enough to look delicate. This step ensures your crochet house hangs neatly on the Christmas tree.
After finishing, take a moment to admire your work. Each stitch in the crochet house to hang on a Christmas tree – step by step tutorial represents creativity and care. You now have a handmade ornament that can be enjoyed for many years and passed down as a holiday tradition.
Creative Ideas and Variations
One of the joys of following a crochet house to hang on a Christmas tree – step by step tutorial is experimenting with creative variations. You can change the shape of the house, the roof style, or the colors to match your personal theme. For example, making a gingerbread-style house with brown yarn and white embroidery for icing details can be a playful option for families with children.
Another idea is to create a snowy cottage. By using fluffy white yarn on the roof and light blue yarn for the house body, you can mimic the look of a cozy cabin surrounded by snow. Small beads or sequins can be attached to represent snowflakes, adding sparkle to your Christmas tree. This type of variation gives your ornament a magical winter wonderland feeling.
If you enjoy farmhouse style, a rustic house can be created using beige yarn for the walls and dark brown for the roof. Adding tiny embroidered hearts or stars above the door will give it a country-inspired charm. This design looks especially beautiful on Christmas trees decorated with natural elements like pinecones, wooden ornaments, and burlap ribbons.
For a modern touch, you can create minimalist crochet houses using only one color and straight, clean lines. Grey, black, or white yarn can be used for this style. These simple designs look elegant on trees with metallic or neutral themes. Following the same crochet house to hang on a Christmas tree – step by step tutorial, you can achieve a completely different aesthetic.
You can also personalize each house with initials, names, or dates. Embroidering these details makes the ornament a meaningful gift or a keepsake for your own family. Personalized crochet houses are wonderful to commemorate special Christmases, weddings, or first holidays in a new home.
Lastly, consider making a set of houses instead of just one. A small village of crochet houses can be hung together on the tree, creating a charming effect. Each house can represent a different member of the family, with unique colors and details. This transforms your tree into a storytelling decoration filled with love and creativity.
Tips for Beginners
For beginners following the crochet house to hang on a Christmas tree – step by step tutorial, it is important to start with simple stitches. Single crochet and double crochet are usually enough to build the structure of the house. Practicing these stitches on a small swatch before starting the project can help build confidence.
Keep your tension even while crocheting. If the stitches are too loose, the house may not keep its shape. If they are too tight, it may be difficult to insert the hook. Finding a balance in tension ensures a neat and well-shaped ornament. This practice will improve naturally with time and patience.
Choosing the right yarn can also make the process easier. Beginners may find smooth and medium-weight yarn the most comfortable to work with. Avoid very thin or textured yarns for the first attempt, as they can be challenging to manage. Once you feel more confident, you can experiment with more decorative yarns.
Don’t rush the steps. Following the crochet house to hang on a Christmas tree – step by step tutorial carefully ensures each part of the project is clear. Take breaks if needed, especially when attaching small details like windows and doors. This way, the final result will be polished and satisfying.
If you make a mistake, don’t worry. One of the advantages of crochet is that stitches can easily be undone and corrected. This flexibility makes crochet a forgiving craft, perfect for beginners who are still learning. Remember that imperfections can even add charm to handmade ornaments.
Finally, enjoy the process. Crocheting a house ornament is not only about the final product but also about the relaxing and joyful experience of creating something with your hands. Each ornament will carry your unique style, making it a special addition to your holiday decorations.
FAQ
1. Can I make a crochet house ornament if I am a beginner?
Yes, the project is beginner-friendly. By following the crochet house to hang on a Christmas tree – step by step tutorial, you can complete the ornament using basic stitches like single and double crochet.
2. What type of yarn is best for this project?
Medium-weight cotton or acrylic yarn is ideal. Cotton gives a clean look, while acrylic offers a softer and cozier finish. Both are great for small decorative projects.
3. Do I need stuffing for the crochet house?
Stuffing is optional. A flat house ornament looks charming and simple, while a stuffed version appears fuller and three-dimensional on the tree.
4. How can I hang the crochet house on the tree?
You can crochet a small chain loop or use a ribbon attached to the roof. Make sure the loop is strong enough to hold the ornament securely on the branch.
5. Can I customize the crochet house with details?
Absolutely. You can add doors, windows, names, dates, or even sequins for sparkle. Customization is one of the most enjoyable parts of the project.
6. How long does it take to make one crochet house ornament?
Depending on your skill level, it can take between one to three hours. Beginners may take a little longer, but with practice, the process becomes quicker.
Conclusion
Making a crochet house to hang on a Christmas tree – step by step tutorial is a wonderful way to bring warmth, tradition, and creativity into your holiday decorations. With just yarn, a hook, and a bit of imagination, you can create beautiful handmade ornaments that will be cherished for many years. This project is beginner-friendly yet versatile enough for advanced crafters to explore different designs and styles.
We have covered the materials, step-by-step instructions, creative variations, and helpful tips to make the process enjoyable. Now it’s your turn to try and create your own crochet house ornament.
I would love to know your thoughts—please share your sincere opinion and suggestions about this tutorial. Your feedback can inspire even more creative ideas for future crochet projects.