
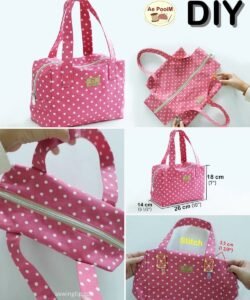
Creating an easy to make pink quilted bag- Step by Step Tutorial is a delightful project for both beginners and experienced crafters. Quilted bags are not only stylish but also functional, perfect for carrying daily essentials or using as a chic accessory. This tutorial focuses on simplicity, showing how a beautiful pink quilted bag can be made without complex techniques. By following this easy to make pink quilted bag- Step by Step Tutorial, anyone can craft a personalized accessory that is both practical and visually appealing.
The easy to make pink quilted bag- Step by Step Tutorial highlights the versatility of quilting techniques. You can experiment with different shades of pink, patterns, or fabrics to achieve a bag that suits your style. Quilted bags are popular because the stitching adds texture, structure, and durability. Using basic quilting methods, this tutorial transforms simple materials into a charming bag that can hold personal items securely while looking fashionable.
Handmade bags, like the one in this easy to make pink quilted bag- Step by Step Tutorial, also make excellent gifts. Personalized and thoughtfully crafted, these bags show creativity and care. Additionally, creating your own quilted bag allows for customization in size, pocket placement, and strap length. This project combines practical skills with creative expression, resulting in a bag that is unique and tailored to your needs.
Materials Needed for the Pink Quilted Bag
To start this easy to make pink quilted bag- Step by Step Tutorial, gather all necessary materials before beginning. You will need fabric for the outer layer, lining, and quilt batting. Cotton fabric is ideal for beginners because it is easy to handle and comes in a wide variety of colors and patterns. For this project, select shades of pink that complement each other.
Quilt batting is essential for adding softness and structure to your bag. Choose a lightweight batting that is easy to quilt by hand or machine. It provides stability while maintaining a flexible and attractive shape.
Additionally, you will need coordinating thread, a sewing machine or hand sewing needles, scissors, pins, and a ruler. These basic tools make assembling the quilted bag more manageable and help maintain precision throughout the project.
Optional materials include zippers, buttons, or decorative trims. These items allow for customization, making the bag functional and visually appealing. Consider adding pockets or compartments to increase practicality without complicating the design.
Finally, ensure your workspace is clean, well-lit, and spacious. Quilting involves multiple layers of fabric, so having ample room makes the sewing process smoother and more comfortable. Organized materials also prevent mistakes or misplaced pieces during construction.
Preparing and Quilting the Fabric
The first step in this easy to make pink quilted bag- Step by Step Tutorial is preparing the fabric. Cut your chosen fabric into rectangles according to the desired bag size. Make sure each piece is slightly larger than the finished bag to allow for seam allowances.
Next, layer the fabric with batting and lining to form a quilt sandwich. Place the outer fabric on top, batting in the middle, and lining at the bottom. Pin the layers together to keep them aligned while quilting.
Quilting can be done using simple straight-line stitches, diagonal lines, or any pattern that appeals to you. This step not only secures the layers but also adds decorative texture. Be consistent with stitch spacing to create a professional look.
For beginners, hand quilting is a great option. Take your time to create even stitches that enhance both the bag’s structure and aesthetic. If using a sewing machine, ensure the tension is appropriate to prevent puckering.
Once the quilting is complete, trim excess fabric and batting. Your quilted rectangle now forms the base of your bag, ready for assembly into the final shape.
The easy to make pink quilted bag- Step by Step Tutorial emphasizes precision in this step because accurate quilting ensures the bag maintains shape and durability throughout use.
Assembling the Quilted Bag
To assemble your easy to make pink quilted bag- Step by Step Tutorial, fold the quilted rectangle into the bag shape. Pin the sides together, making sure edges align correctly. Decide whether you want a flat bottom or a slightly boxed shape for extra capacity.
Next, sew the sides and bottom together using a straight stitch. Reinforce the corners for added strength, especially if you plan to carry heavier items. Keep seams neat to maintain the overall aesthetic of the bag.
Once the body is complete, attach handles or straps. You can create quilted straps for a matching look or use ready-made handles for convenience. Ensure the straps are securely attached, as they will bear the weight of the bag’s contents.
Add a zipper or closure if desired. This step enhances functionality by securing items inside the bag. Choose a zipper color that complements the pink fabric and stitch it carefully for a polished finish.
If desired, sew in internal or external pockets for organization. Small pockets can hold keys, phones, or other essentials, making the bag more versatile without complicating the design.
Finally, inspect the bag for loose threads or uneven stitches. Trim any excess and reinforce areas that may need additional strength. Your easy to make pink quilted bag- Step by Step Tutorial is now ready for use.
Customization and Finishing Touches
One of the most enjoyable aspects of this easy to make pink quilted bag- Step by Step Tutorial is customization. Experiment with different shades of pink or add contrasting fabrics for a playful effect. Personalize the bag with embroidery, appliqués, or fabric paint for a unique design.
Consider decorative stitching along the edges or around pockets. These small details add sophistication and charm while reinforcing the structure of the bag.
You can also add embellishments such as buttons, ribbons, or tassels. These elements enhance the bag’s appearance without affecting functionality.
Lining choices can further customize your bag. Patterned or contrasting linings create a surprise element when opening the bag and elevate the overall design.
Another option is adjustable or removable straps. This feature allows for different carrying styles and adds versatility to your bag.
Finally, press the bag with a warm iron to smooth out wrinkles and give a polished finish. Your easy to make pink quilted bag- Step by Step Tutorial is now complete, showcasing both style and practicality.
FAQ About the Quilted Bag
1. Is this project suitable for beginners?
Yes, the easy to make pink quilted bag- Step by Step Tutorial is designed for beginners with simple quilting and sewing steps.
2. Can I change the bag size?
Absolutely. Adjust the rectangle dimensions to make the bag larger or smaller according to your needs.
3. What type of fabric works best?
Cotton fabrics are ideal for beginners, while durable synthetic fabrics can be used for a longer-lasting bag.
4. Do I need a sewing machine?
No, hand sewing works fine, but a machine speeds up the process and ensures consistent stitching.
5. Can I wash the quilted bag?
Yes, using washable fabrics and batting allows for easy cleaning. Always follow care instructions for your chosen materials.
6. How long does it take to make a bag?
For beginners, the process can take several hours, while experienced crafters may complete it faster.
Conclusion
The easy to make pink quilted bag- Step by Step Tutorial is a simple, creative, and functional project suitable for all skill levels. From preparing and quilting the fabric to assembling and adding finishing touches, this tutorial demonstrates how a basic rectangular piece of fabric can transform into a stylish bag.
This project encourages creativity, allowing you to customize colors, fabrics, and embellishments while learning valuable sewing and quilting skills. Handmade quilted bags are versatile, practical, and make excellent gifts for friends and family.
We invite you to try this easy to make pink quilted bag- Step by Step Tutorial, share your results, and leave your honest opinions and suggestions. Your feedback inspires others and helps improve future tutorials while celebrating the joy of handmade crafting.