
If you are looking for the easiest crochet bags tutorial- Step by Step Tutorial, you have just found the perfect guide. Crochet bags are not only stylish and practical but also fun to make, even for beginners. With just a few simple stitches and the right approach, you can create a functional accessory that reflects your personal style. This article will guide you through the entire process, from understanding the basics of crochet to finishing your own handmade bag.
One of the main reasons why crochet bags have become so popular is that they are versatile and can be customized in endless ways. Whether you prefer a small crossbody bag, a tote, or even a mini pouch, the basic techniques remain the same. Following this step by step tutorial, you will learn how to start with simple stitches, choose the right yarn, and put everything together in a professional-looking finish. This makes it the perfect project for crafters who want something creative and useful at the same time.
Another reason many people are searching for the easiest crochet bags tutorial is that crocheting is both relaxing and rewarding. Working with your hands, seeing each stitch build up, and watching your bag take shape can be very therapeutic. At the same time, you end up with a beautiful accessory that you can use yourself or give as a thoughtful handmade gift. In this article, you will find a clear explanation of every step, tips for success, and a detailed guide designed with beginners in mind.
Choosing the Right Materials for Your Crochet Bag
The first step in making a bag is choosing the right materials. Yarn comes in many different textures, weights, and colors, and the type you choose will affect the final look and durability of your project. For example, cotton yarn is often recommended for bags because it is sturdy and holds its shape well. Acrylic yarn, on the other hand, is more affordable and comes in a wide range of colors, making it a fun choice for colorful designs.
When selecting your yarn, it is important to consider the weight. A medium or worsted weight yarn is a great choice for beginners because it is easy to work with and creates a nice, solid structure. If you want a lighter, more delicate bag, you can opt for thinner yarns, while thicker yarns will give you a chunky, bold look. The easiest crochet bags tutorial- Step by Step Tutorial always suggests beginners start with a yarn that is easy to handle.
Your crochet hook size should match the yarn you choose. Most yarn labels provide recommendations for the hook size that works best. Using the correct hook ensures that your stitches are even and that your bag comes out the right size. If you want a tighter bag that holds items securely, you can use a slightly smaller hook than recommended. This will create denser stitches, which is especially helpful for tote bags or purses.
Besides yarn and a hook, you may also need some additional supplies like stitch markers, a yarn needle for weaving in ends, and handles if you want to add them to your bag. Some people even choose to line their bags with fabric to make them sturdier and more functional. However, for beginners, it is best to start with just the basics and get comfortable with the stitches first.
Once you have your materials, take a moment to organize your space. Having everything nearby makes the process more enjoyable. Remember, the easiest crochet bags tutorial- Step by Step Tutorial is designed to keep things simple and fun, so do not worry about perfection in your first attempt.
Finally, choose a color palette that excites you. Some crafters prefer solid colors for a clean and elegant look, while others love combining multiple shades for a playful effect. Your color choice will make your bag truly unique and personal.
Step by Step Guide to Starting Your Crochet Bag
Now that you have your materials ready, it’s time to start working on your bag. The easiest crochet bags tutorial- Step by Step Tutorial usually begins with a foundation chain. This chain will determine the width of your bag. Beginners should start with around 25–35 chains, depending on how large they want the bag to be.
Once you have your foundation chain, you will start building rows. Single crochet stitches are the most common choice for beginners because they are simple and create a dense fabric that is perfect for bags. Simply insert your hook into the chain, yarn over, pull through, and complete the stitch. Keep repeating this process until you reach the end of the row.
Turn your work and continue crocheting rows until you have a rectangle shape. The length of this rectangle will determine the height of your bag. For a medium-sized tote, you may want around 40–50 rows, but this can be adjusted based on your preference. The beauty of the step by step tutorial is that it allows you to customize the size easily.
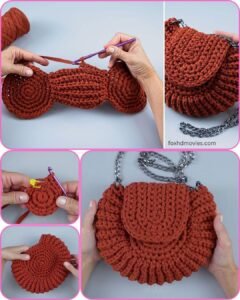
After completing the rectangle, you will fold it in half to form the body of the bag. Using slip stitches or single crochet, join the two sides together, leaving the top open. This creates the basic bag shape without the need for complicated patterns. Beginners love this method because it is simple but produces a functional piece.
Once the body is done, you can add a strap. The simplest way is to crochet a long chain and then reinforce it with a row of single crochet stitches. Attach it securely to both sides of the bag, making sure it is strong enough to hold weight. This is where you can customize the length depending on whether you want a shoulder bag, crossbody, or handheld tote.
At this stage, your bag is technically complete, but you can always add extra details if you like. For example, some people add decorative edges, buttons, or even tassels to make their bag stand out. These little details make each bag unique and fun to carry.
Tips and Tricks for a Professional Finish
Even though this is the easiest crochet bags tutorial- Step by Step Tutorial, there are still a few tips that can help your bag look more professional. First, pay attention to tension. Keeping your stitches consistent will ensure that your bag looks neat and even. If your stitches are too loose, the bag might lose its shape, but if they are too tight, it may feel stiff and hard to use.
Another helpful tip is blocking your finished bag. Blocking is the process of shaping your crochet project by gently wetting it and allowing it to dry in the desired form. This step helps even out stitches and gives the bag a polished appearance. While not required, it can make a big difference in the final look.
If you want your bag to be stronger and last longer, consider adding a fabric lining. This prevents small items from slipping through gaps in the stitches and gives extra durability. It is not mandatory for beginners, but as you get more confident, it’s a great way to upgrade your crochet projects.
Experimenting with stitches is another fun way to personalize your bag. While single crochet is simple and effective, other stitches like half double crochet or double crochet can add texture and style. Mixing different stitch patterns within the same bag makes it more visually interesting.
Handles are another area where you can add creativity. Instead of crocheting a strap, you could use leather handles, wooden rings, or even repurpose handles from an old bag. This mix of handmade and ready-made materials gives your project a unique touch.
Finally, don’t forget about color combinations. Stripes, color blocking, or even using variegated yarns can transform a simple pattern into something eye-catching. Since the easiest crochet bags tutorial allows customization, you can experiment as much as you want.
Expanding Your Crochet Bag Skills
Once you feel comfortable making your first simple bag, you might want to expand your skills. The easiest crochet bags tutorial- Step by Step Tutorial is just the beginning. There are many different bag styles you can try, from backpacks to market totes and clutches. Each new style introduces you to different techniques that will help you grow as a crocheter.
You can also try incorporating granny squares into your bag design. Granny squares are small motifs that can be joined together to form larger items. They are colorful, fun to make, and give your bag a traditional handmade look. This technique allows you to play with multiple colors and patterns.
Another idea is to add closures to your bags. A simple button and loop, a zipper, or a drawstring can make your bag more functional. Learning how to add these details helps you create more practical accessories.
As you gain confidence, you can start designing your own patterns. This means adjusting sizes, experimenting with different yarn types, and combining techniques to create a bag that is truly one of a kind. The step by step tutorial is just a foundation to give you the skills needed to start this creative journey.
You may also want to make crochet bags as gifts or even sell them. Handmade bags are always in demand, and your creations can become a source of extra income. Many people love owning unique, eco-friendly, and sustainable accessories that are not mass-produced.
Ultimately, the more you practice, the more creative possibilities you will discover. Crocheting is a skill that grows with time, and starting with the easiest crochet bags tutorial is the perfect first step toward becoming a confident crafter.
FAQ about the easiest crochet bags tutorial- Step by Step Tutorial
1. Can beginners really make a crochet bag easily?
Yes! The easiest crochet bags tutorial- Step by Step Tutorial is designed with beginners in mind. It uses simple stitches like single crochet, making it approachable even if you are new to crocheting.
2. What yarn is best for crochet bags?
Cotton yarn is a great choice because it is strong and holds its shape well. However, you can also use acrylic or blended yarns depending on the look and feel you want.
3. How long does it take to make a crochet bag?
It depends on the size and complexity, but for beginners following the step by step tutorial, a small to medium bag can usually be completed in a few hours or over a weekend.
4. Do I need to line my crochet bag with fabric?
No, it is not required, but adding a lining can make the bag sturdier and prevent items from slipping through stitches. Beginners can skip this step and add it later as they gain confidence.
5. Can I customize the size of the bag?
Absolutely! You can adjust the foundation chain and the number of rows to create a bag that fits your needs, whether you want a small pouch or a large tote.
6. What type of handle is easiest to make?
The simplest option is crocheting a long chain reinforced with stitches. However, you can also buy ready-made handles or use creative alternatives like wooden rings or leather straps.
7. Is blocking necessary for crochet bags?
Blocking is not essential, but it helps give your bag a neat and professional finish. It evens out stitches and helps the bag hold its shape better.
8. Can I use colorful yarns for my first crochet bag?
Yes, colorful yarns are a great choice for beginners because they make the project more fun. Stripes, variegated yarns, or color blocking are all excellent ways to personalize your bag.
9. What is the easiest stitch to use for crochet bags?
Single crochet is the most recommended stitch for beginners. It is simple, creates a dense fabric, and works perfectly for bags.
10. Can I sell the crochet bags I make?
Yes, many people sell their handmade crochet bags. They are popular as gifts and fashion accessories, and each handmade piece has unique value.
Conclusion
The easiest crochet bags tutorial- Step by Step Tutorial is a fantastic way to begin your journey into the world of crochet. With simple stitches, easy-to-find materials, and step-by-step instructions, anyone can create a beautiful and functional bag. From choosing yarn to adding straps and decorations, every part of the process is enjoyable and creative.
By following this guide, you not only learn how to make a crochet bag but also open the door to countless possibilities in crochet. Whether you keep your bag for personal use, give it as a gift, or even sell it, the satisfaction of creating something handmade is priceless.
I would love to know what you think about this tutorial! Please leave your honest opinion and share any suggestions you may have for future projects. Your feedback helps keep the creative inspiration flowing.