
Starting a Mini crochet ghosts – Step by Step Tutorial is a wonderful way to combine creativity with fun seasonal crafting. These adorable little ghosts can be made quickly, making them perfect for beginners who want to practice their crochet skills while also creating something unique and festive. Whether you’re preparing for Halloween decorations, adding a spooky yet cute charm to your home, or simply looking for a new project to enjoy, mini crochet ghosts are a delightful choice. In this tutorial, we will go through every step clearly so you can follow along with confidence.
One of the reasons many crafters love making mini crochet ghosts is their versatility. They can be used as keychains, ornaments, party favors, or even strung together into a garland for seasonal décor. Plus, since they are small, you don’t need a large amount of yarn or materials, making them budget-friendly projects. With just a few simple stitches, you’ll see your ghost take shape quickly, which is especially satisfying for those who like instant results from their crafting sessions.
Another benefit of this step by step tutorial is that it provides detailed guidance that is easy to follow. Beginners often feel nervous about tackling crochet projects, but mini crochet ghosts are forgiving and adaptable. You’ll learn essential stitches and shaping techniques while creating something fun and charming. By the end of this article, you’ll not only have learned how to make your own crochet ghost but also gained a solid foundation for creating other crochet characters.
Materials Needed for Mini Crochet Ghosts
To get started with your mini crochet ghosts – Step by Step Tutorial, you will need only a handful of basic materials. White yarn is the most common choice, as it represents the classic ghost look, but you can also experiment with different colors if you want playful or themed variations. Cotton or acrylic yarn in medium weight works best for creating a firm and durable structure for your ghost.
You will also need a crochet hook, typically size 3.5mm to 4mm, depending on your yarn choice. Using the correct hook ensures that your stitches are tight enough to prevent stuffing from peeking through. Speaking of stuffing, you will need some fiberfill or any soft stuffing material to give your ghost its cute, rounded shape. If you prefer, small fabric scraps can also be used as a stuffing alternative.
To add personality to your ghost, you can use safety eyes, small beads, or even embroidery thread to create the face. Many crafters prefer safety eyes for a polished look, while others enjoy hand-stitching expressions for a more unique touch. A yarn needle will be needed for sewing parts together and weaving in loose ends. Lastly, keep a pair of scissors handy for trimming yarn.
These materials are affordable and widely available, making this project accessible to anyone. Once you have everything gathered, you are ready to begin crocheting your ghost. Having all your supplies prepared beforehand will make the process smoother and more enjoyable. Remember that preparation is key to ensuring your project turns out neat and stress-free.
If you want to personalize your mini crochet ghost, you can also prepare additional accessories like small bows, tiny hats, or colored yarn to create themed variations. This extra creativity makes the project even more fun, as you can match your ghost to different occasions or personal tastes.
Before moving on to the actual steps, make sure you are comfortable with the basic crochet stitches: chain stitch, slip stitch, and single crochet. These will form the foundation of your ghost and are essential for achieving the correct shape. If you are a beginner, practicing these stitches for a few minutes will help you feel more confident as you start the tutorial.
Step by Step Instructions for Mini Crochet Ghosts
The first step in making your mini crochet ghosts – Step by Step Tutorial is to create a magic ring. This technique allows you to start your crochet piece in a circular shape, which is perfect for forming the rounded head of the ghost. Into this ring, you will crochet six single crochets and then pull the loop tight to close the circle. This creates a neat and secure base.
Next, you will increase the number of stitches in each round to shape the head. For example, you might place two single crochets into each stitch of the second round, giving you twelve stitches in total. Continue increasing gradually until the head reaches the desired size. This part is very similar to making the top of an amigurumi doll, so if you are familiar with amigurumi, you’ll find it familiar.
Once the head is the right size, you will crochet several rounds without increasing to build height. This section forms the body of the ghost and gives it a cylindrical shape. The number of rounds you complete will depend on how tall you want your ghost to be. A shorter body will look more rounded, while a longer body will give the ghost a floating effect.
After shaping the body, it’s time to create the wavy bottom that gives your ghost its iconic appearance. To do this, you will alternate stitches, such as making a combination of single crochets and double crochets in the same stitch, to form small scallops. This simple technique adds movement and character to the ghost, making it look as though it is floating.
Before finishing, remember to stuff the ghost lightly with fiberfill. Avoid overstuffing, as it can make the stitches stretch and distort the shape. A small amount of stuffing is enough to give the ghost its form while keeping it soft and squeezable. Once stuffed, continue crocheting until the body is closed at the top, leaving only the scalloped bottom open.
Finally, you can attach safety eyes or embroider a face onto your ghost. This is where you can truly personalize your creation by giving it different expressions. Some people like happy, smiling ghosts, while others prefer a classic spooky look. Whatever you choose, it will bring your mini crochet ghost to life.
Creative Uses for Mini Crochet Ghosts
After completing your mini crochet ghosts – Step by Step Tutorial, you may wonder what to do with your finished creations. The possibilities are endless! One popular option is to use them as keychains. By attaching a simple keychain ring, you can carry your ghost everywhere and show off your handmade work. These also make thoughtful handmade gifts for friends and family.
Another creative use is turning your mini crochet ghost into an ornament. With a small loop of yarn or ribbon attached to the top, your ghost can hang from a Halloween tree, a doorknob, or even as a fun addition to a car mirror. They are lightweight, so they won’t pull or stretch when hanging.
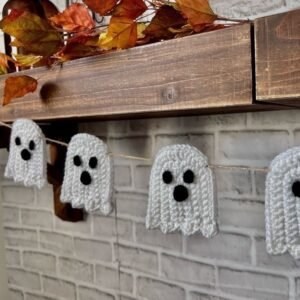
Garlands are another charming way to use these ghosts. By stringing several together on a long piece of yarn, you can create a spooky yet adorable decoration for your home. This works beautifully for parties or seasonal home décor, instantly adding a handmade touch to your space.
Mini crochet ghosts also make excellent party favors or small giveaways. They are quick to make in bulk, which is perfect for distributing at Halloween gatherings, school events, or craft fairs. People love receiving something handmade, and these ghosts are sure to bring smiles.
For those who enjoy imaginative play, these ghosts can even be used as soft toys for children. Since they are small and soft, they are safe for little hands. Just make sure to embroider the eyes instead of using safety eyes if the ghost will be handled by young children.
Finally, don’t forget that you can experiment with colors and accessories. A black or orange ghost, a tiny witch hat, or even a bow tie can completely transform the look of your project. This flexibility is one of the reasons why mini crochet ghosts remain such a fun and popular project among crafters.
Tips for Beginners and Personalization
If this is your first time following a mini crochet ghosts – Step by Step Tutorial, it’s important to take your time. Don’t rush the process, as crochet is meant to be relaxing and enjoyable. If you make a mistake, simply unravel a few stitches and try again. Unlike fabric projects, yarn allows for easy corrections.
Beginners often worry about tension, but the best approach is to practice consistency rather than perfection. If your stitches are too tight, the ghost may be difficult to stuff. If they are too loose, the stuffing may peek through. Finding the right balance comes with practice, so don’t be discouraged.
Personalization is one of the most exciting parts of crocheting. Once you have mastered the basic ghost shape, you can experiment with different yarn textures. For example, using a fluffy yarn can make your ghost look cloud-like, while metallic yarn can give it a magical shimmer.
Adding accessories is another way to personalize your ghost. Tiny hats, scarves, or bows can give each ghost a unique character. You can even crochet miniature pumpkins or bats to accompany your ghost for a complete seasonal set.
If you’re making ghosts as gifts, consider tailoring them to the recipient’s favorite colors or themes. This thoughtful touch makes the handmade item even more special and memorable.
Lastly, don’t forget to photograph your finished ghosts. Sharing your work with the crafting community online can inspire others and also give you a sense of pride. It’s always rewarding to see your hard work appreciated by fellow crafters.
FAQ About Mini Crochet Ghosts
Q: How long does it take to make a mini crochet ghost?
A: On average, it takes about one to two hours, depending on your crochet speed and experience. Beginners may take a bit longer, but the project is still quick compared to larger crochet items.
Q: Can I use any type of yarn for this project?
A: Yes, but medium-weight yarn like cotton or acrylic works best. Lighter yarn may make the ghost too delicate, while heavier yarn will result in a larger ghost.
Q: Do I need to know advanced crochet techniques?
A: No, basic stitches such as chain, slip stitch, and single crochet are sufficient. The tutorial is beginner-friendly and focuses on simple, repetitive stitches.
Q: Are mini crochet ghosts safe for children?
A: Yes, as long as you avoid small parts like safety eyes for very young children. Instead, embroider the face to ensure safety.
Q: Can I sell the mini crochet ghosts I make?
A: Absolutely! Handmade crafts like these are popular at markets and online. Just make sure to add your own creative touches so they stand out.
Q: How can I make my ghost look more unique?
A: Experiment with colors, yarn textures, and accessories. Adding details like hats, scarves, or themed decorations can make each ghost one of a kind.
Conclusion
This mini crochet ghosts – Step by Step Tutorial has shown you everything you need to know to create your own adorable crochet ghost. From gathering materials to shaping the body and adding personal touches, each step is designed to be clear and beginner-friendly. Whether you plan to use your ghost as a decoration, gift, or accessory, the end result will always be something special and handmade with care.
Crochet is not only about the finished product but also about the joy of creating. These mini ghosts are quick, fun, and versatile, making them the perfect project for crafters of all levels. Now that you’ve learned how to make them, why not give it a try and see how your creativity can shine through each ghost?
I’d love to hear your thoughts about this tutorial. Please leave your honest opinion and suggestions in the comments—your feedback helps make future tutorials even better!