
Learning how to make a shopping bag- Step by Step Tutorial is a creative and sustainable way to reduce plastic waste while crafting something useful for everyday life. Whether you are new to sewing or have experience with handmade projects, making your own shopping bag is not only practical but also fun. In this article, you will find a complete guide with clear explanations, easy-to-follow steps, and valuable tips to create a reusable bag that matches your personal style.
Homemade shopping bags are versatile, durable, and eco-friendly. Instead of relying on single-use plastic bags, you can design and sew a bag that reflects your personality while helping the planet. With this step by step tutorial, you will be able to choose the right fabric, cut the pattern, and stitch everything together to create a bag strong enough to carry groceries, books, or even craft supplies.
The best part about this how to make a shopping bag project is that it does not require expensive materials or advanced skills. Even beginners can follow along with simple tools and techniques. Once you finish your first bag, you will see how satisfying it is to carry something you made with your own hands. Now let’s dive into the detailed instructions and explore each step of this exciting project.
Choosing the Right Materials for Your Shopping Bag
When learning how to make a shopping bag- Step by Step Tutorial, the first and most important decision is the material you will use. The strength and durability of your bag depend on choosing the correct fabric. Cotton canvas, denim, or linen are excellent choices because they are sturdy yet easy to sew. For a lightweight option, you can even use old pillowcases or bedsheets, which makes this project sustainable and budget-friendly.
The handles of your shopping bag need to be comfortable and strong. You can use strips of the same fabric or purchase cotton webbing straps. Keep in mind that the length of the handles will determine whether your bag is handheld or shoulder-length. Longer handles are perfect for carrying on your shoulder, while shorter ones are practical for quick shopping trips.
Another key material is thread. Strong polyester or cotton thread will keep your bag together even when it is filled with heavy items. Make sure your thread color matches your fabric or choose a contrasting shade for a decorative effect. A sharp pair of fabric scissors is also essential for cutting clean edges that make sewing easier.
Do not forget to prepare a ruler or measuring tape to ensure precision. Even small differences in measurement can affect the symmetry of your bag. Marking tools like fabric chalk or disappearing ink pens will help you outline patterns clearly. Accuracy at this stage makes the sewing process smoother.
If you want to add an extra touch of creativity, consider decorative fabrics such as printed cotton, patchwork pieces, or recycled clothing. By using different materials, each bag you create will be unique. Choosing eco-friendly fabrics like organic cotton or recycled fibers also supports sustainable living.
Preparing your materials ahead of time ensures that you will not have to stop in the middle of your project to look for supplies. With all the necessary tools ready, you can move smoothly into the next step of creating your shopping bag.
Cutting and Preparing the Fabric
The second stage of how to make a shopping bag- Step by Step Tutorial is cutting the fabric. Start by deciding the size of your bag. A standard shopping bag measures about 16 inches wide and 18 inches tall, but you can adjust these dimensions to suit your needs. For example, a smaller bag is ideal for books, while a larger one is perfect for groceries.
Lay the fabric flat on a clean surface and fold it in half. This way, you can cut two identical pieces for the front and back of your bag at once. Use your measuring tape and fabric chalk to mark the dimensions clearly before cutting. Be sure to add an extra inch on all sides for seam allowance, which gives your bag a stronger finish.
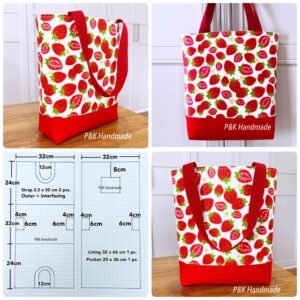
Once you have your two main panels, you will also need to cut strips for the handles. Standard handles measure about 20 to 24 inches long and 2 to 3 inches wide. If you prefer shoulder-length straps, make them longer. Fold the strips in half lengthwise and press them with an iron to prepare them for sewing.
To give your bag more strength and shape, you can cut a bottom panel. This is an optional step, but it helps the bag carry heavier items. The bottom panel should be as wide as the bag and about 4 inches tall. If you skip this step, your bag will still be functional, but it will not have a flat base.
Before you start sewing, iron all fabric pieces. Pressing helps eliminate wrinkles and ensures smoother stitching. Ironing also sets your folds and makes your seams more accurate. Many beginners underestimate this step, but it greatly improves the final result of your bag.
Once all the pieces are cut and pressed, you are ready to move to the sewing stage. Precise preparation guarantees that the assembly process will be easier and faster.
Sewing the Shopping Bag Together
Now that you have prepared your fabric pieces, the third step in how to make a shopping bag- Step by Step Tutorial is sewing them together. Place the two main fabric panels with the right sides facing each other. Pin the sides and bottom edges, leaving the top open. Sew along these edges with a straight stitch, keeping a half-inch seam allowance. This will form the main body of your bag.
After stitching, reinforce the seams by sewing a second line or using a zigzag stitch. This prevents the fabric from fraying and makes your bag durable enough for daily use. If you cut a bottom panel, attach it at this stage by sewing it along the lower edges of the bag panels.
Next, create the handles. Fold the fabric strips lengthwise, right sides facing inward, and sew along the long edge. Turn them inside out, press with an iron, and topstitch both sides for extra strength. If you are using cotton webbing straps, you can skip the sewing step and directly attach them to the bag.
Pin the handles to the top edges of the bag, making sure they are evenly spaced. A good rule is to place them about 3 inches from each side. Sew them securely, stitching several times over the attachment points to ensure they will not come loose.
To finish the top edge of the bag, fold the raw edge inward twice to create a clean hem. Sew along the fold with a straight stitch, enclosing the handle attachments in the seam. This step not only secures the handles but also gives the bag a neat and polished look.
Once all the sewing is complete, turn the bag right side out and press it with an iron. You now have a fully functional shopping bag ready to use.
Adding Personal Touches and Finishing Details
The final step of how to make a shopping bag- Step by Step Tutorial is adding personal touches that make your creation unique. Sewing your own bag gives you the freedom to customize it according to your style and needs. You can decorate it with embroidery, fabric paint, or iron-on patches to give it personality.
If you want to make your shopping bag more practical, consider adding inside pockets. These are perfect for holding keys, wallets, or small items that you don’t want to lose at the bottom of the bag. Simply cut a smaller piece of fabric, hem the edges, and sew it onto one of the inner panels before assembling the bag.
Another finishing touch is reinforcing the corners and handle areas. Since these parts carry the most stress, sewing an extra square or “X” pattern will extend the life of your bag. This simple step ensures your bag will not tear easily, even with heavy loads.
You can also experiment with different shapes. Instead of a simple rectangle, try a rounded or boxy design. By changing the size and style, you can create a collection of shopping bags for different occasions. This flexibility makes handmade bags a great gift idea as well.
For those who care about sustainability, using recycled fabric is an excellent choice. Old jeans, curtains, or shirts can be transformed into strong and stylish bags. This practice not only saves money but also reduces textile waste.
Once you finish adding your creative details, your bag will not just be a tool for shopping but also a reflection of your personality.
FAQ about How to Make a Shopping Bag
1. What is the best fabric for making a shopping bag?
The best fabrics are cotton canvas, denim, and linen because they are strong and easy to sew. Recycled fabrics also work well if you want a sustainable option.
2. Can I sew a shopping bag by hand?
Yes, it is possible to sew a shopping bag by hand using strong thread and backstitching techniques. However, using a sewing machine makes the process faster and the seams more durable.
3. How long does it take to make a shopping bag?
For beginners, it may take around 2 to 3 hours. Once you gain experience, you can complete a bag in under an hour.
4. Can I wash my homemade shopping bag?
Yes, most fabric shopping bags are machine washable. Just be sure to use fabrics that do not shrink or fade easily.
5. How much fabric do I need for one bag?
Usually, one yard of fabric is enough for a standard shopping bag. If you want longer handles or a bigger size, you may need a bit more.
6. Can I make a shopping bag without a sewing machine?
Yes, you can create a no-sew version using fabric glue or iron-on adhesive. While it may not be as durable as a stitched bag, it is still functional for light use.
Conclusion
By following this how to make a shopping bag- Step by Step Tutorial, you have learned how to select materials, cut fabric, sew panels, attach handles, and add finishing details.
Creating your own shopping bag is not only practical but also an enjoyable way to contribute to a sustainable lifestyle.
Now it is your turn to put these steps into practice and craft a bag that is both functional and stylish. Have you ever tried making your own reusable bag? Share your experience in the comments, leave your honest opinion, and suggest new ideas you would love to see in future tutorials.