
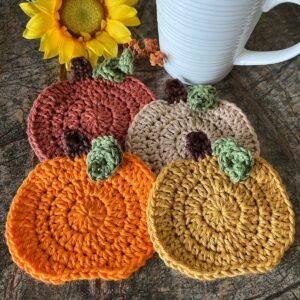
Starting a Crochet Pumpkin Coasters – Step by Step Tutorial is a wonderful way to combine seasonal décor with practical handmade crafts. Coasters are useful for protecting tables, but when shaped like pumpkins, they bring a cozy autumn charm to any home. This project is perfect for beginners who want to practice basic crochet stitches and for experienced crocheters who enjoy creating themed pieces that make beautiful gifts. By following this tutorial, you can learn how to crochet pumpkin-shaped coasters that are both functional and decorative.
One of the best aspects of making crochet pumpkin coasters is how versatile they are. They can be used during fall festivities, placed on the table for a Thanksgiving dinner, or even gifted to friends and family as a handmade surprise. With just a small amount of yarn and a bit of time, you can create a set of coasters that feel unique and personal. This tutorial will guide you step by step through the process so you feel confident, even if you are new to crochet. The simple design means that anyone can join in on this creative project.
This Crochet Pumpkin Coasters – Step by Step Tutorial will cover everything from the materials you need to the specific stitches and assembly required. Each step has been carefully explained to make sure you can follow along easily. By the end of the tutorial, you will not only have a complete set of coasters but also a stronger understanding of how to apply basic crochet techniques to themed projects. Now, let’s begin the journey into crafting these charming pumpkin coasters.
Materials Needed for Crochet Pumpkin Coasters
To begin this Crochet Pumpkin Coasters – Step by Step Tutorial, you’ll need to gather the right materials. Choosing the proper supplies ensures your final product will be both durable and visually appealing. For the yarn, orange cotton yarn is ideal for the pumpkin body, while green or brown yarn works best for the stem. Cotton is highly recommended because it absorbs moisture well and holds its shape better than acrylic when used as a coaster.
A crochet hook of the correct size is equally important. For most cotton yarns, a 4.0 mm to 5.0 mm crochet hook works perfectly. Using the right hook size ensures your stitches are tight enough for durability while still allowing the coaster to lay flat on the table. You will also need scissors and a yarn needle to help weave in loose ends when the project is complete.
Stitch markers can be very helpful, especially for beginners. Since these coasters are worked in rounds, a stitch marker will keep track of where each round begins and ends. This prevents confusion and ensures your pumpkin coaster stays symmetrical.
You may also want to prepare a small amount of stuffing if you prefer a more textured, slightly padded coaster. While this is optional, it can add extra charm to the design. However, keep in mind that a flat version works best if you want the coaster to remain practical for cups and mugs.
Blocking tools can be useful after you finish crocheting. Blocking allows you to shape your pumpkin coasters properly so they lie flat and even. This final step enhances the overall look and polish of your finished project.
With these materials ready, you’ll be well-prepared to follow this Crochet Pumpkin Coasters – Step by Step Tutorial without interruption. Having everything on hand makes the process smoother and more enjoyable.
Step by Step Instructions to Crochet Pumpkin Coasters
To start the Crochet Pumpkin Coasters – Step by Step Tutorial, create a slip knot and chain four. Join with a slip stitch to form a ring. This ring will serve as the base of your coaster. Into this ring, you’ll crochet double crochets to form the round pumpkin body. Usually, 12 double crochets in the first round will give you the correct shape to begin.
In the second round, you’ll increase the stitches to make the coaster larger. Typically, this means placing two double crochets into each stitch around, giving you 24 stitches by the end of the round. This step helps the coaster grow evenly while maintaining its circular pumpkin shape.
As you continue, add additional rounds by increasing gradually. For instance, in the third round, place one double crochet in the first stitch and two double crochets in the next stitch, repeating this pattern around. This ensures a smooth increase and keeps the coaster flat instead of curling up.
Once you reach the size you want, you can add texture to the pumpkin by alternating stitches. For example, switching between single crochet and half double crochet stitches around the coaster can create subtle ridges that mimic the natural grooves of a pumpkin. This is a creative touch that enhances the pumpkin-like appearance.
Next, use green or brown yarn to make the stem. Attach the yarn at the top of the coaster and chain four or five stitches, then slip stitch back into the base to create a simple stem. You can make it longer or shorter depending on your preference. For extra detail, you can add a small green leaf using a few chains and single crochet stitches.
Finally, weave in all the ends with a yarn needle and block your coaster if needed. Your pumpkin coaster should now be complete, flat, and ready to use. Following this Crochet Pumpkin Coasters – Step by Step Tutorial ensures a neat and charming result.
Tips and Tricks for Perfect Crochet Pumpkin Coasters
One important tip when following a Crochet Pumpkin Coasters – Step by Step Tutorial is to maintain consistent tension. Uneven tension can cause the coaster to curl or appear lopsided. Practicing a few rounds on scrap yarn before starting the real project can help improve consistency.
Another trick is to count your stitches carefully after each round. Skipping or adding a stitch accidentally can distort the shape of your coaster. Using a stitch marker is a simple but effective way to prevent mistakes and stay on track.
Experimenting with yarn colors is also a fun option. While orange is traditional for pumpkins, you can make white “ghost pumpkins” or even multicolored pumpkins for a whimsical look. This flexibility allows you to personalize your coasters to suit your home décor or seasonal theme.
If you prefer sturdier coasters, consider crocheting two pumpkin shapes and stitching them together. This creates a thicker coaster that is more absorbent and durable. It can also give a more professional finish to the final piece.
Blocking your coasters is highly recommended for a neat look. Even if your coaster appears flat after finishing, blocking ensures it maintains its shape over time. Simply dampen the coaster, pin it to shape, and allow it to dry naturally.
Finally, remember to enjoy the process. Crochet is not only about the finished item but also about the relaxation and creativity that comes with each stitch. This Crochet Pumpkin Coasters – Step by Step Tutorial is designed to be enjoyable and rewarding.
Creative Uses for Crochet Pumpkin Coasters
While the main purpose of this Crochet Pumpkin Coasters – Step by Step Tutorial is to create functional coasters, there are many creative ways to use them. For example, they can be placed under candles or small planters as decorative mats. Their charming pumpkin design makes them versatile for different settings.
You can also string several pumpkin coasters together to make a festive garland. This is a perfect decoration for fall parties or Thanksgiving gatherings. The garland can be hung across a fireplace, on a wall, or around a doorway for seasonal cheer.
Another creative idea is to gift sets of pumpkin coasters. Handmade gifts are always appreciated, and a set of crochet pumpkin coasters shows care and effort. You can package them with a ribbon and present them as thoughtful seasonal gifts.
For those who sell handmade crafts, these coasters are excellent for craft fairs or online shops. Their seasonal appeal makes them popular items during fall, and they are relatively quick to make compared to larger projects.
Children can also enjoy these coasters as playful seasonal decorations. Since they are soft and safe, they can be used in children’s spaces without worry. Adding fun colors or little embroidered faces can make them even more appealing.
Lastly, you can use the same tutorial to adapt other fruit or vegetable shapes. By changing yarn colors and adjusting stitch patterns, you can make coasters that resemble apples, watermelons, or other seasonal favorites. This extends the usefulness of the Crochet Pumpkin Coasters – Step by Step Tutorial far beyond pumpkins.
FAQ about Crochet Pumpkin Coasters
1. Are crochet pumpkin coasters beginner-friendly?
Yes, this Crochet Pumpkin Coasters – Step by Step Tutorial is beginner-friendly. The project uses simple stitches like chains, single crochet, and double crochet, which are easy to learn and practice.
2. What type of yarn is best for crochet coasters?
Cotton yarn is the best choice for coasters because it absorbs moisture well and keeps its shape. Acrylic yarn is less effective for functional coasters but can be used for decorative versions.
3. Can I make pumpkin coasters in different sizes?
Absolutely. To adjust the size, simply add or reduce the number of rounds. More rounds will make the coaster larger, while fewer rounds will create a smaller pumpkin.
4. How many coasters can I make with one skein of yarn?
Depending on the yarn weight and coaster size, one skein of cotton yarn can make around 6 to 8 pumpkin coasters. This makes it a cost-effective project.
5. Do I need to block crochet coasters?
Blocking is not mandatory but highly recommended. It helps shape the coasters evenly and ensures they lie flat, giving them a polished appearance.
6. Can children learn to crochet pumpkin coasters?
Yes, older children can easily follow this Crochet Pumpkin Coasters – Step by Step Tutorial with some guidance. It’s a fun and creative project that helps improve focus and fine motor skills.
Conclusion
The Crochet Pumpkin Coasters – Step by Step Tutorial is a delightful project that combines creativity, functionality, and seasonal charm.
By following the step-by-step instructions, you can make coasters that not only protect your furniture but also decorate your home with a cozy autumn feel. The process is simple enough for beginners yet enjoyable for experienced crocheters looking for quick seasonal projects.
Now that you know how to create these pumpkin-shaped coasters, it’s your turn to pick up your yarn and hook and bring them to life. Whether you use them at home, gift them to friends, or sell them, they are sure to bring joy and warmth wherever they go. I’d love to hear your opinion about this tutorial—please leave a sincere comment and share any suggestions for future projects!