
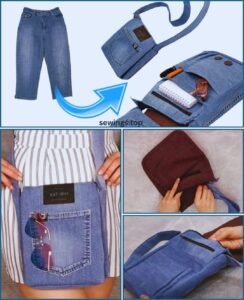
Learning how to sew a shoulder bag from old jeans – step by step tutorial is one of the most rewarding sewing projects you can try. Not only does it give you a stylish and functional accessory, but it also helps you recycle old clothing into something completely new. Denim is a durable fabric, making it the perfect choice for a sturdy shoulder bag that will last for years. This project is beginner-friendly and does not require expensive materials, which means you can create a beautiful bag without spending much money.
When you decide to sew a shoulder bag from old jeans, you are taking a sustainable approach to fashion. Instead of throwing away worn-out jeans, you can upcycle them into something creative and useful. The beauty of this project lies in its versatility—you can design a casual everyday bag, a trendy crossbody, or even a unique tote, depending on your personal style. With the right tools and a clear step by step tutorial, even beginners can achieve great results.
Another great reason to learn how to sew a bag from old jeans is personalization. Unlike store-bought bags, your handmade shoulder bag will have its own story and unique character. You can add embellishments, extra pockets, or even mix fabrics for a patchwork effect. In this article, we will explore a complete step by step tutorial on how to transform your old jeans into a shoulder bag, covering everything from preparation to finishing touches. By the end, you’ll not only have a new accessory but also the confidence to create more sewing projects in the future.
Preparing the Materials for Your Shoulder Bag
The first step in learning how to sew a shoulder bag from old jeans – step by step tutorial is gathering your materials. You will need an old pair of jeans that you no longer use. Look for jeans with sturdy fabric and minimal tears in the area you plan to cut. While faded areas can add character, you want to avoid weak spots that could affect the durability of your bag.
In addition to jeans, you will need basic sewing tools: scissors, sewing pins, measuring tape, and a sewing machine. If you prefer hand stitching, that is possible, but a sewing machine will make the process faster and the seams stronger. Using heavy-duty thread is recommended because denim is thicker than regular fabric and requires extra reinforcement.
Next, consider the lining for your bag. Adding a lining not only makes the interior look neat but also increases the strength of your bag. You can use cotton fabric, leftover material, or even another piece of old clothing. Choosing a fun pattern or contrasting color for the lining can give your bag a stylish interior that stands out.
You will also need straps for your shoulder bag. The easiest option is to cut strips from the same pair of jeans and sew them together. If you want extra comfort, you can use fabric belts or webbing straps. Make sure the length is suitable for your body, whether you want a shoulder-length or crossbody design.
Don’t forget about closures and embellishments. A zipper, magnetic snap, or even a simple button can help keep your belongings secure. Decorative patches, embroidery, or lace trims can also be added to give your bag a more personalized look. Collecting all your materials before starting ensures you won’t have to stop midway through the project.
Finally, prepare your workspace. Denim can shed small threads while being cut, so having a clean, flat surface makes the process easier. Keep your tools within reach and set up your sewing machine with the correct needle for denim. A well-prepared workspace will make your sewing experience smooth and enjoyable.
Cutting and Assembling the Bag Pieces
Once you have everything ready, the next part of the step by step tutorial is cutting your old jeans into usable pieces. Start by laying the jeans flat and identifying which sections you want to use. The legs are usually the best choice because they provide large, even panels of fabric. Cut along the seams to open the fabric and create flat pieces.
Measure and cut two rectangles of equal size for the front and back of your bag. The dimensions depend on how large you want the bag to be, but a common size is around 14 inches wide and 12 inches tall. Make sure both pieces are symmetrical, as this will affect the final shape of your shoulder bag.
For the sides and bottom of the bag, cut long strips from the remaining fabric. These will connect the front and back panels and give your bag depth. A width of about 4 inches works well for a medium-sized bag, but you can adjust depending on your preference. Don’t forget to cut lining pieces of the same size if you plan to add an interior lining.
Next, cut the straps. If you are using denim, cut long strips about 3 inches wide. Fold them lengthwise, stitch along the edges, and turn them inside out to create strong straps. If you want padded or wider straps, consider adding interfacing or extra layers of fabric. The key is to ensure the straps are comfortable and securely attached to the bag.
With all your pieces cut, it’s time to start assembling. Pin the side strips to the front panel, right sides together, and stitch along the edges. Repeat with the back panel until you form the basic bag shape. If you are using a lining, repeat the process separately with the lining fabric. Remember to leave an opening at the bottom of the lining to turn the bag right side out later.
At this stage, you can also add pockets. Cut smaller denim or fabric squares and stitch them onto the front or inside panels. Pockets are both practical and stylish, allowing you to organize your belongings easily. This step is optional, but it adds great functionality to your finished bag.
Sewing the Bag Together
Now comes the exciting part of the step by step tutorial: sewing everything together. Begin by placing the lining inside the denim bag, right sides facing each other. Align the top edges and pin them in place. Insert the straps between the lining and outer fabric, making sure they are positioned evenly on both sides. Pin the straps securely so they don’t shift while sewing.
Sew along the entire top edge of the bag, going through the denim, straps, and lining layers. Use a strong stitch, and if your sewing machine has a denim setting, select it for better results. Once the seam is complete, pull the bag right side out through the opening left in the lining. Sew the opening closed, and then push the lining neatly inside the bag.
Reinforce the straps by stitching an extra square or “X” shape where they connect to the bag. This ensures the straps can handle the weight of your belongings without tearing. Reinforcement is especially important if you plan to carry heavier items like books or electronics.
At this stage, you can add your closure. If you are installing a zipper, sew it along the top edge of the bag before attaching the lining. For magnetic snaps or buttons, stitch them into place carefully, making sure they align correctly. A closure not only adds security but also gives your bag a professional finish.
Once your bag is fully assembled, press the seams with an iron to give it a crisp look. Ironing also helps flatten the fabric and makes the stitching appear more polished. Be careful with high heat on denim, especially if your jeans had any stretch fabric.
Finally, test your bag by carrying a few items inside. Check the durability of the seams, the comfort of the straps, and the functionality of the closure. Making small adjustments at this point ensures your bag will be both stylish and practical.
Decorating and Personalizing Your Bag
The final stage of how to sew a shoulder bag from old jeans – step by step tutorial is adding decorations and personal touches. This is where you can truly make the bag your own. Denim provides a great canvas for creativity, so don’t be afraid to experiment with embellishments.
One popular option is adding embroidery. Simple floral designs, initials, or geometric shapes can be stitched onto the bag to give it a handmade touch. Embroidery floss in bright colors stands out beautifully against denim. If embroidery feels too advanced, you can also use iron-on patches or fabric paint for decoration.
Another way to personalize your bag is by using different fabrics for contrast. For example, adding a strip of colorful fabric along the top edge or sewing on patterned fabric pockets creates an eye-catching design. Patchwork techniques are also popular, combining different fabric scraps with denim to achieve a trendy, bohemian look.
You can also add decorative stitching. Using contrasting thread, sew visible lines along the seams or straps. This not only strengthens the bag but also gives it a stylish detail. If your sewing machine has decorative stitch settings, experiment with different patterns.
Accessories like tassels, beads, or buttons can also be sewn onto the bag for extra flair. These small details make your bag stand out and reflect your personal style. For a rustic or vintage look, consider adding lace trims or recycled jewelry pieces.
The best part of decorating your bag is that there are no strict rules. You can make it minimalistic or full of details depending on your taste. By the end of this step, your handmade denim shoulder bag will not only be functional but also a unique fashion statement.
FAQ About Sewing a Shoulder Bag from Old Jeans
1. Can I make a shoulder bag from jeans without a sewing machine?
Yes, it is possible to hand sew a denim bag, but it requires patience and strong stitches. A sewing machine is recommended for durability and faster results.
2. What type of jeans works best for this project?
Thick, sturdy jeans without too much stretch are ideal. Stretch denim can be harder to sew and may not hold the shape of the bag well.
3. Do I need to use a lining for the bag?
A lining is optional but highly recommended. It makes the bag stronger, neater, and more functional. Plus, it prevents small items from getting caught in denim seams.
4. Can I wash my denim shoulder bag?
Yes, you can wash it gently by hand or in a washing machine on a delicate cycle. Be sure to dry it flat to maintain its shape.
5. How long does it take to make a shoulder bag from old jeans?
For beginners, it may take 3 to 4 hours, depending on the complexity of the design. With experience, you can finish one in less than 2 hours.
6. What can I add to make my bag more functional?
Extra pockets, zippers, and adjustable straps can make your bag more practical for daily use. Personal touches like embellishments also add character.
Conclusion
In this article, you learned how to sew a shoulder bag from old jeans – step by step tutorial, from preparing materials and cutting denim to sewing and decorating your finished bag.
This project is perfect for anyone who loves DIY fashion, upcycling, and creating unique accessories. Not only is it eco-friendly, but it also allows you to design a one-of-a-kind shoulder bag that matches your personal style.
Now it’s your turn to try this project at home. Gather your old jeans, follow the steps, and enjoy the process of turning something old into something new. If you try this tutorial, leave your honest opinion and suggestions in the comments—I’d love to hear how your bag turned out and what creative touches you added.