
If you are looking for a beautiful and meaningful handmade project, learning crochet decoration for your home: Little house with a heart- Step by Step Tutorial is a wonderful idea. This type of crochet piece is not only charming but also perfect for adding a touch of warmth to your home décor. The little house with a heart design symbolizes love, comfort, and coziness, making it a lovely accent for any room or even a thoughtful handmade gift.
Crochet is one of the most versatile crafts, and when it comes to decoration, it allows you to create unique items that bring both style and sentiment into your space. The little house with a heart motif stands out because it represents a home filled with love, making it a heartfelt project to work on. With this tutorial, you will learn how to craft this decorative piece step by step, ensuring that even beginners can follow along with confidence.
Throughout this step by step tutorial, we will focus on choosing the right yarn, understanding the stitches, and assembling the final design in a way that fits perfectly into your home decoration. The goal is to provide you with an easy-to-follow guide while also inspiring creativity so you can add your personal touch. Whether you want to use it as a wall hanging, a keychain, or a framed art piece, the crochet decoration for your home: little house with a heart will surely make your space more welcoming.
Materials and Preparation for the Little House with a Heart
To begin the crochet decoration for your home: little house with a heart- Step by Step Tutorial, it’s important to gather the right materials. Having the proper supplies ensures that your project looks neat and professional while remaining enjoyable to make. The materials required for this project are usually easy to find and can even be customized according to your taste.
Start by selecting yarn. For decorative crochet, cotton yarn is often preferred because it provides a clean finish and holds its shape well. You may choose pastel shades for a delicate look or bright colors for a cheerful decoration. Pair the yarn with an appropriate hook size recommended on the yarn label to make sure your stitches are consistent.
In addition to yarn and hook, you will need scissors, a yarn needle for weaving in ends, and possibly a small piece of felt or fabric for the background if you plan to mount the decoration. Some crafters also like to add embellishments such as buttons, beads, or ribbons to make the house and heart design even more charming.
Once you have your materials ready, it’s a good idea to practice the basic stitches before beginning. Since this project involves simple shapes, most of it can be made with stitches like single crochet, half double crochet, and double crochet. Practicing these beforehand will make the process smoother and more enjoyable.
Preparation also includes deciding on the size of your project. You can make a small keychain version or a larger wall hanging, depending on your purpose. The flexibility of crochet allows you to scale the design up or down just by adjusting the yarn thickness and hook size.
Lastly, organize your workspace before starting. Keeping everything within reach will help you stay focused and prevent interruptions. A well-prepared work area makes the step by step tutorial more enjoyable and productive.
Step by Step Tutorial: Creating the Base of the House
Now that your materials are ready, let’s begin the step by step tutorial by creating the base of the little house. This will be the main part of your crochet decoration and will provide structure for the heart motif that comes later.
Start with a chain foundation according to the size you want your house to be. For a small version, you can begin with around 12 chains, while a larger version may require 20 or more. The chain will determine the width of your house.
Next, work single crochet stitches across each row to create a rectangle shape. Continue crocheting rows until the piece reaches the desired height. This rectangle will represent the walls of the house. Make sure your edges remain straight by counting your stitches in each row.
After completing the rectangle, it’s time to shape the roof. To do this, decrease stitches gradually at the beginning and end of each row to create a triangular top. This triangle will naturally form the roof of the house, giving the decoration its iconic look.
Once you have the rectangle and triangle combined, you will have a basic house shape. At this stage, it’s helpful to block the piece slightly to even out the stitches and give it a neat appearance. Blocking is optional, but it makes a big difference in decorative crochet projects.
You can now choose to outline the house shape with a border. A simple single crochet border around the edges makes the piece stronger and more defined. Alternatively, you can add a contrasting color border to make it stand out more as a decoration.
Adding the Heart to Your Crochet Decoration
With the house base complete, the next step in this step by step tutorial is adding the heart. The heart is the centerpiece of this design, symbolizing love and making the decoration truly special for your home.
To crochet a small heart, start with a magic ring. Inside the ring, work three double crochets, three half double crochets, one double crochet, three half double crochets, and three double crochets. Finally, chain one and slip stitch into the ring. Pull the ring tight to form a heart shape.
You can adjust the size of the heart by using thicker yarn or repeating some stitches. For a larger heart, simply increase the number of double crochets and half double crochets. This flexibility allows you to customize your project according to the space where you want to display it.
After making the heart, sew it onto the center of the house base using a yarn needle. Secure it well so that it stays in place even if the decoration is handled frequently. Try to position it symmetrically to give the house a balanced and polished appearance.
Some crafters prefer to make multiple small hearts and attach them like little windows on the house. This creative variation can add even more charm and uniqueness to your decoration. The important thing is to make sure the heart is visible and stands out as the symbol of love within the house.
Once the heart is attached, consider adding small decorative details such as embroidered doors, windows, or a chimney. These small touches personalize your piece and make it more meaningful. Remember that crochet is about creativity, and your home decoration should reflect your personal style.
Finishing Touches and Home Decoration Ideas
The final part of this crochet decoration for your home: little house with a heart- Step by Step Tutorial is all about finishing touches and creative display ideas. A well-finished project will not only look better but also last longer as part of your home décor.
First, weave in all loose ends carefully using a yarn needle. Hiding them neatly ensures that the back of your piece looks just as tidy as the front. This is especially important if you plan to hang or frame the decoration.
Next, block the entire piece lightly to give it shape and smoothness. Blocking helps the edges stay flat and gives the project a professional look. If you used cotton yarn, blocking will be particularly effective.
Now comes the fun part: deciding how to display your crochet decoration. You can attach a loop at the top of the roof to hang it on the wall or door. Another option is to sew it onto a fabric backing and place it inside a frame, creating a unique wall art piece.
For smaller versions, you can turn the little house with a heart into a keychain, a refrigerator magnet, or even a gift tag. These variations make the project versatile and suitable for many different occasions.
Adding embellishments like ribbons, lace, or beads can enhance the charm of your crochet house. However, remember to keep it balanced so the main design, especially the heart, remains the focus.
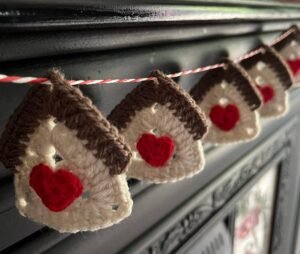
Lastly, consider making multiple houses in different colors and arranging them together as a decorative garland. This idea is perfect for adding a handmade touch to your living room, nursery, or even a festive celebration.
FAQ – Crochet Decoration for Your Home: Little House with a Heart
1. Is this project suitable for beginners?
Yes, this project is beginner-friendly. The stitches used are basic, and the design is simple. Even if you are new to crochet, you can follow the step by step tutorial with ease.
2. How long does it take to complete the crochet house with a heart?
On average, it takes about 2 to 3 hours, depending on your speed and the size of the project. Smaller versions can be finished in under an hour.
3. Can I use different yarn types for this project?
Absolutely. While cotton yarn is recommended for its neat finish, you can use acrylic or wool yarn if you prefer. Just make sure to adjust your hook size accordingly.
4. What are the best uses for this crochet decoration?
The little house with a heart can be used as wall décor, a keychain, a framed art piece, or even as part of a garland. It also makes a thoughtful handmade gift.
5. How can I make the project more unique?
You can experiment with colors, add embellishments, or modify the size of the house and heart. Adding embroidered details like doors or windows can also make it more personal.
6. Do I need to block the finished piece?
Blocking is optional but recommended. It helps the decoration hold its shape and gives it a polished, professional look.
Conclusion
In this article, we explored crochet decoration for your home: little house with a heart- Step by Step Tutorial, from materials and preparation to creating the house base, adding the heart, and finishing with creative decoration ideas.
This project is not only simple and enjoyable but also full of meaning, symbolizing love and comfort in the home.
Now it’s your turn to try this project and bring handmade warmth into your space. I hope this tutorial has inspired you to pick up your crochet hook and create something special. Don’t forget to share your sincere opinion about this tutorial and leave suggestions for future projects—I would love to hear your thoughts!