
A crochet lip balm holder- Step by Step Tutorial is one of the most practical and charming beginner-friendly projects you can create. Not only does it serve a functional purpose, but it also allows you to practice stitches, learn basic shaping, and enjoy the process of making something useful with your own hands. If you’ve ever lost your lip balm at the bottom of your bag, you’ll know how handy a crochet holder can be. This project ensures that your lip balm is always within reach, while also adding a personal, handmade touch to your accessories.
When following this crochet lip balm holder- Step by Step Tutorial, you’ll realize that it requires only small amounts of yarn, making it a great stash-busting project. Because of its simplicity, it’s perfect for beginners who want to try their hand at crochet without committing to a large or time-consuming piece. You can also use this project to experiment with different yarn textures and colors, creating unique holders that reflect your personal style or make thoughtful gifts for friends and family.
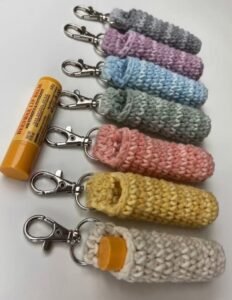
Beyond its practical use, the crochet lip balm holder- Step by Step Tutorial is a creative way to express yourself. You’ll learn how to crochet in the round, practice working with tension, and even add a little loop or clip so you can attach the holder to your keychain, backpack, or purse. It’s not just about creating a lip balm case; it’s about gaining confidence as you build your crochet skills. Now let’s explore in detail how to make this simple yet effective project.
Materials and Preparation for Your Lip Balm Holder
To start this crochet lip balm holder- Step by Step Tutorial, you will first need to gather the right materials. Choosing the right yarn is important, and cotton yarn is usually the best option because it is strong, durable, and holds its shape well. Acrylic yarn can also be used, but it may stretch over time. Selecting a yarn in bright or fun colors will make your holder even more appealing.
You will also need an appropriate crochet hook. For most lip balm holder projects, a 3.5mm to 4mm hook works perfectly, depending on the yarn weight. Beginners should use the hook size recommended on their yarn label, as it helps maintain proper tension. Having a good pair of scissors and a yarn needle for weaving in ends will also make the process easier.
Another key step before starting is to measure your lip balm. Since lip balms vary slightly in size, knowing the exact dimensions ensures your crochet holder fits snugly. This step will help you avoid making a holder that is too tight or too loose. Adjusting your foundation chain or round count is an easy fix if you know the size beforehand.
Markers can be helpful, especially for beginners who are working in the round. They allow you to keep track of your stitches and avoid mistakes that might distort the shape. Don’t worry if you don’t have official stitch markers—small pieces of contrasting yarn will do the job.
Organizing your workspace before you begin also makes the project more enjoyable. Place your yarn, hook, scissors, and lip balm within easy reach so you can work smoothly. A comfortable environment is always key to a relaxing crochet session.
Finally, remember that crochet is about practice and patience. Your first lip balm holder may not be perfect, but each attempt improves your technique. The crochet lip balm holder- Step by Step Tutorial is designed to help you progress with confidence.
Step by Step Instructions to Crochet the Lip Balm Holder
The first step in this crochet lip balm holder- Step by Step Tutorial is to create the foundation. Begin with a slip knot and chain enough stitches to wrap around the base of your lip balm. Typically, this is about 12 to 14 chains, but adjust according to your lip balm’s size. Join the chain with a slip stitch to form a circle.
Next, work single crochet stitches into each chain to create the base round. This will form the bottom of your holder. Make sure the stitches are tight enough so the balm doesn’t slip out, but not too tight that you can’t slide the balm inside. Maintaining consistent tension is key at this stage.
After completing the base, you will continue crocheting in rounds to build up the sides. Each round should consist of single crochet stitches all the way around. This creates a firm, structured tube that will hold the balm securely. Continue working in rounds until the piece is slightly taller than your lip balm tube.
Once you reach the desired height, it’s time to create the loop for attaching your holder. To do this, chain around 10 to 15 stitches, then join back to the rim of the holder with a slip stitch. This loop can be used to attach a key ring or carabiner, making your holder portable and practical.
If you’d like, you can add decorative touches at this point. Switching to a contrasting yarn color for the last round, adding surface stitches, or sewing on small embellishments can make your holder unique. Beginners may want to keep it simple, while more experienced crocheters can experiment with creative finishes.
Finish the holder by fastening off your yarn and weaving in the ends with a yarn needle. Slide your lip balm inside to check the fit. If it feels snug and secure, congratulations—you’ve successfully completed your crochet lip balm holder- Step by Step Tutorial.
Creative Variations of the Lip Balm Holder
The crochet lip balm holder- Step by Step Tutorial can be easily customized to fit different styles and needs. For instance, you can make holders with buttons or snaps to close the top. This adds an extra layer of security for your lip balm and can be a fun way to practice sewing buttons onto crochet.
Another variation is to make the holder in striped patterns by switching yarn colors every few rows. This creates a lively and playful look, and it’s also a great way to use up leftover yarn from other projects. Beginners can practice color changes, which is an important skill in crochet.
You could also try using textured stitches, like half double crochet or double crochet, instead of single crochet. These stitches will give the holder a different look and feel while allowing you to expand your crochet vocabulary. Each stitch variation brings a unique charm to the project.
If you enjoy working with accessories, consider attaching a small charm, tassel, or bead to the loop of your lip balm holder. This not only personalizes the item but also makes it easier to find inside a bag. Handmade touches like these add to the overall appeal of your project.
Some crocheters also like to adapt the pattern to fit larger items, like hand sanitizer bottles or essential oil rollers. By simply adjusting the foundation chain and working additional rounds, you can use the same concept for multiple practical purposes. This shows how versatile this tutorial can be.
Lastly, don’t be afraid to make themed holders for different seasons or events. For example, you could use red and green yarn for Christmas or pastel shades for spring. Creating seasonal designs keeps the project fresh and fun, making it a great idea for handmade gifts.
Benefits of Making Your Own Lip Balm Holder
One of the main benefits of following a crochet lip balm holder- Step by Step Tutorial is that it saves money. Instead of buying a case, you can create one with yarn you already have at home. Plus, handmade holders often last longer because they are crafted with care.
Another advantage is the eco-friendly aspect. By making your own holder, you reduce waste and avoid purchasing plastic alternatives. Crochet projects like this contribute to a more sustainable lifestyle, especially when using natural fibers.
Crochet also has therapeutic benefits. Many people find that working on small projects helps reduce stress, improves focus, and provides a sense of accomplishment. Finishing a lip balm holder in just a short time gives you a boost of confidence.
Personalization is another big plus. You can make each holder unique, choosing colors, textures, and details that reflect your personality. They also make thoughtful handmade gifts that show effort and creativity.
This project also helps beginners practice essential crochet techniques in a manageable way. Learning to crochet in the round, manage tension, and finish neatly are all valuable skills that will help you with larger projects in the future.
Finally, it’s simply fun. Crafting something practical and decorative at the same time brings joy. The crochet lip balm holder- Step by Step Tutorial is not just a guide; it’s an opportunity to enjoy creativity and share your handmade work with others.
FAQ – crochet lip balm holder- Step by Step Tutorial
1. Can beginners really make a crochet lip balm holder?
Yes, this tutorial is designed with beginners in mind. The steps are simple, and the stitches used are basic, making it a great first project.
2. What type of yarn works best for a lip balm holder?
Cotton yarn is ideal because it’s durable and holds its shape well. Acrylic can work too, but it may stretch more over time.
3. How long does it take to make one?
Most crocheters can complete a lip balm holder in under an hour. Beginners may take a little longer, but it’s still a quick project.
4. Can I make the holder bigger or smaller?
Yes, you can adjust the foundation chain and number of rounds to fit different lip balm sizes or even other small items.
5. How do I attach the holder to my bag or keys?
Simply add a loop during the final round and connect it to a key ring, carabiner, or clip. This makes it easy to carry.
6. Is it possible to wash the holder?
Yes, since cotton yarn is commonly used, you can hand wash your holder with mild soap and let it air dry.
Conclusion
In this article, we explored a complete crochet lip balm holder- Step by Step Tutorial that is perfect for beginners and fun for experienced crocheters alike. From gathering materials and making the base to adding creative variations and enjoying the many benefits, this project offers both functionality and creativity.
Now that you know how to make your own crochet lip balm holder, it’s time to try it yourself.
Remember, your first attempt doesn’t need to be perfect—what matters is learning and enjoying the process. Share your experience, leave a sincere opinion about this tutorial, and suggest what kind of crochet guides you’d love to see next.