
If you love practical crochet projects, creating a crochet bag for car visor – step by step tutorial is the perfect way to combine creativity with functionality. This small and handy accessory is not only stylish but also keeps your car organized while adding a personal handmade touch. A crochet bag designed for your car visor is an excellent way to store essential items like sunglasses, pens, tissues, or small notes, ensuring that everything you need is easily accessible while driving.
The beauty of this project lies in its simplicity. Even if you are a beginner in crochet, following a clear step by step tutorial will make it easy to complete. Unlike large projects such as blankets or sweaters, a crochet bag for car visor requires less time and yarn, making it a quick win that delivers both usefulness and satisfaction. At the same time, more advanced crocheters can customize their design with colors, stitches, or even embellishments to match the car interior.
From an organizational perspective, a crochet bag for car visor is much more than a decoration. It prevents clutter inside the vehicle and offers a designated spot for small essentials. Additionally, since this is a handmade project, it makes an excellent gift idea for friends and family who spend a lot of time driving. In this article, you will find a complete step by step tutorial with explanations that will guide you through the process.
Materials Needed to Make a Crochet Bag for Car Visor
To start this project, the first step is to gather the correct materials. The most important supply is yarn. Choosing a sturdy yarn such as cotton is highly recommended, as it ensures durability and easy maintenance. Cotton yarn resists wear and tear and is also simple to wash if it gets dirty inside the car. Beginners can start with medium-weight yarn, while more experienced crocheters may experiment with texture.
Another essential item is the crochet hook. The hook size should match the thickness of the yarn you choose. For most medium-weight cotton yarns, a 4mm or 5mm hook works well. Using the correct hook size guarantees that your stitches remain tight and firm, preventing the bag from stretching too much with use. Always check the yarn label for recommendations.
In addition to yarn and hook, you will need a pair of scissors and a tapestry needle. The scissors will be used to cut the yarn neatly at the end of your project, while the tapestry needle helps you weave in the loose ends securely. Keeping everything tidy is important so that the final bag looks professional and well-made.
For fastening the crochet bag to your car visor, you can use elastic straps or Velcro bands. Elastic allows the bag to stretch easily around the visor, while Velcro gives you the option to remove and reattach it whenever you like. Both options are effective, and you can choose the one that suits your needs best.
Some crafters enjoy adding buttons or zippers to their bags for extra security. While these are optional, they can enhance the functionality of your bag by preventing items from slipping out. Decorative buttons or wooden beads can also be included for style, turning a simple visor bag into a unique accessory.
Finally, consider a stitch marker if you are still learning. Markers help you keep track of the beginning and end of rows, especially when working in rounds. With all your materials ready, you will be fully prepared to begin the step by step tutorial for your crochet bag for car visor.
Step by Step Tutorial: Starting the Crochet Bag
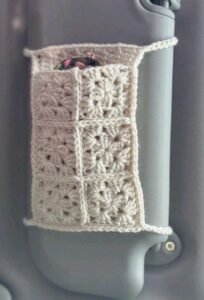
The first step in making a crochet bag for car visor is to create the base. Begin with a foundation chain that matches the width of the visor. Most car visors measure around 10 to 12 inches wide, so your starting chain should reflect this length. Once you have the chain, work single crochet stitches across to build a sturdy base. This will form the bottom edge of your bag.
After completing the base, continue working rows in single crochet or half-double crochet stitches to build height. These stitches are dense, ensuring that the bag will hold items without stretching too much. The number of rows you need depends on how deep you want your bag to be, but generally 15 to 20 rows will give enough space for storing small accessories.
Once the body of the bag is completed, you can move on to making the flap or front pocket, if you want one. To add a pocket, simply crochet a smaller rectangle separately and sew it onto the front of the bag. This is a perfect place to store pens or small notes, keeping them separate from larger items inside the bag.
The next step is creating the straps that will hold the bag to the visor. Crochet two long strips using single crochet stitches, making sure they are strong enough to support the weight of items. If you prefer Velcro, sew small Velcro patches onto the straps for easy fastening. The straps should be evenly spaced to prevent the bag from tilting when attached.
Once all the parts are ready, use your tapestry needle to sew them together securely. Attach the straps to the top corners of the bag and reinforce them with extra stitches to ensure durability. At this stage, your crochet bag for car visor should already resemble its final form.
Before finishing, try attaching the bag to your car visor to check the size and fit. If adjustments are needed, you can easily add or remove rows before completing the project. This flexibility is one of the great advantages of handmade crochet work.
Customizing Your Crochet Bag for Car Visor
One of the most enjoyable aspects of making a crochet bag for car visor is customizing it according to your style and needs. You can start by selecting yarn colors that match your car interior. Neutral colors like black, gray, or beige blend seamlessly, while bright shades like red or turquoise add a pop of personality.
Experimenting with stitches is another way to personalize your bag. While single crochet stitches are simple and practical, adding a row of shell stitches or puff stitches can give the bag a decorative touch. Even a simple border in a contrasting color can make a big difference in the final look.
If you want to make your crochet bag even more functional, consider dividing the inside into compartments. This can be done by crocheting small panels and attaching them vertically inside the bag. With compartments, you can keep items organized and avoid them mixing together.
Adding decorative buttons, appliqués, or embroidery can also give your visor bag a unique style. For example, you could crochet a small flower or star and sew it onto the front, turning a simple bag into a charming accessory. Personal touches like these make the project more rewarding.
Practicality should always remain a priority. If you plan to use the bag to store heavier items, reinforce the straps with extra stitches or even a second layer of yarn. This prevents stretching and ensures that your bag remains reliable over time.
Lastly, think about who might enjoy such a gift. A crochet bag for car visor makes a thoughtful handmade present for family members, especially those who travel often. You can customize the design for each recipient, making it both practical and personal.
Tips for Beginners and Advanced Crocheters
If you are a beginner, the most important tip is to take your time. The crochet bag for car visor – step by step tutorial is simple, but practicing basic stitches such as single crochet, slip stitch, and half double crochet will make the process much smoother. Do not worry about perfection; consistency comes with practice.
Beginners should also remember to count their stitches carefully. Keeping track of the number of stitches in each row prevents uneven sides and ensures a neat rectangular shape. Using stitch markers at the ends of rows is a helpful habit.
For advanced crocheters, this project can be a fun way to experiment with textures. Combining stitches, such as alternating rows of single crochet and double crochet, creates an interesting pattern. You can also explore tapestry crochet to add designs or even initials to the bag.
Blocking is another useful step, especially for advanced crafters who want a perfectly shaped piece. Wet blocking your crochet bag before final assembly helps even out stitches and gives the project a professional finish.
Whether you are a beginner or advanced, one essential tip is to choose durable yarn. Since the bag will be exposed to sunlight and frequent use, strong materials like cotton are preferable to prevent fading or stretching.
Finally, enjoy the creative process. Handmade projects are not only about the finished item but also about the joy of crafting. Take pride in each step of the tutorial, knowing that you are creating something both beautiful and functional.
FAQ – Crochet Bag for Car Visor
1. How long does it take to make a crochet bag for car visor?
The time depends on your crochet speed and experience, but on average, it can be completed in 3 to 5 hours. Beginners may take longer, while advanced crafters may finish in less time.
2. What type of yarn is best for a crochet bag for car visor?
Cotton yarn is the best choice because it is durable, easy to clean, and holds its shape well. Avoid very stretchy yarns like acrylic blends, as they may not provide the needed structure.
3. Can I wash my crochet bag for car visor?
Yes, if you use cotton yarn, the bag can be hand-washed or machine-washed on a gentle cycle. It is recommended to air dry it to preserve its shape.
4. Do I need advanced crochet skills for this project?
No, this project is suitable for beginners. The stitches used are simple, and following the step by step tutorial makes it accessible even for those new to crochet.
5. How can I attach the crochet bag to my car visor?
You can use crocheted straps with Velcro or elastic bands. Both options are easy to secure and allow you to adjust or remove the bag as needed.
6. Can I customize the size of the bag?
Yes, the size is completely adjustable. By increasing or decreasing the foundation chain and rows, you can make the bag wider or deeper depending on your storage needs.
Conclusion
Making a crochet bag for car visor – step by step tutorial is a rewarding and practical project for crochet lovers of all skill levels. It combines functionality with creativity, resulting in a handmade accessory that keeps your car tidy while reflecting your style. With just yarn, a hook, and a few simple techniques, you can craft a unique piece that is both useful and beautiful.
Now that you have learned the full process, from gathering materials to customizing and finishing, you are ready to start your own.
I would love to hear your thoughts! Please leave a sincere opinion and share your suggestions so we can continue improving and exploring creative crochet projects together.