
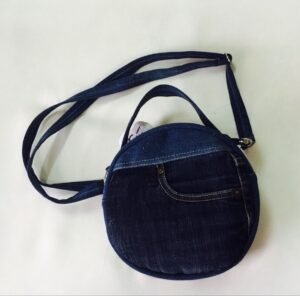
A round bag made from old jeans – step by step tutorial is not only a creative project but also a sustainable way to reuse materials that would otherwise go to waste. Denim is durable, stylish, and versatile, making it an excellent fabric choice for handmade bags. With just a few simple supplies, you can transform a pair of worn-out jeans into a fashionable accessory that is both functional and eco-friendly. This guide will walk you through the process of making a round bag from start to finish.
The idea of creating a round bag made from old jeans is perfect for those who enjoy DIY crafts, sewing, or upcycling old clothes. Instead of throwing away jeans that no longer fit or are damaged, you can give them a new life by turning them into a unique and personalized bag. This not only helps reduce textile waste but also allows you to showcase your creativity and personal style. Every bag you make can be slightly different, depending on the wash and texture of the denim used.
Following a step by step tutorial ensures that even beginners can complete this project successfully. By breaking down the process into clear instructions, you’ll learn how to cut, assemble, and stitch your bag with confidence. Whether you want a casual everyday bag or a statement piece to complement your outfit, this project offers endless possibilities. Let’s dive into the details of how to create your own round bag from old jeans.
Materials and Preparation
The first step in making a round bag made from old jeans – step by step tutorial is gathering the necessary materials. You will need an old pair of jeans, scissors, sewing thread, a needle or sewing machine, a zipper, lining fabric, and some pins. Choosing sturdy jeans ensures your bag will last longer and hold its shape well. Lighter denim can also work, but thicker fabric provides a more professional finish.
Cutting the fabric correctly is crucial for this project. Begin by cutting two perfect circles from the jeans, making sure both pieces are the same size. These will serve as the front and back of your round bag. Using a plate or large bowl as a template helps you achieve consistent, smooth edges. In addition, cut a long strip of denim that will form the side panel of your bag, connecting the two circles together.
Preparing the lining is equally important. Cut the same circle and strip shapes from your chosen lining fabric. The lining not only gives your bag a neat interior finish but also adds durability. It prevents the raw edges of the denim from fraying and provides extra support for carrying heavier items. At this stage, you should also measure and cut your zipper to match the side strip.
Before sewing, it’s a good idea to pin all the pieces together and check the shape of your bag. This step allows you to make adjustments and ensures everything aligns correctly. Many beginners skip this stage, but it helps avoid mistakes later on. Take your time in preparation—it will make the sewing process much smoother.
Finally, ensure you have strong thread in a matching or contrasting color, depending on the look you want. A bold thread can add a decorative touch, while a matching thread creates a cleaner, subtle finish. With all your materials ready, you can now begin assembling your round bag made from old jeans with confidence.
Sewing the Base and Sides
Now that your materials are ready, the next step in this round bag made from old jeans – step by step tutorial is sewing the base circles and side strip together. Start by attaching the zipper to the side strip of denim. Place the zipper face down along the edge of the strip and sew carefully. This step requires patience, but it is essential for creating a professional-looking bag.
Once the zipper is secured, fold the side strip in half to form a continuous loop. This loop will connect the two circles of denim that form the front and back of the bag. Make sure the zipper is placed at the top center for easy access when the bag is finished. This also ensures your bag hangs naturally when carried.
Attach the side strip to one of the denim circles, right sides facing each other. Pin the pieces together before sewing to keep them aligned. Sew slowly around the circle, curving the strip as you go. If you’re new to sewing curves, go gradually, lifting the presser foot when needed to adjust the fabric.
Repeat the process with the second denim circle, connecting it to the other side of the strip. Once sewn, your project will resemble a complete bag shape. At this stage, check that the zipper opens and closes smoothly without catching on the fabric. A well-placed zipper is key to functionality.
Don’t forget to repeat these steps with the lining fabric. Assemble the lining in the same way, but without the zipper. Once complete, insert the lining inside the denim shell with the wrong sides facing each other. This gives your bag a polished, finished look inside and out.
Now that the body of your bag is complete, you can press the seams gently with an iron to smooth out wrinkles. A neatly sewn base and sides make a big difference in the final appearance of your round bag made from old jeans.
Adding Straps and Details
The next part of this step by step tutorial is creating straps for your round bag. You can either cut long strips of denim from the leftover jeans or use a pre-made strap such as a belt, rope, or leather handle. Denim straps create a coordinated look, while other materials add contrast and style.
To make denim straps, cut two long strips and fold each strip in half lengthwise. Sew along the open edge to create strong, durable straps. For extra sturdiness, you can insert interfacing or a piece of fabric inside before stitching. This will ensure the straps hold up well when carrying heavier items.
Decide on the strap length based on how you want to wear your bag. Short straps work well for handheld bags, while longer ones are perfect for crossbody or shoulder bags. Once you decide, pin the straps securely to the top edges of your bag, making sure they are even on both sides.
Sew the straps firmly in place with a box stitch or several reinforcing stitches. Since straps bear the most weight, they need to be extra strong. A weak stitch here could cause the bag to tear over time. Take care to double-sew this section for durability.
You can also add decorative details at this stage. Pockets, patches, embroidery, or buttons can make your bag unique. Many crafters love adding a small pocket made from the jeans’ original back pocket for extra style and functionality. It’s a clever way to reuse every part of the fabric.
Finishing touches such as topstitching around the edges or attaching a decorative charm can elevate the overall design. These little details make your round bag made from old jeans feel truly custom-made and stylish.
Final Adjustments and Care
At this stage of the round bag made from old jeans – step by step tutorial, you should inspect your work and make final adjustments. Check the seams carefully for any gaps or loose threads. Reinforce any weak spots by sewing over them again. A strong finish ensures your bag will last for many years.
Turn your bag right side out and test its functionality. Open and close the zipper multiple times, carry it by the straps, and even place a few items inside. This test run helps identify if anything needs fixing before the bag is officially complete.
If you want a more structured bag, you can insert interfacing or cardboard between the denim and lining. This keeps the round shape firm and prevents the bag from collapsing when empty. It’s optional but highly recommended for a polished result.
Caring for your denim bag is also important. Since it’s made from old jeans, it can usually be spot-cleaned with a damp cloth. If deeper cleaning is needed, hand washing is safer than machine washing to avoid damaging the zipper or straps. Always air dry your bag to maintain its shape.
Over time, denim develops a natural worn look that adds to its charm. Don’t be afraid of small fades or frays—they give your bag character and uniqueness. Unlike store-bought bags, a handmade denim bag carries a personal story and special value.
With your final adjustments complete, you now have a fully functional and stylish round bag made from old jeans that you can proudly use or gift to someone special.
FAQ about Round Bag Made from Old Jeans
1. Can I make a round bag without a sewing machine?
Yes, it’s possible to make a round bag by hand stitching, though it will take more time. Using strong thread and small stitches will help keep the bag durable.
2. What size should the bag circles be?
The size is flexible, depending on your preference. Many people use a dinner plate or large bowl as a guide, but you can adjust it for smaller or larger bags.
3. Do I have to use denim, or can I try other fabrics?
While this tutorial focuses on old jeans, you can use canvas, corduroy, or other sturdy fabrics. However, denim is recommended for its durability and style.
4. Can I add more pockets inside or outside the bag?
Absolutely. Adding extra pockets is a great way to personalize your bag and make it more functional. You can reuse the jeans’ original pockets or sew new ones.
5. How do I keep the bag looking neat over time?
Spot cleaning, gentle hand washing, and avoiding overloading the bag will help maintain its look. Denim naturally becomes softer and more stylish with age.
6. Is this project beginner-friendly?
Yes, this step by step tutorial is suitable for beginners. As long as you follow the instructions carefully and take your time, you’ll be able to complete the bag successfully.
Conclusion
Creating a round bag made from old jeans – step by step tutorial is a rewarding project that combines sustainability, creativity, and practicality.
You’ve learned how to prepare materials, sew the base and sides, add straps and details, and make final adjustments for a polished finish. This eco-friendly craft not only saves money but also helps reduce textile waste.
I hope this tutorial has inspired you to try making your own denim bag. Each bag carries a personal touch and story, making it unique. If you enjoyed this guide, please leave your honest opinion and share your suggestions—I’d love to hear your feedback and see how your projects turn out!