
The Crochet Slipper Keychain – Step by Step Tutorial is a delightful project for crochet lovers who enjoy creating small, functional, and adorable accessories. This miniature slipper keychain combines charm and practicality, making it a perfect handmade gift or a fun addition to your own keyring. Working on this pattern not only strengthens basic crochet skills but also provides an opportunity to craft something creative and useful. From beginners to experienced crocheters, this project offers joy, simplicity, and a rewarding result.
Learning how to make a crochet slipper keychain is also a great way to use leftover yarns and experiment with different color combinations. These keychains can be customized with bright shades, pastel tones, or even traditional hues to reflect your personal taste. Since they require only a small amount of yarn, they are eco-friendly and budget-friendly, making them ideal for crafters who love to make sustainable choices. Each finished keychain carries a unique handmade charm that factory-made items cannot replicate.
With this step by step tutorial, you will understand the process in a simple, organized, and clear manner. The project is suitable even if you are new to crochet, as it doesn’t demand advanced stitches. Instead, it emphasizes fundamental techniques like chains, single crochets, and slip stitches. The following sections will guide you from choosing the right materials to shaping and assembling your little crochet slipper. By the end, you’ll have a delightful keychain ready to gift, sell, or keep for yourself.
Materials Needed for Crochet Slipper Keychain – Step by Step Tutorial
To begin this Crochet Slipper Keychain – Step by Step Tutorial, gather a few simple supplies. The materials are easy to find, and chances are, if you already crochet, you may have them at home. You will need yarn, a crochet hook, scissors, a keyring, and a yarn needle. The choice of yarn weight and texture can make a big difference in the final look of the slipper.
Select a soft, lightweight yarn for the best results. Cotton yarn is a favorite because it gives structure and durability to small projects. Acrylic yarn also works well, especially if you want a slipper that is vibrant and long-lasting. Remember, since this project requires only a little yarn, it’s a great way to use scraps. Mixing colors for the sole and body of the slipper adds charm.
The crochet hook size should match your yarn choice. For most lightweight yarns, a 2.5 mm to 3.5 mm hook is suitable. Using the right hook ensures your stitches are neat and the slipper holds its shape. If the stitches are too loose, the slipper may look floppy; too tight, and it may be difficult to work with. Always test a small swatch before starting.
Don’t forget about the keyring attachment. You can use a standard split ring or a lobster clasp keychain. The size depends on how you plan to use it—whether to attach it to keys, bags, or pouches. Make sure it’s sturdy enough to hold up to daily use.
A yarn needle is needed for weaving in ends and attaching the slipper securely to the keyring. This step is essential for giving your project a polished, professional finish. Scissors, of course, will help you trim excess yarn neatly. With these few materials ready, you can start creating your tiny slipper.
Lastly, remember to have patience and enjoy the process. Crochet is not just about the final product—it’s about the relaxation and creativity that comes with each stitch. Keeping your tools organized and your yarn untangled makes the project even more enjoyable.
Step by Step Instructions for Crochet Slipper Keychain
The heart of the Crochet Slipper Keychain – Step by Step Tutorial lies in the instructions. The process is simple yet detailed enough to give your project a neat look. We will begin with the sole of the slipper and then build the upper part. Each step uses beginner-friendly stitches.
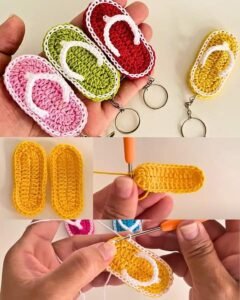
Start by making a chain of about 8 to 10 stitches. This will form the base of your slipper’s sole. Depending on the desired slipper size, you can adjust the number of chains. Once you have the chain, work single crochets along one side, add increases at the ends, and continue on the opposite side to form an oval shape.
The second round should expand on this oval, adding stitches at the curve to keep the sole flat. Usually, two single crochets in each corner stitch will help shape it properly. Work evenly around the sole until it reaches the desired length. This forms the foundation of your slipper.
Now it’s time to work the body of the slipper. Attach yarn to one side and crochet rows back and forth across half of the sole. This creates the toe portion. You can use single crochet or half double crochet depending on how dense you want the fabric to be. Keep working until you cover about one-third of the sole length.
To give the slipper its characteristic shape, decrease stitches gradually toward the toe. This makes it look rounded. Once the top part is complete, fasten off the yarn and weave in the ends with a needle. At this point, your slipper should resemble a miniature shoe.
Finally, attach the slipper to a keyring. Use a strong yarn tail or a small chain stitch loop to connect it. Weave securely to ensure durability. Now, your crochet slipper keychain is ready to use or gift. Each slipper may vary slightly, and that uniqueness makes handmade crafts even more special.
Creative Variations for Crochet Slipper Keychain
While this Crochet Slipper Keychain – Step by Step Tutorial gives you the basic method, there are countless ways to personalize the design. Creativity is what transforms a simple slipper into a one-of-a-kind accessory. Playing with colors, textures, and embellishments allows you to add your own touch.
One fun variation is to make striped slippers. Simply alternate yarn colors every two or three rows. This adds a cheerful and playful effect to your mini slippers. Pastel stripes look soft and sweet, while bold colors make a vibrant statement.
You can also add small embellishments such as bows, buttons, or beads. A tiny ribbon bow on the front makes the slipper look elegant. Cute buttons shaped like flowers or stars add charm. If you enjoy beadwork, sewing a few beads onto the upper part makes the keychain sparkle.
Another idea is to use textured stitches. Instead of plain single crochets, try puff stitches or bobble stitches. This gives the slipper a cozy, fluffy look. Texture adds depth and makes your miniature slipper stand out from ordinary crochet keychains.
Don’t be afraid to experiment with yarn types. Using sparkly yarn, velvet yarn, or even gradient yarn creates unique effects. Each yarn brings a different personality to the slipper, from soft and cozy to shiny and glamorous.
You could also create themed slippers. For example, make Christmas slippers in red and green, or Valentine’s slippers in pink and red with heart buttons. Themed keychains are especially fun as seasonal gifts.
Lastly, making a set of slippers in different colors is a great idea for selling or gifting. A small collection of these keychains presented in a box looks professional and thoughtful. They are lightweight, inexpensive, and perfect for craft fairs or handmade shops.
Benefits of Making a Crochet Slipper Keychain
Working on a Crochet Slipper Keychain – Step by Step Tutorial offers more than just a finished item—it provides a range of personal and practical benefits. Crochet is known for its relaxing and therapeutic effects, and creating small projects like this enhances those feelings.
One benefit is skill-building. This keychain may be small, but it uses essential crochet techniques. Beginners can practice chains, single crochets, and shaping, while experienced crocheters can refine their stitch consistency. It’s a simple way to improve without committing to a large project.
Another advantage is sustainability. By using leftover yarn scraps, you reduce waste and create something useful. Small projects like these make excellent eco-friendly crafts. They give a new purpose to yarn that might otherwise be discarded.
The keychains also make thoughtful handmade gifts. Because they are quick to create, you can make several in a short time. Gifting something handmade shows care and effort, which many people appreciate more than store-bought items.
From a practical perspective, keychains are items people use daily. Attaching a tiny crochet slipper makes keys easier to find and adds a personal touch to everyday life. It’s both functional and decorative.
For those interested in selling handmade crafts, slipper keychains are profitable. They require minimal materials, are easy to make in bulk, and appeal to a wide audience. Their small size makes them affordable yet charming items for markets.
Lastly, crocheting such items provides joy and stress relief. Many people find crochet meditative. Working on a small, quick project like this gives a sense of accomplishment, which is especially encouraging for beginners.
FAQ About Crochet Slipper Keychain – Step by Step Tutorial
What size yarn is best for a crochet slipper keychain?
Lightweight cotton or acrylic yarn works best, as it keeps the slipper sturdy while maintaining flexibility.
Can I make the slipper bigger or smaller?
Yes, simply adjust the starting chain length and the number of rounds in the sole to customize the size.
Is this project suitable for beginners?
Absolutely! The stitches used are basic, making this tutorial beginner-friendly.
How long does it take to make one keychain?
On average, it takes about 30 to 45 minutes to complete a slipper, depending on your speed and experience.
Do I need special tools for attaching the keyring?
No, a simple yarn needle and strong thread are enough to attach the slipper to the keyring securely.
Can I wash the crochet slipper keychain?
Yes, but hand washing is recommended to preserve its shape and details.
Conclusion
The Crochet Slipper Keychain – Step by Step Tutorial is a fun, practical, and creative project that allows you to practice crochet techniques while crafting something charming. From gathering materials to finishing touches, this guide has shown you how simple it is to create your own unique slipper keychain.
Whether you’re making it for yourself, as a gift, or for sale, this project highlights the beauty of handmade crafts. You now know how to shape the sole, build the body, personalize it with variations, and appreciate the benefits of crocheting these tiny accessories.
I hope this tutorial inspires you to start your own crochet slipper keychain project. Don’t forget to leave your sincere opinion and share suggestions—I’d love to know how your slippers turned out and what creative ideas you added to make them truly your own.