
If you love creative quilting projects that bring warmth, charm, and personality to your home, then this Chicken Quilt Tutorial: A Whimsical Farm-Inspired Quilt Pattern – Step by Step Tutorial is the perfect guide for you. This tutorial combines the cozy art of quilting with playful farm-inspired designs, turning fabric into a story that feels nostalgic yet modern. The cheerful chicken motifs not only make the quilt visually appealing but also bring a unique handmade touch that fits any country-style or farmhouse-themed decor. From beginners to advanced quilters, anyone can follow this step-by-step process to create a quilt that will surely become a treasured heirloom.
Making a quilt is more than just sewing fabric together; it’s about piecing memories, traditions, and artistry. The Chicken Quilt Tutorial shows how to blend color, texture, and imagination to craft a quilt that’s both functional and decorative. Inspired by whimsical farm life, this quilt design captures the playful spirit of chickens while allowing quilters to experiment with fabric scraps, bold prints, and contrasting tones. Whether you want to display it as a wall hanging, use it as a cozy blanket, or gift it to someone who loves country charm, this tutorial gives you everything you need.
Another wonderful aspect of this farm-inspired quilt pattern is its versatility. You can customize the chicken blocks with bright yellows, reds, whites, and browns, or even experiment with patterned fabrics to give each chicken a quirky personality. This step-by-step tutorial will walk you through fabric preparation, cutting techniques, block assembly, and finishing touches so you can confidently complete your project. Quilting doesn’t have to feel overwhelming—when broken into clear steps, it becomes an enjoyable process filled with creativity and joy.
Gathering Materials for the Chicken Quilt
The first step in this Chicken Quilt Tutorial: A Whimsical Farm-Inspired Quilt Pattern – Step by Step Tutorial is to gather all the materials you’ll need. Proper preparation ensures that your quilting process goes smoothly and helps you avoid mistakes later. For this quilt, you’ll need fabrics in different colors and patterns, batting for softness, backing fabric, a rotary cutter, quilting ruler, cutting mat, and of course, your sewing machine. Don’t forget basic sewing tools like thread, needles, and pins.
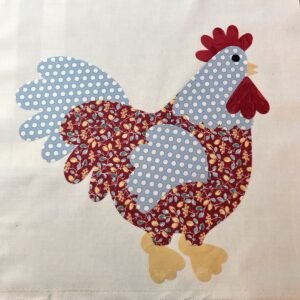
Choosing fabrics is one of the most enjoyable parts of quilting. Since this quilt is inspired by chickens, opt for warm earthy tones, farm-inspired prints, or even playful polka dots and florals to add charm. Quilting cotton is recommended because it’s durable, easy to sew, and widely available. When selecting fabrics for the chicken blocks, consider choosing contrasting colors for the chicken body, wings, and comb so that each feature stands out clearly.
Next, prewash your fabrics to prevent shrinking later. Ironing them flat before cutting ensures that your measurements remain precise. Accuracy is crucial in quilting because even small mistakes in cutting can affect the entire pattern. Prepare your rotary cutter and ruler to achieve clean, straight lines. Using a cutting mat will protect your surfaces while helping you measure accurately.
You’ll also need batting, which provides the quilt’s softness and thickness. For this whimsical farm-inspired quilt, medium-weight cotton batting works beautifully. The backing fabric should complement the chicken blocks, either with a simple solid color or a playful farm-themed print that ties everything together.
Thread is another important choice. Neutral tones such as cream, beige, or gray are versatile, but don’t be afraid to choose bold colors if you want the stitching to stand out as part of the design. Good-quality thread ensures durability and a smoother sewing experience.
Finally, have your tools organized and ready before you begin. Keeping scissors, pins, seam rippers, and fabric markers within reach will make the process less stressful. With everything gathered, you’re ready to start cutting and piecing together your quilt blocks.
Cutting and Preparing the Fabric
Once your materials are ready, the next step in this Chicken Quilt Tutorial: A Whimsical Farm-Inspired Quilt Pattern – Step by Step Tutorial is cutting your fabric pieces. Precision is key here because it ensures that your quilt blocks align correctly and your chickens look neat and well-shaped. Start by measuring and cutting squares and rectangles for the chicken bodies, wings, combs, and background sections.
It’s best to cut all your pieces at once so you can focus on sewing without interruptions later. Use your quilting ruler and rotary cutter for clean edges. Always double-check your measurements before cutting because a small error can affect the symmetry of the block. Labeling your fabric pieces can also be helpful, especially if you’re working with multiple colors and prints.
For the chicken’s body, larger rectangles or squares work best, while smaller triangles or rectangles can be used for the wings, tail feathers, and comb. You can create variations by slightly altering the size or shape of the wings to give each chicken block its own personality. This adds to the whimsical charm of the quilt.
Background pieces are just as important because they frame the chickens and help them stand out. Choose lighter shades or simple prints that contrast with the chicken fabrics. This balance allows the chicken motifs to become the focal point of the quilt.
Iron each piece before sewing to ensure smooth seams. Crisp fabric is much easier to work with, and pressing your pieces during the cutting stage sets the foundation for accurate assembly. Many quilters also recommend starching fabrics for extra stability, especially when working with small pieces.
At this stage, you should have all the components ready for your quilt blocks. Having everything cut and prepared in advance makes the sewing process more enjoyable and less stressful. Now it’s time to bring your chicken blocks to life by piecing them together.
Assembling the Chicken Quilt Blocks
In this step of the Chicken Quilt Tutorial: A Whimsical Farm-Inspired Quilt Pattern – Step by Step Tutorial, we begin sewing the chicken blocks. Start with the body pieces and carefully align them using pins before stitching. Consistent seam allowances are essential, so always use a 1/4-inch seam for quilting projects. This ensures that all blocks remain uniform and easy to assemble.
Add the wings and combs by attaching the smaller pieces to the body. Pay attention to placement so the chickens look balanced. You can experiment with different orientations—some chickens facing left, others right—to make the quilt design more dynamic. This small detail adds movement and variety to your quilt.
Press each seam as you sew. Ironing the seams flat not only makes the blocks neater but also helps them fit together more accurately when assembling the quilt top. Good pressing habits make a significant difference in the final appearance of your quilt.
Once all the chicken blocks are complete, arrange them on a flat surface or design wall. This helps you visualize how the quilt will look once finished. Play around with the layout, mixing different colors and orientations until you find a balance that pleases your eye.
Between the chicken blocks, you can add sashing—strips of fabric that separate the blocks and add structure to the quilt top. Sashing gives the quilt a clean and polished appearance, while borders can frame the entire design beautifully.
After you’re satisfied with the layout, begin sewing the blocks together row by row. Attach the rows to form the quilt top, pressing each seam as you go. By this stage, you’ll see your whimsical farm-inspired chickens coming together in a cohesive, charming quilt.
Quilting and Finishing Touches
Now that the quilt top is complete, the next stage of this Chicken Quilt Tutorial: A Whimsical Farm-Inspired Quilt Pattern – Step by Step Tutorial is quilting and finishing. Layer your quilt sandwich by placing the backing fabric right side down, batting in the middle, and the quilt top on top with the right side facing up. Smooth out each layer to remove wrinkles before basting.
Basting can be done with safety pins, spray adhesive, or long hand stitches. This step secures the layers so they don’t shift while quilting. Take your time to ensure everything is flat and even. Proper basting makes the quilting process much easier.
Quilting stitches can be simple or decorative, depending on your preference. Straight-line quilting works well for beginners and gives a neat, modern look. If you’re more experienced, you can experiment with free-motion quilting to add swirls, feathers, or even chicken footprints across the quilt. These details enhance the whimsical theme.
After quilting, it’s time to bind the edges. Cut strips of fabric, fold them, and sew them around the perimeter of the quilt to enclose the raw edges. Binding not only secures the quilt but also provides a finishing touch that frames the design. Choose a fabric color that complements the chicken blocks or adds a bold contrast.
Give the entire quilt a final press to smooth out any wrinkles. This last step enhances the professional look of your quilt and highlights the careful work you’ve put into it.
At this point, your chicken quilt is complete! Whether you display it, gift it, or keep it as a cozy blanket, the result is a one-of-a-kind piece filled with creativity, warmth, and personality.
FAQ About the Chicken Quilt Tutorial
1. Is the Chicken Quilt suitable for beginners?
Yes, this Chicken Quilt Tutorial: A Whimsical Farm-Inspired Quilt Pattern – Step by Step Tutorial is beginner-friendly. The blocks use simple shapes, and the instructions break everything into manageable steps.
2. What size should I make my quilt?
The size depends on your preference. You can make a small wall hanging, a lap quilt, or even a large bedspread by adjusting the number of chicken blocks you create.
3. Do I need special tools to make this quilt?
Basic quilting supplies like a rotary cutter, ruler, cutting mat, sewing machine, and fabric are enough. While quilting-specific tools are helpful, they’re not strictly necessary.
4. How long does it take to finish the quilt?
The time varies depending on your pace. Beginners may take several days or weeks, while experienced quilters could finish in less time. The key is to enjoy the process without rushing.
5. Can I personalize the chicken designs?
Absolutely! You can experiment with different fabrics, colors, and even embellishments like embroidery or buttons to give each chicken its own character.
6. How do I care for my finished quilt?
Wash your quilt gently using cold water and mild detergent. Air drying or tumble drying on low helps preserve the fabrics and stitching. Regular care will keep your quilt looking beautiful for years.
Conclusion
In this Chicken Quilt Tutorial: A Whimsical Farm-Inspired Quilt Pattern – Step by Step Tutorial, we explored how to gather materials, cut and prepare fabrics, assemble whimsical chicken blocks, and finish the quilt with quilting and binding. Each step was designed to help you create a fun, farm-inspired quilt that combines creativity with functionality.
This project is not only about sewing but also about storytelling, where each chicken block adds personality to your quilt. Whether you’re a beginner or experienced quilter, the process is rewarding and the final result is a charming piece full of warmth.
We hope this guide inspires you to start your own chicken quilt. Don’t forget to leave a sincere opinion and suggestions in the comments—your feedback helps make future tutorials even better!