
Learning how to make easy crochet slippers – step by step tutorial is one of the most rewarding experiences for crochet lovers. Not only are slippers a practical project that you can use daily, but they are also beginner-friendly, meaning you don’t need advanced skills to get started. By following a clear guide, you can create cozy and stylish slippers in no time, even if you are new to crocheting. These slippers make excellent gifts and can also be customized with colors, patterns, and decorations to suit any style.
The popularity of crocheted slippers comes from the fact that they combine comfort, creativity, and affordability. Making them yourself ensures that they fit perfectly, and you can choose soft, high-quality yarn for maximum coziness. Whether you’re preparing for colder months or just want a lightweight pair for around the house, crocheting your own slippers allows you to design something truly unique. The easy crochet slippers – step by step tutorial ensures that you won’t feel overwhelmed and will have a finished project that you can proudly wear.
Another benefit of crocheting slippers is the satisfaction that comes with handmade work. In today’s world, many people seek hobbies that reduce stress and allow them to slow down. Crochet is both relaxing and productive, offering an opportunity to make something useful. By following this easy crochet slippers – step by step tutorial, you will not only create something practical but also enjoy the calming process of crafting with yarn and hook.
Materials You Will Need for Easy Crochet Slippers
When starting your easy crochet slippers – step by step tutorial, the first thing to gather is the right materials. Having the right supplies makes the process smoother and ensures your slippers come out as planned. You will need yarn, a crochet hook, scissors, a yarn needle, and optional decorative items. Choosing yarn carefully is essential because it determines the softness and durability of the slippers.
Most people prefer medium-weight yarn, also known as worsted weight, as it provides both warmth and flexibility. Cotton yarn works well for lighter slippers, while wool or acrylic blends are excellent for colder climates. Make sure to choose a yarn that feels comfortable against your skin since slippers are worn barefoot or with socks.
The crochet hook size should match the yarn you select. Typically, a 4.5 mm to 5.5 mm hook works well for slipper projects. Always check the yarn label for recommendations to achieve the best results. A hook that is too small will make the slippers tight, while a hook that is too large may create loose stitches that don’t hold shape.
You’ll also need a yarn needle for weaving in ends neatly once your slippers are finished. This small step ensures durability and prevents unraveling. Scissors will be used for cutting the yarn, and you can add optional items like buttons, pom-poms, or ribbons to personalize your slippers.
Before starting, it’s a good idea to test a small swatch of stitches to confirm your tension. This ensures your slippers will fit correctly. Beginners sometimes overlook this step, but it’s a simple way to avoid resizing issues later. With your materials ready, you are set to begin this easy crochet slippers – step by step tutorial.
Finally, keeping everything organized before you begin helps the process flow without interruptions. Set aside a comfortable space with good lighting so that you can enjoy the project without straining your eyes. Having your tools within reach ensures a smooth and enjoyable crocheting experience.
Step by Step Instructions for Easy Crochet Slippers
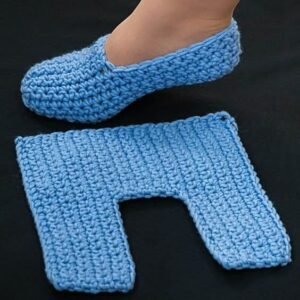
The first step in this easy crochet slippers – step by step tutorial is creating the sole. Start by chaining the foundation length, usually around 20–25 chains depending on the size of the slipper. The sole is worked in rounds or rows to create an oval base that matches the length of the foot. Work single crochet stitches around the chain to build a sturdy and comfortable base.
Once the sole is complete, it’s time to build the body of the slipper. This is usually done with half double crochet or double crochet stitches, which work up faster and create a soft texture. Crochet in rounds, moving upward from the sole to shape the slipper’s sides. This method ensures the slipper fits snugly around the foot.
To shape the toe area, gradually decrease stitches at the front of the slipper. This gives the slipper its rounded look and provides a comfortable fit. Beginners often find this part challenging, but by carefully following the step-by-step process, the decreases are easy to master. Remember that symmetry is important so both slippers look alike.
For the heel, you can continue working in rows back and forth, then seam them together for a neat finish. This step allows you to adjust the slipper’s length and width for a custom fit. The easy crochet slippers – step by step tutorial emphasizes flexibility, so you can make adjustments as you go.
After shaping the main slipper, you can add decorative elements like a cuff. Some crocheters like to make ribbed cuffs by alternating front and back post stitches, which give a stretchy, sock-like finish. Others prefer to keep the design simple and straightforward. Both options work beautifully.
At this point, the slipper should resemble a complete shoe. Make sure to try it on and adjust if necessary. This ensures your slippers are both stylish and comfortable. Once you’re satisfied, move on to finishing touches.
Finishing Touches and Customization
Finishing your easy crochet slippers – step by step tutorial involves adding those personal touches that make them unique. One of the simplest ways to decorate is by attaching buttons or bows. These small details add charm and personality to your slippers without much extra effort.
Another option is to add pom-poms or tassels. Pom-poms bring a playful touch, while tassels can make slippers look more elegant. Both decorations are quick to make and attach, giving your project a polished look.
For those who prefer a more functional upgrade, consider adding non-slip soles. You can apply fabric paint in patterns on the bottom or sew small patches of felt for better grip. This is especially useful if you plan to wear your slippers on smooth floors.
If you enjoy experimenting with color, try making striped slippers. By switching yarn colors every few rows, you can create vibrant patterns. Solid colors give a classic look, while multicolored yarn creates a fun and unique finish.
Customizing sizing is another important part of finishing touches. You can adjust by adding extra rows for larger sizes or reducing rows for smaller ones. This flexibility ensures that your easy crochet slippers – step by step tutorial can be adapted for adults, children, or even babies.
Finally, weave in all yarn ends securely with a needle. This step prevents unraveling and gives your slippers a professional appearance. Now your slippers are complete, ready to be worn, gifted, or even sold as handmade treasures.
Benefits of Making Easy Crochet Slippers
One of the biggest advantages of following this easy crochet slippers – step by step tutorial is that you end up with practical footwear. Unlike many decorative crochet projects, slippers are used daily, which makes them very rewarding to create.
They are also excellent beginner projects. Even if you have never crocheted before, slippers introduce you to basic stitches, shaping, and finishing techniques. This makes them a perfect first project for learning crochet.
Handmade slippers can also be personalized for friends and family. They make thoughtful gifts for birthdays, holidays, or simply to show appreciation. A pair of cozy, handmade slippers is always appreciated.
From a financial perspective, crocheting your own slippers is cost-effective. With just a few skeins of yarn, you can create multiple pairs. This makes it a budget-friendly craft with practical results.
Crocheting slippers also promotes relaxation and stress relief. The repetitive motions of crochet have been shown to calm the mind, and having a useful product at the end boosts satisfaction.
Lastly, slippers are a project that can be completed quickly. Unlike larger projects such as blankets, slippers can often be finished in a single day, giving you a sense of accomplishment right away.
FAQ About Easy Crochet Slippers
1. Can beginners really make crochet slippers easily?
Yes, the easy crochet slippers – step by step tutorial is designed for beginners. By focusing on simple stitches and clear instructions, even those new to crochet can succeed.
2. What is the best yarn for crochet slippers?
Medium-weight yarn like acrylic, cotton, or wool blends works best. It provides warmth and durability while remaining soft and comfortable for everyday wear.
3. How do I make slippers in different sizes?
Adjust the number of chains and rows in the sole and body. Adding more rows makes the slippers larger, while fewer rows make them smaller. The tutorial provides flexibility for customization.
4. How long does it take to crochet slippers?
On average, slippers can be made in 3–5 hours depending on your speed and the complexity of decorations you add. Simple designs are very quick to complete.
5. Can I wash handmade crochet slippers?
Yes, most slippers can be hand-washed with mild detergent. Always check your yarn label for care instructions to ensure they last longer.
6. Are crochet slippers durable for daily use?
With the right yarn and careful stitching, slippers can last for months or even years. Adding non-slip soles can also improve durability and functionality.
Conclusion
In this article, we explored the easy crochet slippers – step by step tutorial, covering everything from materials and instructions to finishing touches and customization. We also highlighted the many benefits of making slippers, from their practicality to the joy of gifting them.
Now it’s your turn to try this project and experience the satisfaction of creating your own footwear. We would love to hear your honest opinion and suggestions about this tutorial.
Have you tried making crochet slippers before, or is this your first attempt? Share your thoughts and feedback—we can’t wait to know how your project turns out!