
Grandma’s Easy Crochet Rectangle – Step by Step Tutorial is one of the most accessible projects for beginners who want to learn the art of crochet while creating something useful and beautiful. This timeless design is a beginner-friendly rectangle that can be adapted into many practical and decorative items. Whether you are new to crochet or simply want to revisit the charm of traditional stitches, this project will guide you with simple steps and techniques. Using just a few materials and some basic knowledge of crochet, you can create a project that feels both nostalgic and modern at the same time.
Crocheting rectangles has long been a starting point for many crafters, especially when learning from grandmothers or older relatives who passed down their skills through generations. The Grandma’s Easy Crochet Rectangle – Step by Step Tutorial captures this heritage while making it simple enough for anyone to follow. With just a hook, yarn, and patience, you can create a foundation that can be turned into scarves, dishcloths, placemats, and even larger blankets by repeating the technique. It’s not only about the final piece but also about enjoying the relaxing process of crochet.
What makes this pattern special is how it bridges tradition with creativity. Many people remember watching their grandmother sit by the window, crocheting rectangles with love and dedication. This guide allows you to bring that memory to life in your own hands. The Grandma’s Easy Crochet Rectangle – Step by Step Tutorial is a versatile approach that lets you experiment with yarn colors, stitch variations, and sizes while still keeping the project simple. By the end of this tutorial, you will not only have a finished rectangle but also the skills to expand your crochet journey into more complex patterns.
Materials and Tools You Will Need
To start with Grandma’s Easy Crochet Rectangle – Step by Step Tutorial, you only need a few basic supplies that are easy to find. First, you will need a crochet hook, which comes in different sizes. The hook size will depend on the yarn you choose, so always check the yarn label for recommendations. Beginners often find medium-sized hooks easier to handle because they provide good grip and help stitches remain clear.
Next, you’ll need yarn. For beginners, smooth, medium-weight yarn is recommended because it’s easier to see and manage. Cotton yarn is an excellent choice if you plan to make items like dishcloths, while acrylic yarn is ideal for practice or larger projects like blankets. The Grandma’s Easy Crochet Rectangle – Step by Step Tutorial works well with most yarn types, so you can adapt it to your preference.
Scissors are another essential tool because you’ll need them to cut the yarn neatly at the end of your project. A yarn needle is also useful for weaving in the loose ends once your rectangle is complete. These finishing touches make your work look clean and professional. Having a measuring tape can also help if you want your rectangle to reach a specific size.
It’s also helpful to have a stitch marker on hand, especially if you are new to crochet. A stitch marker helps keep track of your starting or turning point, which is important when working on even rectangles. As you follow this Grandma’s Easy Crochet Rectangle – Step by Step Tutorial, using a stitch marker will make it easier to stay consistent with your rows.
Comfort is another thing to consider. Make sure you sit in a well-lit space with enough room to move your hands comfortably. Keeping a basket for your yarn and tools nearby will also make the process more enjoyable. With everything prepared, you’ll be ready to start crocheting confidently.
Finally, remember that patience is just as important as the tools. As with any craft, there may be mistakes along the way, but they are part of the learning process. The beauty of this Grandma’s Easy Crochet Rectangle – Step by Step Tutorial is that it is forgiving and allows you to practice as much as you need.
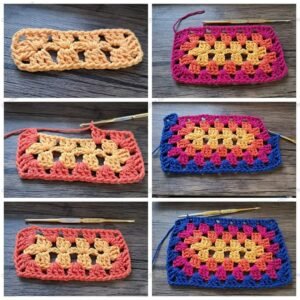
Step-by-Step Instructions for Crocheting the Rectangle
To begin the Grandma’s Easy Crochet Rectangle – Step by Step Tutorial, start by creating a slip knot and placing it on your crochet hook. This is the foundation of almost every crochet project. Once you have the slip knot, chain a number of stitches according to the width you want your rectangle to be. For example, chaining 20 to 30 stitches makes a good size for practice.
The first row will be made by working single crochet stitches into each chain. Insert the hook into the second chain from the hook, yarn over, pull through, yarn over again, and pull through both loops. Continue this across the chain until you reach the end. This first row sets the base of your Grandma’s Easy Crochet Rectangle – Step by Step Tutorial and gives structure to your work.
At the end of the row, chain one and turn your work. This turning chain allows you to start a new row. Then, continue making single crochet stitches across the row. Always insert the hook under both loops of the stitch from the previous row for a strong, even rectangle. Consistency is the key here, so take your time.
As you work more rows, your rectangle will start to grow. The Grandma’s Easy Crochet Rectangle – Step by Step Tutorial can be customized by deciding how many rows you want to crochet. If you want a small dishcloth, 20 to 25 rows may be enough. For a larger rectangle that could become part of a blanket, you can continue crocheting until you reach the desired length.
If you feel confident, you can experiment with other stitches such as half double crochet or double crochet. These stitches add height and texture to your rectangle. The beauty of this project is that you can keep it simple or make it more creative without losing the essence of the rectangle.
Once your rectangle has reached the size you want, finish off by cutting the yarn, leaving a small tail. Pull the tail through the last loop on your hook and tighten it to secure your work. Use a yarn needle to weave in the loose ends so that your rectangle looks neat and polished. Congratulations, you’ve completed the Grandma’s Easy Crochet Rectangle – Step by Step Tutorial!
Creative Uses for Your Crochet Rectangle
The Grandma’s Easy Crochet Rectangle – Step by Step Tutorial does not end with just creating a rectangle. The true beauty of this project lies in the versatility of the finished piece. With some imagination, your rectangle can be transformed into many useful and decorative items.
One of the most popular uses is turning your rectangle into a dishcloth or washcloth. Cotton yarn is perfect for this because it absorbs water well and is durable. Simply follow the steps in the tutorial and you’ll have a functional piece for your kitchen or bathroom.
Rectangles can also be sewn together to create larger projects like blankets, throws, or rugs. This is a great way to use up leftover yarn while making something practical. By using different colors, you can design a patchwork-style blanket that is both cozy and visually appealing.
Another fun idea is to turn your rectangle into a scarf. By crocheting a long rectangle and adding tassels to the ends, you can create a warm accessory that is stylish and handmade. The Grandma’s Easy Crochet Rectangle – Step by Step Tutorial makes it easy to adapt the length and width to suit your personal style.
If you enjoy home décor, consider making placemats or table runners with your rectangles. Using neutral or seasonal colors can add a personal touch to your dining area. With just a little effort, your crochet project can brighten up your home.
For those who like small, quick projects, your rectangle can become a bookmark. By using thinner yarn or thread, you can make a delicate rectangle that slips perfectly between the pages of your book. This shows how flexible and creative this simple tutorial can be.
Tips for Beginners and Common Mistakes to Avoid
Even though the Grandma’s Easy Crochet Rectangle – Step by Step Tutorial is beginner-friendly, it’s natural to face some challenges when starting out. One common mistake is making the rectangle wider or narrower as you go. This happens when stitches are added or skipped accidentally. To avoid this, always count your stitches at the end of each row.
Another frequent issue is tension. Some beginners crochet too tightly, making the fabric stiff and difficult to work with, while others crochet too loosely, creating uneven stitches. Practice maintaining a steady hand and consistent tension. With time, this will become more natural.
Yarn splitting can also be frustrating, especially with certain types of yarn. If your hook is splitting the yarn instead of pulling it through smoothly, try adjusting your angle or switching to a different hook size. Choosing a smooth yarn when practicing this tutorial can help avoid this problem.
Many beginners also forget to make a turning chain at the end of a row. Without it, the rectangle will not stay even. The Grandma’s Easy Crochet Rectangle – Step by Step Tutorial emphasizes the importance of chaining one before starting each new row to keep the edges neat.
Don’t worry if your first rectangle doesn’t look perfect. Crochet is about progress, not perfection. Each attempt will improve your skills, and soon you’ll notice your stitches becoming more even and consistent. The rectangle is an ideal shape to practice with because it is forgiving and easy to adjust.
Finally, remember to enjoy the process. Crochet is not just about the final product but also about the calm and relaxation it brings. Take breaks when needed and appreciate each step you complete in the tutorial.
FAQ About Grandma’s Easy Crochet Rectangle – Step by Step Tutorial
1. How long does it take to complete a crochet rectangle?
The time depends on the size of the rectangle and your speed. A small rectangle like a dishcloth can be completed in one or two hours, while a larger piece may take several sessions.
2. What is the best yarn for beginners using this tutorial?
Medium-weight acrylic or cotton yarn is best because it is easy to work with and clearly shows the stitches, which helps beginners learn faster.
3. Can I use different stitches for the rectangle?
Yes, you can experiment with half double crochet, double crochet, or even textured stitches once you are comfortable. The tutorial is flexible and allows for creativity.
4. Do I need to block my crochet rectangle?
Blocking is optional, but it can help your rectangle look more even and professional, especially if you plan to use it in a larger project like a blanket.
5. How do I keep the edges straight in my rectangle?
Always remember to count your stitches at the end of each row and make a turning chain before starting a new row. This prevents the edges from becoming uneven.
6. Can I make a blanket using this method?
Absolutely! Simply create multiple rectangles and join them together, or make one large rectangle by continuing until it reaches the desired size.
Conclusion
The Grandma’s Easy Crochet Rectangle – Step by Step Tutorial is a simple yet rewarding project that opens the door to countless creative possibilities.
From dishcloths to blankets, scarves to bookmarks, this basic shape can be transformed into many useful items. Along the way, you’ll improve your skills, learn patience, and experience the joy of crochet.
Now that you’ve learned each step, it’s your turn to pick up a hook and yarn and try it yourself. We hope this tutorial has been helpful and inspiring. Don’t forget to share your honest opinion about this guide and leave your suggestions for future crochet tutorials—we’d love to hear from you!