
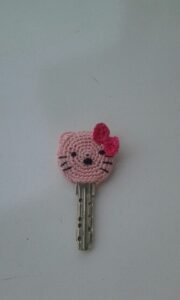
Learning Crochet Hello Kitty key covers – Step by Step Tutorial is not only fun but also a creative way to add a personal touch to something as simple as your keys. These little covers are charming, practical, and serve as a wonderful beginner-friendly crochet project. By following a clear guide, anyone can make a cute and functional accessory while practicing their crochet skills. Adding this playful Hello Kitty-inspired design makes your keys easy to recognize and adds a touch of personality to your everyday items.
One of the main reasons people love making crochet Hello Kitty key covers is because they combine functionality with creativity. Instead of having plain keys, you get to protect them while carrying a stylish and recognizable character. The durability of yarn ensures your cover lasts a long time, and you can also play around with different colors to match your own taste. It’s the type of crochet project that brings instant joy and a smile every time you reach for your keys.
This step by step tutorial will walk you through everything from choosing your materials to shaping the iconic Hello Kitty design. Even if you are new to crochet, this project is approachable and forgiving, making it perfect for practicing basic stitches. Once you finish, you’ll not only have a cute key cover but also the confidence to take on more advanced crochet accessories. Let’s dive into the process together and create something both beautiful and functional.
Materials Needed for Crochet Hello Kitty Key Covers – Step by Step Tutorial
To begin, you will need some essential materials for this crochet Hello Kitty key covers – Step by Step Tutorial. The most important item is cotton yarn, preferably in white for Hello Kitty’s face, pink or red for the bow, and a little bit of black and yellow for the details. Cotton yarn is highly recommended because it is durable, easy to work with, and keeps its shape well.
Another essential tool is the crochet hook. For this project, a smaller hook size, usually between 2.5mm to 3.5mm, works best to create tight stitches that securely hold the keys. Loose stitches can make the cover stretch too much, so using the correct hook is key. Along with your hook, make sure you have a pair of sharp scissors and a yarn needle for sewing the pieces together.
You will also need a key ring or an actual key to measure your cover against. This helps in ensuring the cover fits snugly. Having stitch markers can also be useful for beginners to keep track of rounds and avoid confusion. Even though it seems like a small detail, these markers help maintain accuracy throughout the process.
Polyester fiberfill or a small amount of stuffing may be needed if you want to add a slightly padded effect to the cover. This gives the project a neater and fuller finish. Although optional, it adds a professional look that makes the finished piece more attractive.
A final optional but recommended material is a small zipper or button closure if you want the cover to stay extra secure around your key. While many crocheters simply slide the key inside the cover, a closure provides an added level of security. Beginners can skip this step, but it’s worth considering for durability.
Once all your materials are gathered, you will be fully prepared to move into the actual step by step tutorial and start crocheting your Hello Kitty design. Having everything at hand makes the process smoother and much more enjoyable.
Step by Step Tutorial for Crochet Hello Kitty Key Covers
To start this step by step tutorial for crochet Hello Kitty key covers, make a magic ring with white yarn. This will form the base of the cover, which represents Hello Kitty’s face. Work in rounds, adding single crochet stitches while gradually increasing to form a small circle. Keep checking the size against your key to ensure it will fit properly.
Once the circle is large enough to cover one side of the key, continue crocheting without increases. This will build the sides of the cover, creating a pocket-like shape. Make sure your stitches are tight so that the key will not slip out easily. Beginners should take their time here since this part forms the foundation.
Next, crochet the back side of the cover in the same way and then sew the two pieces together, leaving the bottom open for the key. Use a yarn needle and make small, neat stitches to connect the edges. Be sure to leave a little flexibility so the cover is not too tight when inserting the key.
For Hello Kitty’s bow, switch to red or pink yarn and crochet a small rectangular shape. Fold it in the middle and wrap some yarn around to create a classic bow look. This detail is what gives the character its signature appearance and adds a playful touch to your project.
The facial features are just as important. Use black yarn to embroider the eyes and whiskers, and yellow yarn for the nose. Keep the details simple but balanced, so the design clearly resembles Hello Kitty. A yarn needle makes this part easier and ensures precision.
Once all the parts are completed, attach the bow to one side of the face and secure all ends tightly. Your crochet Hello Kitty key cover is now ready for use. This process may take some time, but each step builds on the last, resulting in a delightful finished product.
Tips and Tricks for Perfect Crochet Hello Kitty Key Covers
One useful tip when making crochet Hello Kitty key covers – Step by Step Tutorial is to always keep your stitches consistent. Uneven stitches can make the cover look lopsided or too loose. Practicing single crochet and working in rounds before starting this project can help you gain confidence.
Another trick is to block your finished pieces before sewing them together. Blocking helps the yarn relax and gives a cleaner finish. For small items like this, simply dampen the crochet pieces lightly and shape them with your hands before letting them dry flat.
Experimenting with different yarn colors can also be fun. While the traditional Hello Kitty design uses white, red, yellow, and black, you can customize it with pastel shades or even rainbow versions. This personal touch makes your project unique and can also serve as a thoughtful handmade gift.
When embroidering the face, always double-check placement before securing the yarn. Using removable fabric markers to lightly dot the spots where the eyes, nose, and whiskers should go can save time and prevent mistakes. Symmetry plays a big role in achieving the recognizable Hello Kitty appearance.
Beginners often worry about sewing the pieces together, but the key is to take it slow. Use a whip stitch or mattress stitch for neat seams. Pulling the yarn too tightly can make the edges pucker, so keep your tension even.
Lastly, always weave in loose ends carefully to avoid unraveling later. Since this is a frequently used item, durability is important. Taking a few extra minutes to secure your work ensures that your key cover will last a long time.
Creative Uses for Crochet Hello Kitty Key Covers
Apart from serving as a decorative and protective cover for your keys, these crochet Hello Kitty key covers can also be used in many other creative ways. For example, they can double as small keychain charms or even be attached to bags for extra decoration. The versatility of crochet makes them useful beyond their main function.
Another fun use is gifting. Handmade gifts always carry more meaning, and a Hello Kitty key cover is a perfect example. They are small, lightweight, and easy to customize, making them ideal for birthdays, holidays, or even party favors. Anyone who loves Hello Kitty will appreciate the effort and thought behind such a gift.
Some people also use these covers as collectible items. By creating a variety of designs and colors, you can build a collection of character-themed covers. This turns a simple crochet hobby into a unique set of handmade keepsakes.
If you are someone who often loses track of keys, these covers can be practical too. A bright Hello Kitty cover makes keys more noticeable in bags, on tables, or in drawers. It’s a simple but effective way to stay organized.
For parents, these covers can also serve as a playful introduction to crochet for children. While small kids should not handle needles and hooks, they can still help choose colors or stuff the pieces. It becomes a bonding activity and a way to encourage creativity.
Finally, crochet Hello Kitty key covers can be sold at craft fairs or online shops. Their popularity and cuteness make them a great choice for small handmade businesses. With practice, you can create these quickly and offer them as affordable handmade accessories.
FAQ About Crochet Hello Kitty Key Covers – Step by Step Tutorial
1. How long does it take to make a crochet Hello Kitty key cover?
It usually takes 1–2 hours depending on your skill level. Beginners may take longer, but with practice, the process becomes much faster.
2. What type of yarn is best for this project?
Cotton yarn is highly recommended because it is durable, easy to clean, and holds its shape well. Acrylic yarn can also be used, but cotton gives a neater finish.
3. Can beginners follow this step by step tutorial easily?
Yes, this project is beginner-friendly. The stitches used are basic, and the small size makes it less overwhelming than larger crochet projects.
4. How do I make sure the cover fits my key properly?
Always measure your work against the key while crocheting. Adjust the number of stitches and rounds as needed for a snug fit.
5. Can I customize the colors of Hello Kitty?
Absolutely! While the classic colors are white, red, yellow, and black, you can use any shades you prefer to make your project unique.
6. Do I need stuffing for the key cover?
Stuffing is optional. Adding a little can give the cover a fuller shape, but many crocheters prefer leaving it flat for easier key insertion.
7. How do I attach the cover to my key?
Simply slide the key inside the bottom opening of the cover. Some people add a small closure like a button or elastic band for extra security.
8. Is it safe to wash crochet Hello Kitty key covers?
Yes, if you use cotton yarn, the cover can be hand-washed gently with mild soap. Avoid machine washing to preserve the shape.
9. Can I sell crochet Hello Kitty key covers I make?
Yes, handmade versions can be sold, especially at craft fairs or small shops. Just avoid using official Hello Kitty branding in commercial promotions.
10. What other characters can I make using this same tutorial?
Once you master the basics, you can adapt the pattern to create other animals or characters by changing colors and details.
Conclusion
In this Crochet Hello Kitty key covers – Step by Step Tutorial, we explored how to create a charming and functional crochet project that combines fun, style, and practicality.
From gathering the right materials to shaping the bow and embroidering the face, every step contributes to a unique handmade piece. These covers not only protect your keys but also add personality and creativity to your daily life.
Now that you know how to make your own crochet Hello Kitty key covers, I’d love to hear your thoughts. Did this tutorial help you? Do you have any suggestions or creative variations you’d like to try? Please share your honest opinion and ideas—I’m always happy to improve and inspire others in their crochet journey.