
Creating a cloth case with zipper – step by step tutorial is an enjoyable and rewarding sewing project for beginners and advanced crafters alike. This type of project not only teaches essential sewing skills but also results in a functional and stylish accessory. Whether you plan to use the case for storing pencils, makeup, or small craft supplies, learning how to make one yourself ensures you can personalize it to your taste with fabrics, colors, and patterns you love.
When sewing a cloth case with zipper, you develop important techniques such as measuring fabric accurately, cutting with precision, and installing zippers neatly. These skills are highly transferable and can later be applied to more complex sewing projects like handbags, cushions, and clothing. A cloth case project is perfect for practicing because it is small, easy to manage, and requires only basic materials that are affordable and easy to find.
Another wonderful benefit of following a cloth case with zipper – step by step tutorial is that you can create sustainable, reusable items while reducing waste. Instead of buying mass-produced cases, you craft a durable item with your own hands, which also makes it a thoughtful handmade gift. Now, let’s explore the materials, techniques, and steps to bring your cloth case to life.
Materials Needed for a Cloth Case with Zipper
The first step in a cloth case with zipper – step by step tutorial is gathering the necessary materials. To make this project successful, you will need fabric, a zipper, thread, scissors, pins, and a sewing machine. Choosing the right materials will ensure the case is strong, functional, and visually appealing.
Start with fabric selection. Cotton is the most popular choice for beginners because it is easy to sew, affordable, and comes in countless patterns and colors. For a sturdier case, you can use canvas, denim, or upholstery fabric. Adding interfacing between the fabric layers gives extra structure and makes the case more professional.
Next, you will need a zipper. For a small pencil case, a zipper around 7–9 inches works well. Always choose a zipper slightly longer than the fabric opening so you can trim it later if needed. Nylon coil zippers are recommended for beginners since they are easy to sew through compared to metal ones.
Thread is another important material. Always match the thread color to your fabric for a clean finish or choose a contrasting color for a decorative effect. A strong polyester thread works well for durability. Don’t forget essential sewing tools such as sharp fabric scissors, a measuring tape, pins or clips, and a seam ripper for corrections.
A sewing machine makes the process much faster, but if you don’t have one, this project can also be sewn by hand. Just make sure to use small, tight stitches for durability. Finally, having an iron nearby will help press seams and give your finished case a crisp, professional look.
Gathering the right materials before starting saves time and ensures a smooth sewing experience. Preparation is one of the keys to making a neat and durable cloth case with zipper.
Cutting and Preparing the Fabric
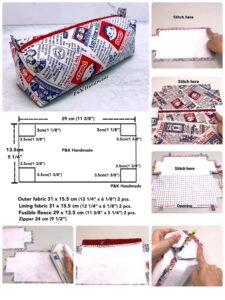
Now that you have your materials, the next step in this cloth case with zipper – step by step tutorial is cutting and preparing the fabric. Precise cutting is important to ensure that both sides of the case align correctly when sewn together.
Begin by deciding the size of your cloth case. For a basic pencil case, cut two rectangles of fabric measuring about 10 inches wide and 6 inches tall. If you plan to use interfacing for extra structure, cut pieces of interfacing in the same size. For lining, cut another two rectangles of fabric with the same measurements.
After cutting, press the fabric with an iron to remove wrinkles. This will make it easier to handle while sewing. If using interfacing, fuse it to the wrong side of your main fabric pieces by following the manufacturer’s instructions. This step prevents the case from being too flimsy.
Mark the placement of the zipper with chalk or a fabric marker. This helps ensure your zipper will sit evenly at the top of the case. Using pins or clips, secure the zipper to the right side of the fabric. Place the lining fabric on top, creating a sandwich with the zipper in the middle.
Careful preparation saves time during the sewing process and reduces mistakes. Beginners often underestimate the importance of pressing, marking, and pinning, but these small steps make a big difference in the final result. With fabric properly prepared, you’re ready to move on to sewing.
Practicing accuracy in this stage will not only help this project but also improve your overall sewing skills for future projects. Precision always leads to cleaner results in sewing.
Sewing the Zipper and Assembling the Case
The most exciting part of a cloth case with zipper – step by step tutorial is sewing the zipper and assembling the case. For many beginners, sewing a zipper seems intimidating, but with the right method, it becomes simple and satisfying.
Begin by sewing the zipper in place. Use a zipper foot on your sewing machine, as it allows you to sew closer to the zipper teeth. Sew along one side of the zipper sandwich (main fabric, zipper, and lining). Then, flip the fabrics so they are facing outward and press the seam with an iron for a neat finish. Repeat this process for the other side of the zipper.
Once both sides of the zipper are sewn, you will have a tube of fabric with the zipper running down the center. At this stage, it’s important to press both sides flat to prevent fabric from catching in the zipper teeth. Test the zipper to make sure it opens and closes smoothly.
Next, pin the main fabric pieces together with right sides facing, and do the same for the lining pieces. Leave the zipper partially open so you can turn the case right-side out later. Sew around the edges, leaving a small gap in the lining to make turning possible.
After sewing, trim any excess zipper and clip the corners of the fabric to reduce bulk. Turn the case right-side out through the gap in the lining. Push out the corners neatly with a blunt tool, like a pencil or chopstick, and then close the lining gap with a small stitch.
Finally, press the entire case with an iron to give it a professional finish. At this stage, your cloth case is complete and ready to use. You now have a functional, handmade accessory crafted by following a clear cloth case with zipper – step by step tutorial.
Each step may take a little patience, but the result is worth the effort. With practice, the process becomes quicker and easier, allowing you to experiment with different fabrics and sizes.
Creative Ideas and Customization
One of the best aspects of making a cloth case with zipper – step by step tutorial is the opportunity to personalize and customize your creation. Handmade cases are unique and can be tailored for personal use, gifts, or even small business opportunities.
A simple way to customize is by choosing fun fabrics. Children may love cases made with cartoon prints, while adults may prefer elegant floral or minimalist patterns. Mixing fabrics for the front and back panels can create interesting contrasts. You can also add decorative stitching for extra detail.
Another creative idea is to vary the size and shape of the case. Instead of a rectangle, try sewing a square, oval, or triangular case. Larger versions can serve as cosmetic bags, while smaller ones make great coin purses. The same basic sewing technique applies, so once you master the steps, the possibilities are endless.
Adding embellishments is another fun option. Try attaching a small fabric tab, a ribbon pull for the zipper, or even embroidered initials for a personal touch. Buttons, patches, or lace trims can also enhance the design.
For those who like functionality, consider adding interior pockets or dividers to keep items organized. A padded version with quilted fabric can protect delicate items like glasses or electronics. These modifications make your handmade case even more practical.
Customizing your cloth case with zipper not only boosts creativity but also makes your sewing journey more rewarding. Experimenting with fabrics, embellishments, and shapes allows you to develop your own style.
The satisfaction of using or gifting something uniquely crafted is what makes handmade sewing projects truly special.
FAQ about Cloth Case with Zipper
1. Is a cloth case with zipper difficult for beginners to sew?
No, this project is beginner-friendly. It involves basic straight stitching and simple zipper installation, which are great skills to practice when learning sewing.
2. What type of fabric works best for a cloth case with zipper?
Cotton is the easiest fabric to use for beginners, but sturdier fabrics like canvas, denim, or upholstery fabric can create a more durable case.
3. Do I need a sewing machine to make a cloth case with zipper?
While a sewing machine makes the process faster and neater, it is possible to sew a cloth case by hand using small, even stitches.
4. Can I make a cloth case without lining?
Yes, but adding a lining makes the case stronger and helps hide the raw fabric edges, giving it a more professional finish.
5. How can I adjust the size of the cloth case?
Simply change the measurements of your fabric rectangles. The steps remain the same whether you want a small coin purse or a large cosmetic bag.
6. Can I wash a cloth case with zipper in the machine?
Yes, most cloth cases are machine washable, especially if you use cotton fabric and a nylon zipper. Always wash gently to preserve shape.
Conclusion
Making a cloth case with zipper – step by step tutorial is a fun and practical sewing project suitable for beginners and advanced crafters alike.
By learning how to select materials, cut fabric, sew zippers, and assemble the case, you not only create a functional item but also gain valuable sewing experience. Customization allows you to add your personal touch, making each case unique and special.
Now that you know the process, it’s time to try it yourself. I’d love to hear your opinion—share your experience, results, or suggestions for future sewing projects. Your feedback helps improve tutorials and inspires others to explore the joy of sewing.