
If you love both crochet and unique home accessories, this crochet duck jewelry holder-Step by Step Tutorial is perfect for you. This project not only allows you to create a charming decorative piece but also helps keep your jewelry organized in a fun, creative way. With this tutorial, even beginners can learn how to transform simple yarn into a functional and adorable jewelry holder shaped like a duck. You’ll enjoy combining practical use with artistic design while adding a handmade touch to your living space.
Making a crochet duck jewelry holder-Step by Step Tutorial is not just about crafting; it’s about creating a personal item that can brighten your room. Using the right materials and following this step-by-step guide ensures your holder is both sturdy and visually appealing. You’ll discover how easy it is to follow the process, customize the colors, and even add small embellishments that make your duck unique. This project also helps improve your crochet skills while producing something useful.
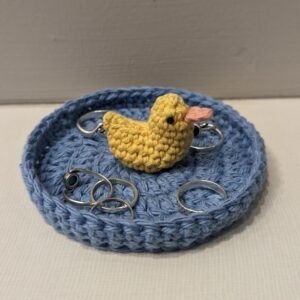
Whether you are gifting this item or keeping it for yourself, this crochet duck jewelry holder-Step by Step Tutorial provides a simple, structured approach. The tutorial covers everything from materials and tools to stitches and assembly, so even beginners can achieve a professional-looking finish. By the end, you’ll have a delightful crochet duck that holds earrings, rings, and other small accessories safely and stylishly.
Materials and Tools Required
To create your crochet duck jewelry holder-Step by Step Tutorial, you first need to gather the right materials and tools. Having everything ready before starting ensures a smooth and enjoyable crafting experience.
The most important material is yarn. For this project, cotton yarn is recommended because it is durable, holds shape well, and comes in various colors. You can choose yellow for a classic duck look or experiment with other colors to create a unique design. Using soft yarn ensures your jewelry will not be scratched or damaged while in the holder.
Next, you will need a suitable crochet hook. The hook size depends on the yarn thickness, but a 2.5 mm to 4 mm hook generally works well for small, detailed projects like this. Using the right hook ensures consistent stitches and a smooth finish for your duck.
Other essential tools include scissors for trimming yarn ends, a tapestry needle for weaving in loose ends, and stitch markers if you want to keep track of rounds or specific stitches. You may also want small embellishments, such as tiny buttons or beads, to decorate the eyes or other details of your duck.
Finally, you will need a stuffing material to give your crochet duck shape and stability. Polyester fiberfill works perfectly because it is lightweight, non-toxic, and easy to shape. Proper stuffing ensures your jewelry holder stands upright and maintains its form over time.
With these materials and tools ready, you are fully prepared to start your crochet duck jewelry holder-Step by Step Tutorial. Proper preparation ensures a smoother crafting process and better results.
Step by Step Crochet Process
Starting your crochet duck jewelry holder-Step by Step Tutorial begins with creating the body. Start with a magic ring and single crochet stitches to form a tight base. This allows you to shape the duck’s body accurately. Gradually increase stitches in each round to form a plump, rounded body.
Once the base is wide enough, continue working even rounds to elongate the body. Make sure your stitches are consistent and tight to prevent gaps where stuffing could show through. This creates a clean, professional look and ensures your jewelry stays protected.
After reaching the desired body size, start decreasing stitches to close the top while leaving a small opening for stuffing. Fill the body with polyester fiberfill, making it firm but not overly tight. Proper stuffing keeps the duck upright and stable.
Next, create the wings by crocheting small, separate pieces using simple stitches like single crochet or half double crochet. Attach the wings securely to each side of the duck’s body using a tapestry needle and yarn. Make sure the wings are evenly positioned for a balanced look.
The head is shaped by crocheting a smaller round piece that is attached to the top of the body. The neck can be a few rounds of tighter stitches to ensure a secure connection between the head and body. After assembling the head and body, add eyes and a beak using yarn or small embellishments.
Finally, add any decorative details that make your crochet duck jewelry holder unique. You may add tiny flowers, patterns, or color changes to enhance the duck’s charm. Once complete, your crochet duck is ready to hold rings, earrings, or small necklaces in style.
Customization Ideas for Your Duck
One of the most enjoyable aspects of this crochet duck jewelry holder-Step by Step Tutorial is personalization. You can adjust colors, sizes, and embellishments to suit your style.
For color, traditional yellow is cute, but pink, blue, or multicolor yarns create a fun, whimsical appearance. You can also crochet patterns on the body or wings, adding stripes, polka dots, or tiny hearts.
Another customization is using beads or buttons for eyes instead of yarn. This gives a slightly more realistic or playful look. Be sure to sew them on securely so they remain safe for everyday use.
Size customization is another option. A slightly larger duck can hold multiple pieces of jewelry at once, while a smaller version is perfect for rings or earrings alone. Adjust the number of stitches and rounds according to the size you want.
Adding accessories like a tiny scarf or hat gives your duck personality. Crochet these items separately and attach them carefully for a charming effect.
Finally, you can make multiple ducks in different colors and sizes to create a full set of jewelry holders. This can also serve as an adorable gift set for friends or family.
Tips for Care and Longevity
To maintain your crochet duck jewelry holder, proper care is essential. Avoid exposing it to excessive moisture, which can weaken the yarn and cause stuffing to become misshapen.
Regularly dust the duck with a soft cloth or gentle brush. If it gets dirty, hand wash with mild soap and cold water, then air dry. Avoid machine washing to maintain shape and durability.
Ensure that heavier jewelry items do not stretch the crochet or distort its shape. Keep your jewelry holder light and balanced for maximum longevity.
Check for loose threads or stitches periodically. Use a tapestry needle to secure any weak points immediately. This simple maintenance ensures your crochet duck remains functional and attractive.
If your duck loses its shape over time, gently reshape it and add a small amount of extra stuffing. This quick fix restores its form while keeping it ready for jewelry storage.
By following these care tips, your crochet duck jewelry holder will remain a charming and functional piece for years to come.
FAQ – crochet duck jewelry holder
1. Can beginners make this crochet duck jewelry holder?
Yes, this tutorial is beginner-friendly. The steps are easy to follow, and simple stitches like single crochet are primarily used.
2. What type of yarn is best?
Cotton yarn is recommended for durability and ease of shaping. Soft acrylic yarns can also work but may wear faster.
3. How long does it take to make one duck?
On average, it takes 3–5 hours, depending on your crochet speed and customization.
4. Can this holder accommodate all types of jewelry?
Yes, it is ideal for rings, earrings, and lightweight necklaces. Heavier chains should be placed carefully to avoid stretching.
5. How do I clean my crochet duck?
Hand wash gently with mild soap and cold water. Air dry completely before using.
6. Can I make multiple ducks in different sizes?
Absolutely. Adjust the number of stitches and rounds to create small or large versions for a set.
Conclusion
Creating a crochet duck jewelry holder-Step by Step Tutorial is a delightful way to combine creativity with function.
You’ve learned about the materials, step-by-step process, customization, and care tips. This project allows you to organize your jewelry while adding charm to your space.
Now it’s your turn to try this tutorial and craft your own unique duck. We invite you to share your honest opinions, experiences, and suggestions to inspire others and celebrate the joy of handmade creations.