
Starting a Crochet eye keychain – Step by Step Tutorial can be both fun and rewarding for beginners and experienced crafters alike. This project is perfect if you want to create a small accessory that is unique, stylish, and useful in daily life. A crochet eye keychain is not only a decorative piece but also a meaningful symbol often associated with protection and good luck. With just a few materials and some basic crochet techniques, you can design your very own handmade keychain that can be gifted to loved ones or kept as a personal charm.
One of the main advantages of this craft is its simplicity and portability. Unlike large crochet projects such as blankets or garments, making a keychain does not require much yarn or time. You can easily complete it in a single sitting while enjoying a relaxing activity. This makes it a great project for beginners who want to practice stitches while still creating something functional and attractive. The Crochet eye keychain – Step by Step Tutorial ensures that even those who are new to crochet can follow along with ease.
Additionally, the creative possibilities are endless. You can experiment with different yarn colors, eye designs, and even add embellishments like beads, charms, or tassels. The finished piece is lightweight, durable, and practical. Whether you want to attach it to your house keys, backpack, or handbag, a crochet eye keychain is both trendy and symbolic. Following this step by step tutorial will give you the confidence to make as many as you like and even create personalized gifts for friends and family.
Materials Needed for Crochet Eye Keychain – Step by Step Tutorial
To begin the Crochet eye keychain – Step by Step Tutorial, it is essential to gather all the necessary materials before starting. Having everything prepared will make the process smoother and allow you to focus on the stitches. For this project, you will need a few basic crochet tools and accessories that are easily available.
First, select your yarn. Cotton yarn is highly recommended because it provides a clean stitch definition and durability, which are important for a small accessory like a keychain. You will need at least three colors: white for the eye’s background, black for the pupil, and blue or green for the iris. However, feel free to personalize the eye by choosing different shades according to your preference.
Next, you will need a crochet hook suitable for the thickness of your yarn. Usually, a 2.5mm to 3.5mm hook works well for this type of project. The goal is to create tight stitches so that the keychain holds its shape and does not appear loose. A smaller hook helps achieve that compact finish.
You will also need a pair of scissors to cut yarn ends neatly and a yarn needle to weave in those ends securely. Additionally, a keychain ring or lobster clasp is essential to turn your crochet piece into a functional accessory. These can be found in craft stores or repurposed from old keychains.
Stuffing is optional but recommended if you want your eye to look slightly puffy and three-dimensional. Polyester fiberfill works well for this purpose. Finally, stitch markers can be handy if you want to keep track of your rounds, especially if you are new to crocheting in circles.
By preparing all these materials in advance, you set yourself up for a smooth crafting experience. Once everything is ready, you can confidently move forward with the steps of creating your crochet eye keychain.
Step by Step Instructions for Crochet Eye Keychain
Now that you have your materials ready, it’s time to follow the Crochet eye keychain – Step by Step Tutorial instructions. The project is worked in rounds, starting from the pupil and expanding outward to form the eye shape. Each round builds upon the previous one to create a detailed and symmetrical design.
Begin with the black yarn to make the pupil. Create a magic ring and work six single crochets into it. Pull the ring tight and join with a slip stitch. This small circle represents the center of the eye. The next step is switching to your iris color, such as blue or green. In this round, increase your stitches evenly by making two single crochets into each stitch from the previous round. You should now have twelve stitches.
Switch to white yarn for the sclera, which is the outer part of the eye. Work another round of increases, adding one single crochet and then an increase stitch repeatedly. This should give you eighteen stitches. Continue building the white section by adding a few more rounds until you reach the desired size for your eye keychain.
At this point, you can decide whether to make the eye flat or slightly stuffed. If you want a more three-dimensional look, crochet two identical pieces and sew them together, leaving a small opening to add stuffing. Once filled, close the opening securely.
Now, add details to make the eye look more realistic. You can use black yarn to stitch a small curved line above the eye, resembling an eyelid or eyelashes. This is optional but adds extra personality to your keychain.
Finally, attach the keychain ring or lobster clasp. Use your yarn needle to sew the ring securely onto the top of the eye. Make sure it is firmly attached so that it can hold up to daily use. With that, you have completed the step-by-step instructions and created your very own crochet eye keychain.
Creative Variations and Personalization Ideas
One of the best aspects of following a Crochet eye keychain – Step by Step Tutorial is that you can easily customize the design to suit your style. Personalization makes your craft even more special and allows you to experiment with creativity.
A simple way to personalize your keychain is by changing the colors. Instead of the classic blue or green iris, you can try purple, brown, or even multicolored yarn for a unique look. If you enjoy bold accessories, use metallic or glitter yarn to make the eye sparkle.
You can also experiment with the shape. Instead of keeping the eye perfectly round, add extra stitches on the sides to make an oval shape. This creates a more realistic eye appearance. If you enjoy whimsical designs, you could even add eyelashes using small chains of black yarn attached to the top.
Another fun idea is to add embellishments. Beads can be sewn around the iris to create a decorative border, or you could attach a tiny tassel at the bottom for extra flair. Sequins can be used to add shine, giving the eye an almost magical appearance.
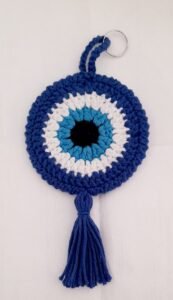
For those who enjoy symbolic crafts, you can design the keychain to resemble the “evil eye” talisman, often believed to protect against negative energy. By using blue and white shades, your crochet piece becomes not just a decoration but also a meaningful charm.
Lastly, consider making sets of these keychains for different occasions. They can be wonderful handmade gifts for friends, family, or even party favors. With each one being slightly different, they hold a personal touch that store-bought accessories lack. The possibilities are endless when it comes to personalization.
Tips for Beginners and Common Mistakes to Avoid
When following the Crochet eye keychain – Step by Step Tutorial, beginners may face a few challenges. Knowing some tips and common mistakes to avoid will help ensure success with this project.
One common issue is tension control. Beginners sometimes crochet too tightly or too loosely, which can affect the final shape of the eye. Try to keep your stitches even so that the circle lies flat without curling or puckering.
Another mistake is forgetting to count stitches. Since this project is worked in rounds, maintaining the correct stitch count is essential for symmetry. Use a stitch marker to mark the beginning of each round to avoid confusion.
Switching colors can also be tricky. Make sure to change yarns at the end of a stitch rather than in the middle to create a clean transition between the pupil, iris, and sclera. Weaving in ends properly will also keep the piece neat and durable.
Beginners should also avoid using yarn that is too thick or fuzzy. Smooth cotton yarn works best for small items like keychains because it highlights the stitches clearly. Thick yarn can make the design look bulky and less defined.
Additionally, do not skip the step of attaching the keychain ring securely. If the attachment is weak, the keychain may fall apart with daily use. Take extra time to sew it in tightly.
Lastly, remember that practice is key. If your first attempt is not perfect, do not be discouraged. Crochet is a skill that improves with experience, and each project helps you grow more confident in your abilities.
FAQ about Crochet Eye Keychain – Step by Step Tutorial
1. How long does it take to make a crochet eye keychain?
It usually takes between one to two hours, depending on your crochet speed and experience level. Beginners may take slightly longer.
2. Can I use any type of yarn for this project?
While you can experiment with different yarns, cotton yarn is the best choice because it creates neat stitches and holds its shape well.
3. Do I need stuffing for the crochet eye keychain?
Stuffing is optional. If you want a flat design, you can skip it. For a three-dimensional look, adding a small amount of fiberfill is recommended.
4. How do I attach the keychain ring securely?
Use a yarn needle and strong thread or yarn to sew the ring tightly onto the crochet piece. Make sure it is reinforced so it withstands daily use.
5. Is this project suitable for beginners?
Yes, the Crochet eye keychain – Step by Step Tutorial is beginner-friendly. It uses basic stitches like single crochet and simple increases.
6. Can I sell crochet eye keychains I make?
Absolutely. Handmade keychains are popular at craft fairs and online shops. Just make sure your finishing is neat and secure.
Conclusion
The Crochet eye keychain – Step by Step Tutorial is a simple yet creative project that allows you to practice crochet skills while making a functional and meaningful accessory.
From gathering materials to adding personal touches, every step contributes to a beautiful handmade item. Whether you make it flat or stuffed, plain or embellished, each keychain reflects your personal style and creativity.
Now that you know how to make your own crochet eye keychain, it’s time to try it yourself. We hope this guide has been helpful, clear, and inspiring. If you decide to make one, please share your honest opinion and any suggestions you may have. Your feedback can help improve future tutorials and encourage more people to enjoy the art of crochet.