
How to Crochet Animal Face Appliques: A Pattern for Everyone-Step by Step Tutorial is a delightful craft project that allows you to add a touch of charm and playfulness to almost any crochet piece. Whether you want to decorate a baby blanket, a children’s hat, a tote bag, or even a cozy sweater, these appliques are the perfect solution. Their versatility makes them a favorite among beginners and advanced crafters alike. With simple techniques, a few stitches, and some creativity, you can transform leftover yarn into adorable faces of cats, dogs, bears, rabbits, and more.
One of the most appealing aspects of creating animal face appliques is that they are small, quick projects that use minimal materials. This makes them an excellent way to practice new crochet stitches, experiment with colors, or use up scrap yarn from larger projects. Unlike large projects that may take weeks to finish, a single applique can be completed in under an hour, making it highly satisfying for crafters who love immediate results. The tutorial we will explore in this article will guide you through the process step by step, ensuring that you can easily follow along and create beautiful results.
Moreover, the joy of learning how to crochet animal face appliques: a pattern for everyone-step by step tutorial lies not only in the act of crafting but also in the personalization. You can give each animal a unique personality by altering its features. For example, a dog applique might look playful with floppy ears, while a cat might appear elegant with pointed whiskers. The details are entirely up to you, making these appliques as expressive as your imagination allows. This flexibility is one of the reasons why they are popular across all age groups and crochet skill levels.
Materials and Tools You Will Need
To begin this step by step tutorial, the first step is gathering the right tools and materials. Choosing appropriate yarn and hook sizes is essential for achieving the look you desire. Generally, lightweight or medium-weight yarn works best for appliques since they are small and should not be too bulky. Cotton yarn is often preferred for its neat stitches and durability, though acrylic can also be used if you want a softer texture.
Next, you will need a crochet hook that matches the yarn weight. For most applique projects, a 3.5mm to 4.5mm hook works well, but always check the yarn label for guidance. Having a few different hook sizes on hand can help you adjust the size of your appliques without changing the pattern.
Besides yarn and hooks, you’ll want to have embroidery floss or thin yarn for the facial details such as eyes, noses, and mouths. A tapestry needle will help you sew these details onto the face. Safety eyes can also be used if you’re attaching the applique to something that won’t be handled by very small children.
Scissors are, of course, an essential tool for cutting your yarn cleanly. Additionally, keeping some stitch markers handy can help you keep track of your rounds, especially if you are new to crocheting in the round. While not absolutely necessary, these little tools can make the process smoother and prevent mistakes.
Finally, you may want to prepare a small piece of felt or fabric glue if you plan to reinforce the back of the applique. This can provide extra stability, especially when attaching the applique to clothing or accessories that will be used often.
With these tools ready, you can confidently move forward into the process, knowing that you have everything necessary for success. Preparing your materials ahead of time ensures the project is enjoyable and stress-free.
Step by Step Instructions for Crocheting Animal Faces
To start crocheting the animal face, you will usually begin with a magic ring, which creates a tight and neat circle for the base. If you are not yet comfortable with the magic ring, you can chain two and work your stitches into the second chain from the hook as an alternative. The first round typically consists of single crochets or half double crochets, depending on the pattern you’re following.
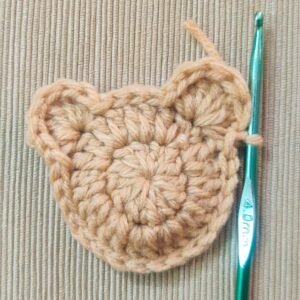
After establishing your foundation circle, you will expand it by increasing stitches in each round. This creates a flat circle, which becomes the base of your applique. For example, you might start with six single crochets in the magic ring, then double them to twelve in the next round, and continue increasing evenly until your circle reaches the desired size. This circle forms the animal’s face.
Once the base is complete, you can add features like ears, which are usually made separately and sewn on later. A cat’s ears might be small triangles, while a bear’s ears are little rounded circles. Rabbits will require elongated shapes for their characteristic long ears. These small details bring out the individuality of each animal.
The next step is embroidering or crocheting the facial expressions. Using black yarn or embroidery thread, you can stitch on eyes and a nose. If you want a cheerful look, curve the line of the mouth upward. For a sleepy animal, you could sew closed eyes using simple straight stitches.
Adding details such as whiskers, eyebrows, or even rosy cheeks with pink yarn makes each applique more expressive. Don’t be afraid to experiment. These appliques are small, so if you make a mistake, it is easy to redo without wasting too much time or yarn.
Once all the parts are finished, sew or glue them together securely. Make sure to weave in all yarn ends neatly so the applique looks polished and professional. Now, your animal face applique is ready to be attached to your chosen project.
Creative Uses for Animal Face Appliques
One of the most exciting parts of learning how to crochet animal face appliques: a pattern for everyone-step by step tutorial is deciding where to use them. These small yet detailed decorations can instantly transform an ordinary item into something special.
Baby items are among the most popular projects for appliques. A baby blanket with animal faces stitched in the corners adds an adorable touch. Similarly, a plain baby hat can become a delightful character hat when you attach a bunny or bear face applique.
Tote bags and purses are also excellent choices. Adding a cute dog or cat applique to the front of a bag can make it stand out. Children especially love carrying items decorated with their favorite animals.
Home décor projects are another creative outlet. You can use appliques to embellish pillow covers, table runners, or even wall hangings. A set of coasters featuring different animal faces can be both functional and charming.
Clothing is another area where appliques shine. A simple sweater can be elevated with a playful panda or fox face. These small accents make garments unique and personalized.
Finally, appliques can be used for seasonal crafts. For example, create a reindeer face applique for Christmas, or a bunny for Easter. The versatility of this craft ensures you’ll never run out of creative ways to use your designs.
Tips for Success and Personalization
When working through how to crochet animal face appliques: a pattern for everyone-step by step tutorial, one important tip is to keep your stitches consistent. Even tension will ensure that your appliques are smooth and neat, making them easier to attach to other projects.
Choosing the right colors is also essential. Natural shades like brown, black, and cream work well for realistic animals, while bright, playful colors can make your appliques whimsical and fun. Don’t hesitate to experiment with unexpected color combinations to add a unique flair.
If you are a beginner, start with simpler animal faces like a bear or cat. These require fewer details and are easier to assemble. As you gain confidence, you can move on to more complex designs like owls, foxes, or elephants.
Personalization is what makes these appliques special. Add accessories such as bows, glasses, or hats to your animals to give them even more personality. These little touches make your work memorable and showcase your creativity.
Practice is key to improving. The more appliques you make, the faster and more precise your stitches will become. Save your early attempts, as they will serve as a reminder of how far you’ve come in your crochet journey.
Lastly, enjoy the process. Crocheting appliques should be a relaxing and rewarding activity. Don’t focus solely on perfection; instead, focus on the joy of creating something with your hands.
FAQ About Crocheting Animal Face Appliques
Q: Do I need advanced crochet skills to make animal face appliques?
A: No, most applique patterns are beginner-friendly. Basic stitches like single crochet, half double crochet, and slip stitches are usually enough.
Q: How long does it take to make one applique?
A: Depending on the design, most appliques can be finished in 30 to 60 minutes, making them a quick and fun project.
Q: Can I use leftover yarn for these appliques?
A: Yes, appliques are perfect for using up small amounts of yarn. Just make sure the yarns are of similar thickness for the best results.
Q: How do I attach appliques to fabric or crochet projects?
A: You can sew them on with a tapestry needle and matching thread or use fabric glue for a no-sew option.
Q: Are appliques safe for baby items?
A: They are safe as long as you avoid small parts like plastic safety eyes, which can be a choking hazard. Instead, embroider eyes and other features.
Q: Can I wash items with appliques attached?
A: Yes, but it’s best to hand wash or use a gentle cycle, especially if you used glue. Always secure ends properly to avoid unraveling.
Conclusion
In this guide, we explored how to crochet animal face appliques: a pattern for everyone-step by step tutorial, covering the materials, detailed instructions, creative uses, and tips for success. From choosing yarn to adding facial expressions, each step allows you to bring personality and creativity into your projects.
These appliques are not only practical but also fun to make, offering endless possibilities for customization. Whether you’re adding them to clothing, baby items, or home décor, they will always bring a smile.
Now that you’ve learned the process, it’s time to try it yourself. Share your experiences, leave a sincere opinion about this tutorial, and suggest new ideas for future applique designs. Your creativity can inspire others in the crochet community.