
If you are passionate about handmade crafts, then the Amigurumi Crochet Chicken Pattern-Step by Step Tutorial is the perfect project to try. Amigurumi is a Japanese art of crocheting small stuffed toys, and it has captured the hearts of crochet lovers worldwide. Creating a crochet chicken allows you to bring together cuteness, creativity, and functionality, as these little chickens can be used as toys, decorations, or even thoughtful gifts.
The beauty of following an Amigurumi Crochet Chicken Pattern lies in its simplicity and adaptability. Even if you are a beginner, you can easily follow along with this step by step tutorial and create your very own chicken. All you need is yarn, a hook, stuffing, and a bit of patience. Not only will you learn new crochet techniques, but you will also enjoy the rewarding process of making something adorable from scratch.
In this detailed guide, you will discover everything from choosing the right yarn and crochet hook size to assembling the different parts of your chicken. Whether you plan to gift it to a child, display it as a home décor piece, or sell it as part of your handmade collection, this Amigurumi Crochet Chicken Pattern-Step by Step Tutorial will guide you through the entire process with clarity and confidence.
Materials and Tools You Will Need
When starting an Amigurumi Crochet Chicken Pattern-Step by Step Tutorial, the first step is gathering all the necessary materials. Choosing the right supplies ensures that your chicken turns out neat, durable, and visually appealing. You will need medium-weight cotton or acrylic yarn in white, yellow, red, and orange shades. These colors will give your chicken its realistic and charming appearance.
The crochet hook size usually depends on the yarn you choose, but a 2.5mm to 3.5mm hook is commonly recommended for amigurumi projects. Using a smaller hook than suggested for the yarn helps create tighter stitches, which prevents the stuffing from showing through. Make sure to test a small swatch before beginning the full project.
In addition to yarn and hook, you will need polyester fiberfill for stuffing. This material is lightweight, soft, and gives your crochet chicken its desired shape. A yarn needle will be necessary for sewing the parts together, and stitch markers are helpful to keep track of your rounds.
Safety eyes or small black beads are often used to give your chicken a lively expression. If you prefer, you can also embroider the eyes with black yarn to make the toy completely safe for small children. Don’t forget scissors for trimming yarn ends and pins to hold pieces in place before sewing.
It’s worth mentioning that high-quality tools can make the process smoother. Sharp scissors, a sturdy yarn needle, and durable stitch markers will save you time and frustration during the project. Even though this is a simple amigurumi, preparation is key to achieving the best results.
By gathering everything ahead of time, you ensure that your crafting experience flows without interruptions. This way, you can fully focus on the fun part—crocheting and watching your little chicken come to life.
Step by Step Tutorial for the Body
The core of this Amigurumi Crochet Chicken Pattern-Step by Step Tutorial is creating the chicken’s body. Start with a magic ring, a common technique in amigurumi that allows you to crochet in the round without leaving a hole at the center. Into this ring, make six single crochet stitches, and then gradually increase each round until you form a ball-like base.
As you work in continuous rounds, use a stitch marker to mark the first stitch of each round. This will prevent confusion and keep your stitches even. The body should gradually widen and then narrow again, creating an oval shape. Stuff lightly with polyester fiberfill as you go, making sure the filling is evenly distributed.
When shaping the chicken, consistency is essential. Make sure your stitches are uniform in size, as uneven tension can distort the overall shape. Continue crocheting until you reach the desired size, usually around 10–12 cm for a small amigurumi chicken.
Once the body is finished, close it neatly by decreasing stitches. Use your yarn needle to weave in any ends, pulling them securely so that they do not come loose over time. This creates a strong and polished base for the rest of the chicken’s parts.
A good tip for beginners is to crochet slowly at first, paying close attention to the increases and decreases. If mistakes happen, do not hesitate to unravel a few stitches. Amigurumi is very forgiving, and patience will always reward you with a better final result.
By the end of this section, you should have a sturdy and rounded chicken body that forms the foundation of your project. With this completed, you are ready to move on to creating wings, beak, comb, and tail.
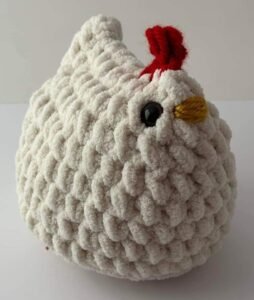
Adding Details: Wings, Beak, and Comb
Details are what make amigurumi projects so delightful. In this Amigurumi Crochet Chicken Pattern-Step by Step Tutorial, the wings, beak, and comb bring your chicken’s personality to life. Start by crocheting two small oval-shaped wings. These are usually made by working in rows rather than rounds. Once finished, lightly stuff them and sew them symmetrically on each side of the body.
The beak is another defining feature. It can be made with a few simple stitches using orange yarn. Crochet a tiny triangle and attach it just below the chicken’s eyes. The size of the beak will determine the expression of your chicken, so adjust it to your liking—smaller for a cute look or larger for a more humorous effect.
Next comes the comb, which sits proudly on top of the chicken’s head. This is made using red yarn, often with a series of small crochet bumps worked in a row to resemble the natural shape of a chicken’s comb. Once crocheted, sew it carefully in place, making sure it stands upright.
These small elements may seem simple, but they significantly enhance the overall appearance of your amigurumi chicken. Placement is important, so use pins to position parts before permanently sewing them. This gives you the chance to adjust and balance the features for the most appealing look.
Remember to secure each part firmly so they can withstand handling, especially if the toy is intended for children. Strong stitching ensures durability and safety, while neat sewing improves the professional look of your finished project.
With wings, beak, and comb in place, your chicken will start to look lively and full of character. These additions transform the basic body into a recognizable and charming little creature.
Final Touches: Stuffing, Assembly, and Expression
The last part of this Amigurumi Crochet Chicken Pattern-Step by Step Tutorial is about final touches. Proper stuffing and assembly make a big difference in how your chicken looks and feels. Continue adding polyester fiberfill until the body is firm but still squeezable. Overstuffing can stretch stitches, while under-stuffing leaves the toy floppy.
Carefully sew the wings, beak, and comb onto the body using a yarn needle and matching thread. It’s important to place them symmetrically for balance. Take your time here, as neat sewing will enhance the overall finish of your amigurumi chicken.
For the eyes, attach safety eyes securely, or embroider them with black yarn. Embroidered eyes are safer for babies and toddlers since there are no small detachable parts. Eyes can change the entire mood of your chicken, so experiment with placement before finalizing.
If you want to make your chicken extra unique, you can add accessories such as a tiny scarf, a bow, or even small embroidered details. These little touches personalize your creation and make it stand out from others.
Once all the pieces are attached, hide any loose yarn ends inside the body. This not only improves the look but also ensures the toy lasts longer. A neat finish is what separates a beginner’s work from a professional-looking amigurumi.
After completing these steps, you will hold in your hands a charming handmade chicken that showcases your creativity and effort. This final stage is both exciting and rewarding, as you see your project fully come to life.
FAQ About Amigurumi Crochet Chicken Pattern-Step by Step Tutorial
1. Is this pattern suitable for beginners?
Yes, the Amigurumi Crochet Chicken Pattern-Step by Step Tutorial is beginner-friendly. It uses basic stitches like single crochet, increases, and decreases, making it accessible even for those new to amigurumi.
2. How long does it take to complete one chicken?
Depending on your skill level, it may take anywhere from 4 to 6 hours to finish. Beginners might take a little longer, but the process is enjoyable and relaxing.
3. Can I use different yarn types?
Absolutely. While cotton and acrylic are most common, you can experiment with other fibers. Just keep in mind that yarn weight and hook size affect the final size of the chicken.
4. What can I use the finished chicken for?
These chickens make great gifts, toys for children, keychains, or even Easter decorations. Some crafters also sell them as part of their handmade collections.
5. How do I clean an amigurumi chicken?
Hand washing with mild soap and cold water is recommended. Avoid machine washing to prevent distortion of shape and damage to stitches.
6. Do I need safety eyes, or can I embroider the eyes?
Both options work well. Safety eyes give a professional finish, but embroidered eyes are safer for babies and toddlers.
Conclusion
In this Amigurumi Crochet Chicken Pattern-Step by Step Tutorial, we explored how to gather materials, crochet the body, add detailed features, and complete the final touches. By following each step carefully, even beginners can create a charming and durable crochet chicken.
This tutorial not only teaches crochet techniques but also encourages creativity and personal customization. Whether you plan to make one chicken or a whole flock, each project will bring joy and satisfaction.
Now it’s your turn—try this pattern, enjoy the process, and share your results. We would love to hear your honest opinion and suggestions in the comments. Your feedback helps inspire new tutorials and keeps the crochet community growing.