
If you have ever wanted to bring more charm and warmth to your dining table, learning how to sew a bread basket-Step by Step Tutorial is a great place to start. Handmade bread baskets are not only functional, but they also add a unique touch of creativity and love to any meal. Whether you enjoy baking fresh bread at home or simply want a stylish way to present store-bought bread, a fabric bread basket can be the perfect solution. This tutorial will walk you through the process, from choosing fabrics to finishing your final stitches, so you can create your own beautiful and practical bread basket.
Sewing your own bread basket is not as complicated as it may seem. With a few basic materials, some sewing techniques, and patience, you can make something that looks store-bought while still holding the personal touch of being handmade. The best part about this how to sew a bread basket-Step by Step Tutorial is that it can be customized to match your kitchen décor or the theme of a special occasion. From festive holiday prints to neutral tones for everyday use, the possibilities are endless.
In addition to being a fun project, a handmade bread basket is also an eco-friendly choice. Instead of buying plastic or disposable packaging, you can create a reusable basket that lasts for years. You will not only save money but also contribute to reducing waste. By the end of this guide, you will have a clear understanding of every step and feel confident in your ability to complete this project successfully. Let’s dive into the detailed steps and explore the creative process together.
Materials and Preparation for Sewing a Bread Basket
To start your journey with how to sew a bread basket-Step by Step Tutorial, you will need a few simple materials. The basic supplies include cotton fabric, interfacing for stiffness, scissors, pins, a ruler, thread, and of course, a sewing machine. Cotton fabric is a great choice because it is durable, washable, and available in a wide range of colors and patterns. If you prefer a sturdier look, canvas or linen can also work well.
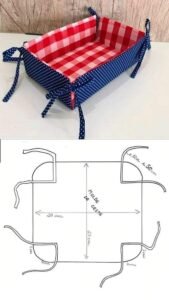
Next, think about the size of your bread basket. Do you want it to be small for dinner rolls or larger to hold a full loaf of bread? Take a few measurements to help you cut the right size of fabric. A standard bread basket often measures about 10×10 inches, but you can adjust these dimensions depending on your needs. Using a ruler or quilting square will help keep your cuts straight and even.
Adding interfacing is an important step because it helps the basket hold its shape. Without interfacing, the fabric may be too soft and collapse when filled. Iron the interfacing onto the wrong side of your fabric before sewing. Choose a medium-weight interfacing for the best balance between flexibility and stability. This is what gives your bread basket that crisp, professional look.
Once your fabric and interfacing are prepared, cut out two squares of the same size—one for the outer layer and one for the lining. Cutting them at the same time helps ensure accuracy. You can also prepare coordinating thread colors to match your fabric, which will give the basket a polished finish. If you want a playful touch, consider using contrasting thread for visible stitching.
Don’t forget about pins or clips. These small tools help keep your fabric pieces aligned as you sew. It may seem like a minor detail, but careful pinning makes a huge difference in the outcome. When everything is neatly in place, sewing becomes much smoother and less stressful.
Finally, set up your sewing machine and make sure it’s threaded correctly. A straight stitch is usually all you need for this project, but adjusting the stitch length slightly longer can create stronger seams. Now you are ready to begin assembling your bread basket with confidence.
Step-by-Step Process for Sewing the Basket
The first step in this how to sew a bread basket-Step by Step Tutorial is to place your outer fabric and lining fabric squares together, with the right sides facing each other. This way, when you turn the basket inside out, the seams will be hidden neatly. Pin the layers around all four edges to keep them from slipping as you sew.
Next, sew around the edges of the square with a ½ inch seam allowance, leaving a small opening on one side for turning the fabric right side out. Make sure to backstitch at the beginning and end to reinforce the seams. After sewing, trim the corners diagonally to reduce bulk when turning. This will help the corners look sharper and cleaner.
Turn the fabric right side out through the opening. Use a blunt tool, like the back of a pencil, to gently push out the corners so they are crisp. Once the fabric is turned, iron the square flat. Pressing is an essential part of sewing because it gives your project a professional appearance and makes the next steps easier.
Now, close the opening you left by folding the raw edges inward and stitching close to the edge. You can use a straight stitch or even a decorative stitch to make this part look stylish. Once it’s closed, you should have a neatly finished square with interfacing inside for structure.
The next step is shaping the basket. To do this, fold the square in half diagonally and mark about 2 inches from the corner along the folded edge. Sew across this point to form a triangle flap. Repeat this process on all four corners. When you unfold the fabric, you will see that it naturally forms into a basket shape with upright sides.
Finally, press the seams and make any finishing touches. You can add topstitching along the upper edge of the basket to reinforce the shape and add extra durability. If you want, attach small fabric handles or decorative buttons for an added touch of charm. At this stage, your bread basket should be fully functional and ready to use.
Creative Ways to Customize Your Bread Basket
One of the most enjoyable parts of how to sew a bread basket-Step by Step Tutorial is personalizing it. You can easily adapt the design to reflect your taste and style. For example, you might choose bright floral fabrics for a spring theme or rustic plaids for a cozy farmhouse look. The fabric itself becomes a way to showcase your creativity.
Embroidery is another way to customize your bread basket. Adding a stitched monogram or small decorative motif can make the basket unique and personal. If you are making it as a gift, embroidery is a thoughtful addition that shows extra care and attention. Simple stitches like backstitch or chain stitch can add a lot of charm.
Consider also playing with the lining fabric. The outside might be plain, while the inside has a bold, colorful print that surprises guests when they reach for bread. This contrast makes the basket visually interesting while keeping it versatile for everyday use.
You can add trims such as lace, rickrack, or ribbon to the top edge of the basket. These decorative elements give your bread basket a handmade feel and make it stand out. Experiment with different colors and textures to see what best complements your chosen fabric.
Handles are another creative option. Adding two short fabric handles makes it easier to carry the basket to the table and gives it a more finished look. Handles can be sewn from matching fabric or made from coordinating ribbon for a playful effect.
Finally, think about seasonal versions of your bread basket. For example, you could make one with snowflake fabric for winter, pumpkins for autumn, or bright pastels for Easter. This allows you to switch out baskets depending on the time of year, making your table settings more festive and fun.
Caring for and Using Your Fabric Bread Basket
Once your basket is complete, it’s important to know how to care for it properly. Since it’s made of fabric, washing is usually straightforward. Most cotton or linen baskets can be washed in cold water on a gentle cycle. Avoid hot water, as it may cause shrinkage. After washing, reshape the basket and air dry it to maintain its form.
If your basket has decorative trims or embroidery, consider spot-cleaning instead of machine washing. A gentle hand wash in mild soap and water may be enough to keep it fresh without damaging the details. Always check the care recommendations of the fabrics you used.
To keep the basket looking crisp, iron it occasionally. A quick press will remove wrinkles and help it maintain its neat shape. If you use interfacing, it should hold up well over time and prevent the basket from looking floppy.
When using your bread basket, consider lining it with a cloth napkin or tea towel. This not only makes it look more inviting but also keeps crumbs contained and makes cleaning easier. A napkin liner can also be changed out to match your table décor.
Beyond bread, these baskets are versatile. You can use them to hold fruit, pastries, or even craft supplies. Their soft fabric design makes them safe to use in many settings without worrying about scratches or damage.
With proper care, your handmade bread basket will last for years. Each time you use it, you’ll be reminded of the effort and creativity you put into making something beautiful and practical for your home.
FAQ about How to Sew a Bread Basket
1. What type of fabric is best for sewing a bread basket?
Cotton and linen are the most recommended fabrics because they are durable, washable, and easy to work with. Heavier fabrics like canvas also work well for a sturdier structure.
2. Do I need interfacing for my bread basket?
Yes, interfacing is highly recommended as it helps the basket hold its shape. Without it, the fabric may collapse or look too soft.
3. Can I make a bread basket without a sewing machine?
It is possible to sew a bread basket by hand, but it will take more time and effort. A sewing machine provides stronger and more even seams, making the basket more durable.
4. How do I make my bread basket food-safe?
Line the basket with a clean cloth napkin or food-safe liner before placing bread inside. This protects the bread and keeps the basket clean.
5. Can I wash my bread basket in the washing machine?
Yes, most fabric bread baskets can be machine-washed on a gentle cycle with cold water. Always air dry and reshape after washing.
6. What size should my bread basket be?
It depends on your needs. A 10×10 inch basket is standard, but you can adjust the dimensions for smaller rolls or larger loaves.
Conclusion
In this guide, you learned how to sew a bread basket-Step by Step Tutorial with clear instructions on choosing fabrics, preparing materials, sewing, and customizing your project. We also discussed care tips and answered common questions to make sure your basket stays beautiful for years.
Creating your own bread basket is a rewarding experience that combines practicality with creativity.
Now that you know the process, you can make baskets for yourself, family, or even as thoughtful gifts. I’d love to hear your opinion about this tutorial—please share your feedback and suggestions for future projects.