
Creating an organizer with fabric divider-Step by Step Tutorial is a rewarding project for anyone who enjoys sewing, crafting, or simply wants a practical solution to keep their belongings neat and tidy. Fabric organizers are versatile and can be adapted to store household items, sewing supplies, stationery, or even cosmetics. By making one yourself, you gain full control over the design, size, and fabrics, ensuring it matches your personal style and needs. This tutorial will guide you through each stage with clarity, while also giving useful insights for beginners and experienced crafters alike.
The great thing about making an organizer with fabric divider is its ability to turn simple fabric pieces into a functional storage solution. Many store-bought organizers lack the personal touch and adaptability that handmade ones have. By following this step by step tutorial, you will be able to customize every detail — from the fabric choice to the placement of dividers. This allows you to create an item that is not only practical but also visually appealing, blending beautifully into any space in your home.
In addition to being a fun and creative project, sewing your own fabric divider organizer also teaches you valuable skills. You will learn how to measure, cut, and assemble fabric while practicing techniques like sewing straight lines, creating pockets, and adding dividers for better organization. This makes the project a great option for beginners who want to enhance their sewing knowledge while still ending up with a useful product. With patience and careful attention to the instructions, your finished organizer will bring both satisfaction and everyday utility.
Materials You Need to Make an Organizer with Fabric Divider
To start this organizer with fabric divider-Step by Step Tutorial, gathering the right materials is the first essential step. Choosing quality supplies ensures that your project will last and look professional once completed. Luckily, the materials required are easy to find and relatively affordable, making this project accessible to most sewing enthusiasts.
The most important element is the fabric. Opt for cotton or canvas fabrics, as they are durable and easy to work with. If you want a sturdier organizer, consider using interfacing or batting to add structure. The outer fabric should reflect your style, while the inner fabric can be complementary or neutral for balance. Using fabrics with patterns or solid colors can enhance the design depending on your taste.
Next, you will need thread that matches or contrasts with your fabric, depending on your desired look. A strong, all-purpose thread works best for durability. Additionally, prepare a pair of sharp fabric scissors, a rotary cutter, and a cutting mat for precise measurements. These tools are essential for clean edges, which will make the sewing process smoother and the finished product neater.
Measuring tools like a ruler or a measuring tape are also necessary to ensure accuracy. Remember that a well-measured project results in dividers and compartments that fit perfectly without looking uneven. Marking tools, such as fabric chalk or disappearing ink pens, are useful to mark sewing lines and divider positions clearly before stitching.
Don’t forget the sewing machine, which will speed up the process and provide stronger stitches compared to hand sewing. While it is possible to make this organizer by hand, using a machine ensures durability, especially for the seams that will bear more weight. Beginners should practice sewing a few straight lines on scrap fabric to gain confidence before starting on the organizer.
Lastly, consider adding accessories such as buttons, Velcro, or zippers if you want to close the organizer or secure items inside. These finishing touches not only add functionality but also elevate the overall design. With all these materials ready, you can confidently move to the next step: cutting and preparing the fabric.
Cutting and Preparing the Fabric
The cutting stage of this organizer with fabric divider-Step by Step Tutorial is crucial for achieving a professional-looking final product. Proper preparation of fabric pieces makes the sewing process smoother and helps avoid mistakes that could lead to uneven compartments. Patience here pays off in the later steps.
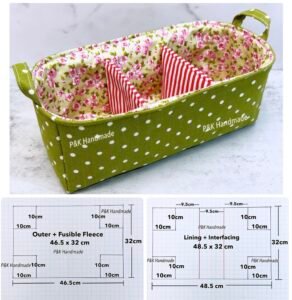
Start by deciding on the size of your organizer. A medium size, such as 12 inches by 8 inches, works well for most household uses, but you can adjust dimensions depending on your storage needs. Draw and cut out a paper template for the base and dividers to ensure accuracy before working directly with the fabric.
Once your template is ready, use a rotary cutter on a cutting mat to cut the outer fabric, lining, and interfacing. Make sure to cut each piece with sharp tools to avoid frayed edges. Cutting neatly is especially important for dividers, as they need to fit precisely into the organizer without bunching or misaligning.
The fabric divider itself should be slightly smaller than the length and width of the organizer so that it fits neatly inside without pushing against the edges. Depending on the number of compartments you want, cut multiple dividers. Each one should be reinforced with interfacing to add stiffness and durability.
After cutting, press all pieces with an iron to remove wrinkles. Flat fabric is much easier to sew, and it helps the dividers line up correctly during assembly. Ironing also allows the interfacing to fuse securely to the fabric if you are using fusible interfacing.
Mark all sewing lines and divider placements on the fabric using chalk or a disappearing ink pen. These markings act as a guide during stitching, preventing mistakes and ensuring symmetry. Taking time to prepare these details in advance makes the next stage—sewing and assembly—far easier and more enjoyable.
Sewing the Organizer and Adding Dividers
Now that your fabric is ready, this part of the organizer with fabric divider-Step by Step Tutorial focuses on stitching and assembly. This step is where your organizer starts to take shape, so careful sewing is key to achieving clean results.
Begin by sewing the outer fabric and lining together, with the right sides facing inward. Leave a small opening for turning it right-side out later. Reinforce the edges with a top stitch once it is turned, as this adds strength and gives a professional finish. If you’ve added interfacing, ensure it is smoothly attached to avoid lumps.
Next, position the fabric dividers inside the base. Align them with the markings you made earlier. Pin them in place to prevent shifting during sewing. Stitch carefully along the marked lines, making sure your stitches are straight and strong. These seams will form the compartments, so durability here is important.
If you want multiple compartments, add more dividers by repeating the process. You can create vertical and horizontal dividers to form a grid-like pattern, which is excellent for storing small items. The number of dividers is entirely up to you, and customizing this is one of the best aspects of making your own organizer.
For additional functionality, consider adding pockets to the sides of the organizer. These can be sewn onto the lining before attaching it to the outer fabric. Pockets are perfect for storing smaller items like pens, scissors, or makeup brushes. They also add to the neatness and versatility of your organizer.
At this stage, test the compartments by placing small items inside. This helps you ensure that the dividers are strong and properly aligned. If any divider feels loose, reinforce it with another line of stitching. A sturdy organizer is much more practical and long-lasting.
Once all dividers are in place and reinforced, finish the edges of the organizer neatly. Trim any loose threads and press the entire piece with an iron to make it crisp and professional. At this point, your fabric organizer is ready to be used or gifted.
Tips for Customizing and Decorating Your Organizer
This organizer with fabric divider-Step by Step Tutorial wouldn’t be complete without ideas for personalizing your project. Adding unique touches not only makes the organizer functional but also allows you to express creativity and style. Customization is what sets handmade projects apart from store-bought alternatives.
One simple way to decorate your organizer is to choose fabrics with vibrant prints or patterns. Mixing solids with florals, stripes, or geometric designs creates visual interest. Consider coordinating colors with your home décor or the theme of the room where the organizer will be used.
You can also add embellishments like appliqués, embroidery, or fabric paint to make the organizer stand out. A small embroidered monogram, for instance, personalizes the piece and makes it perfect as a thoughtful handmade gift. Decorative stitching along the edges can also enhance the look.
Handles or straps can be attached to the sides if you plan to carry the organizer from room to room. Fabric handles sewn securely add portability without sacrificing strength. For a sturdier design, reinforce the handles with interfacing or double stitching.
If you need more flexibility, consider making the dividers removable. This can be done by sewing Velcro strips to the sides of the organizer and to the edges of the dividers. Removable dividers let you adjust compartment sizes depending on what you want to store.
Another great customization idea is adding a closure mechanism, such as buttons, snaps, or zippers. This is especially useful if you plan to store items that may spill out easily. A closure keeps everything secure and makes the organizer travel-friendly.
Finally, don’t hesitate to experiment with sizes. Small organizers are great for desk supplies, while larger ones can be used for toys, clothes, or craft tools. The adaptability of this project is what makes it so practical and enjoyable.
FAQ About Organizer with Fabric Divider
1. What is the best fabric to use for an organizer with fabric divider?
Cotton and canvas fabrics are the best choices because they are durable, easy to sew, and hold their shape well. Adding interfacing provides extra stability.
2. Can I make the organizer without a sewing machine?
Yes, but it will take more time and effort. Hand stitching is possible, but a sewing machine provides stronger seams and a more professional finish.
3. How many dividers should I add to my organizer?
This depends on your needs. You can add as many as you like, depending on the size of the items you want to store. More dividers create smaller compartments.
4. Can I wash the organizer once it is finished?
Yes, if you use washable fabrics. However, avoid harsh detergents and always air dry to maintain the shape and strength of the dividers.
5. How do I make the organizer more sturdy?
Use interfacing or batting to reinforce the fabric. Double stitching the dividers and using strong fabrics like canvas will make it more durable.
6. Can I make the dividers adjustable?
Yes, by attaching Velcro or snaps to the organizer and dividers, you can move them around and create compartments of different sizes.
7. Is this project suitable for beginners?
Absolutely. It involves basic sewing techniques and is a great way for beginners to practice while creating something useful.
8. Can I add extra features like pockets or handles?
Yes, pockets and handles are excellent additions that increase functionality. They can be customized according to your preference.
9. How long does it take to make an organizer with fabric divider?
On average, it takes a few hours to complete, depending on the complexity and the number of dividers you include.
10. Can I gift a handmade organizer?
Definitely. Handmade organizers make wonderful, practical gifts that can be personalized with fabric choices, embroidery, or decorations.
Conclusion
In this organizer with fabric divider-Step by Step Tutorial, we explored how to design, cut, sew, and customize a fabric organizer that is both functional and stylish.
From gathering the right materials to adding personal touches like handles, pockets, or embellishments, this project offers endless possibilities for creativity.
By following these steps, you can create an organizer that suits your needs perfectly while learning valuable sewing skills. I hope this guide inspires you to try the project and adapt it to your own preferences. Please share your sincere opinion and suggestions in the comments — your feedback is always appreciated and helps improve future tutorials.