
The crochet star keychain – Step by Step Tutorial is a delightful project for anyone who loves handmade crafts and wants to create something small, practical, and full of personality. Crochet keychains are wonderful because they combine functionality with creativity. A crochet star is not just decorative but also symbolic, often representing light, guidance, and positivity. Making a crochet star keychain allows you to carry a little piece of art with you wherever you go while practicing useful crochet skills.
This project is beginner-friendly yet satisfying for experienced crafters as well. One of the best things about working on a crochet star keychain is that it requires only a small amount of yarn and a little bit of time, making it perfect for practicing stitches, learning shaping techniques, and even creating thoughtful handmade gifts. This tutorial explains every step carefully so you can follow along and succeed even if you have never crocheted a star before.
In addition to being a fun hobby, crochet items like star keychains can be customized in many ways. You can experiment with colors, sizes, and yarn textures to make each piece unique. Some people even add beads, embroidery, or charms to personalize their keychains further. Whether you are making one for yourself or preparing them as presents, this crochet star keychain – Step by Step Tutorial will guide you through the process clearly and effectively.
Materials and Preparation
To start your crochet star keychain, you will need a few basic materials that are inexpensive and easy to find. Choosing the right yarn is important because it determines how sturdy your keychain will be. Cotton yarn is highly recommended since it is durable and gives a clean stitch definition. However, you can also use acrylic yarn if you prefer brighter colors and a softer texture.
Another essential item is a crochet hook. For small keychain projects, a hook size between 2.5 mm and 3.5 mm usually works best, depending on your yarn thickness. A smaller hook ensures tighter stitches, which prevents the stuffing from showing through. If you want your star to look more delicate, try using a lightweight yarn paired with a smaller hook.
You will also need a small amount of stuffing to give the star its shape. Polyester fiberfill is the most common choice, but you can also recycle yarn scraps for an eco-friendly alternative. To finish the project, you will require a keychain ring or clasp. These can be found at craft stores or reused from old keychains you already have.
A yarn needle will help you sew the two sides of the star together neatly, and scissors will be necessary for trimming ends. Some people also like to add optional decorations, such as sequins, safety eyes, or embroidery thread, to give their star an extra charming touch. Gathering all these supplies before you begin will make your work much smoother and more enjoyable.
Preparing your workspace is just as important as gathering materials. Find a comfortable spot with good lighting, and if possible, organize your tools in a basket or tray. Keeping your yarn clean and tangle-free will save you time and frustration. A good preparation step ensures that you can focus entirely on learning the stitches and shaping your crochet star.
Finally, it is worth mentioning that patience plays a big role in crafting. Even if your first star does not come out perfect, remember that every stitch you make helps you improve. The beauty of this crochet star keychain – Step by Step Tutorial is that you can repeat it as many times as you like until you are completely happy with the result.
Step by Step Instructions
The crochet star keychain – Step by Step Tutorial begins with creating a magic ring, which will form the base of the star. This technique allows you to start crocheting in the round with no hole in the center, giving the star a polished look. Beginners might find the magic ring tricky at first, but with practice, it becomes second nature. If you prefer, you can also start with a chain and join it into a ring.
Once the ring is ready, you will crochet the first round using single crochet stitches. The number of stitches in this round determines the symmetry of the star, so counting carefully is essential. Usually, five points work best for a star, but you can also experiment with more or fewer points if you like.
In the second round, you will begin shaping the star points by combining stitches of different heights, such as single crochet, half double crochet, and double crochet. This combination creates the pointed shape that gives the star its recognizable outline. At this stage, it is normal if the star looks slightly uneven, but once you complete all five points, the design will come together beautifully.
After finishing the front side of the star, you will repeat the process to create a second identical star piece. These two pieces will later be joined together. Before closing them completely, you will insert a little stuffing to give the star a soft, three-dimensional effect. Be careful not to overfill it, as too much stuffing can distort the shape.
When the two star pieces are ready, use a yarn needle to sew them together around the edges with a simple whip stitch. While sewing, leave a small opening to insert the stuffing, and then close it completely. Make sure your stitches are neat and secure so the stuffing stays inside. This part gives your star its final shape and makes it durable enough for everyday use.
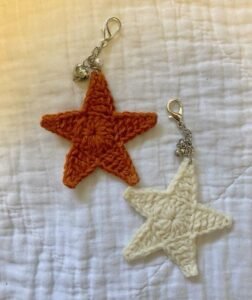
Finally, attach the keychain ring or clasp. You can do this by sewing a small yarn loop at the top of the star and sliding the ring through it. For extra strength, reinforce the loop with a few additional stitches. Once the keychain hardware is in place, your handmade crochet star keychain is ready to use or gift.
Creative Variations and Customization
One of the most enjoyable aspects of this crochet star keychain – Step by Step Tutorial is the freedom to customize it. A star can be made in any color you like, and experimenting with combinations is a fun way to personalize your project. For example, you could crochet stars in pastel colors for a soft and dreamy look or use bright tones for a playful and bold effect.
Another great idea is to add embellishments. Sequins or small beads can be sewn onto the star to make it sparkle, while embroidery stitches can give it a whimsical expression. Some people even add tiny faces using safety eyes and embroidery thread for a cute amigurumi-inspired style. These little details make each star unique and full of character.
Size variation is also an option. By changing the yarn thickness and hook size, you can create larger stars to use as bag charms or smaller stars that work well as zipper pulls. Having a set of stars in different sizes makes for a wonderful collection of handmade accessories.
You can also play with textures by using different yarn types. For example, using a glittery yarn gives the star a festive feel, perfect for holiday gifts. On the other hand, natural cotton or linen yarns provide a minimalist and rustic appearance. Each material choice adds its own charm to the finished keychain.
If you enjoy themes, you can make stars for different occasions. Red, white, and blue stars are great for patriotic holidays, while gold and silver stars work beautifully for Christmas. Personalizing your project to match special events adds extra meaning to your handmade creation.
Lastly, you can even use the same star pattern for other purposes. With slight adjustments, the crochet star can be turned into an ornament, a garland decoration, or even part of a baby mobile. This flexibility makes the project versatile and ensures that the time you spend learning the technique is useful for many different applications.
Benefits of Making Crochet Star Keychains
Following a crochet star keychain – Step by Step Tutorial is not just about crafting a pretty accessory; it also brings several benefits to your daily life. Crochet itself is a relaxing activity known for reducing stress and improving focus. Working on small projects like keychains is especially rewarding because they can be completed in a short amount of time, giving you a sense of accomplishment.
Crocheting stars also helps you practice and refine your stitch control. Since this project involves shaping points and creating symmetry, it improves your understanding of stitch tension and counting. These are valuable skills that will help you succeed in larger and more complex crochet projects.
Additionally, making handmade keychains is eco-friendly. Instead of buying mass-produced accessories, you are creating something sustainable and unique. Using leftover yarn scraps for stars is a smart way to reduce waste while still producing beautiful items.
Another benefit is the joy of giving. Handmade gifts like crochet star keychains carry a personal touch that store-bought items simply cannot match. Friends and family often appreciate the effort and love put into creating something by hand, making it a thoughtful present for birthdays, holidays, or special occasions.
Crocheting small projects also encourages creativity. Each star is like a blank canvas where you can try new stitch variations, colors, and decorations. This freedom to experiment keeps the hobby exciting and inspires new ideas for future projects.
Finally, creating items like star keychains can even become a source of extra income if you decide to sell them. Many people love buying handmade crochet accessories, and small, affordable items like keychains are especially popular at craft fairs or online shops.
FAQ about Crochet Star Keychain – Step by Step Tutorial
1. Is the crochet star keychain beginner-friendly?
Yes, it is suitable for beginners. The stitches are basic, and the project is small, making it easy to complete.
2. How long does it take to make a crochet star keychain?
Most people can finish one within an hour, depending on their crochet speed and level of detail added.
3. What type of yarn is best for this project?
Cotton yarn is recommended for durability, but acrylic yarn can also be used for softer or brighter designs.
4. Can I wash my crochet star keychain?
Yes, but it is best to hand wash it gently and let it air dry to keep its shape and colors intact.
5. Do I need stuffing for the star?
Stuffing is optional. A flat star works fine, but adding stuffing gives it a more three-dimensional look.
6. Can I make the star larger or smaller?
Absolutely. Adjusting the yarn thickness and hook size allows you to customize the size to your preference.
7. How do I attach the keychain ring?
You can create a small yarn loop at the top of the star and slide the ring through, securing it with a few stitches.
8. Can I sell the crochet star keychains I make?
Yes, many crafters sell handmade keychains. Just make sure your design is original or inspired by free patterns.
9. Is it possible to make the star without a magic ring?
Yes, you can start with a chain and join it into a ring instead of using a magic ring.
10. What other uses can the crochet star have?
Besides keychains, it can be used as bag charms, ornaments, garland pieces, or baby mobile decorations.
Conclusion
The crochet star keychain – Step by Step Tutorial is a versatile, fun, and creative project that suits both beginners and advanced crocheters. By following the steps, you can easily make your own star-shaped accessory, personalize it with colors and embellishments, and even gift or sell it.
This tutorial not only teaches you valuable crochet skills but also shows how small handmade projects can bring joy and meaning into everyday life.
Now that you have learned the complete process, we would love to know your thoughts. Please leave your honest opinion and share suggestions for future tutorials. Your feedback helps improve and inspire new creative ideas for everyone in the crochet community.