
Creating a fabric wallet for cards – step by step tutorial is a wonderful project for anyone who enjoys sewing and crafting. Not only does it give you a functional accessory, but it also allows you to showcase your creativity by choosing fabrics, colors, and small details that reflect your style. Unlike bulky store-bought wallets, a handmade fabric wallet is lightweight, personalized, and eco-friendly. This makes it both a practical and meaningful project to undertake.
A fabric wallet for cards is a small, compact wallet designed to hold credit cards, IDs, business cards, and even a bit of cash if needed. Since it is sewn using basic materials, it’s also a beginner-friendly project that doesn’t require advanced sewing skills. With just some fabric scraps, a sewing machine, and patience, you can create a beautiful wallet that is sturdy enough to be used daily. The process is straightforward, and by following a structured tutorial, you can easily achieve professional-looking results.
In this article, we will provide a step by step tutorial on how to make a fabric wallet for cards, ensuring you understand every detail of the process. From cutting the fabric to assembling the wallet and adding the final touches, everything will be covered clearly. Whether you want to create one for yourself, gift it to a loved one, or even sell them as handmade items, this tutorial will guide you through every part of the journey.
Materials Needed to Make a Fabric Wallet for Cards
The first step in a fabric wallet for cards – step by step tutorial is gathering all the necessary materials. Preparation is key, and having everything at hand ensures that your sewing process goes smoothly. Since this is a small project, you will only need simple tools and fabric pieces, making it cost-effective and accessible for anyone.
You will need two main types of fabric: one for the outside of the wallet and one for the lining. The outer fabric should be sturdy, such as cotton canvas or quilting cotton with interfacing, to provide durability. The inner fabric can be lighter and softer, giving the inside of your wallet a neat and polished look. Using different prints or colors adds personality and makes your wallet truly unique.
Interfacing is another important material that provides structure. Without it, the fabric might feel too soft and not hold its shape well. Fusible interfacing works best since it can be ironed directly onto your fabric pieces. A medium-weight interfacing is usually perfect for card wallets because it gives firmness without being too bulky.
In addition to fabric and interfacing, you will need sewing tools like scissors or a rotary cutter, a ruler or measuring tape, pins or clips, and a sewing machine. While it’s possible to sew by hand, a machine makes the project faster and ensures cleaner seams. Thread that matches or contrasts with your fabric can be chosen depending on your design preference.
Optional materials include elastic bands, snaps, or Velcro if you want to add a closure. This helps keep your cards secure inside the wallet. Decorative elements such as buttons, embroidery, or labels can also be added to give your project a personal touch. Having these materials ready before you begin will save time and reduce interruptions while sewing.
Lastly, make sure your workspace is clean and organized. Since you will be working with small fabric pieces, it’s easy to misplace them. A tidy setup helps you stay focused on each step of the tutorial and reduces mistakes along the way.
Cutting and Preparing Fabric Pieces
In the fabric wallet for cards – step by step tutorial, cutting and preparing your fabric is one of the most important stages. Accuracy during this step ensures that your final wallet has straight seams and professional finishing. Before cutting, always iron your fabric to remove wrinkles that could distort your measurements.
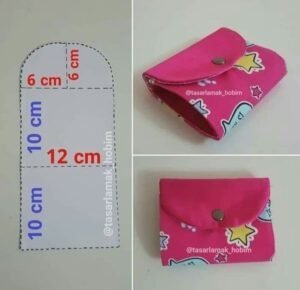
The typical fabric wallet consists of an exterior panel, an interior lining, and multiple card slots. Begin by cutting the outer fabric and lining pieces in equal dimensions. A common size for a card wallet is around 4.5 inches by 8 inches for the main body, but you can adjust depending on your preference. Make sure to also cut interfacing pieces that match the fabric sizes.
For the card slots, you will need smaller rectangular pieces. These can be cut slightly larger than a standard credit card, leaving extra space for seams. When folded and layered, these pieces will form the pockets that hold your cards. It’s a good idea to cut at least three to four pieces to create multiple slots.
Once everything is cut, fuse the interfacing onto the wrong side of your fabric pieces. This step reinforces the fabric and prevents fraying. Use a hot iron and follow the manufacturer’s instructions to ensure the interfacing adheres properly. Smooth and even fusing is essential for a neat look.
Next, fold and press the edges of your pocket pieces. This creates crisp lines and makes sewing them onto the lining easier. Take your time with this step, as neat folding will directly affect how your final wallet looks. If you want rounded edges, use a small cup or circular object to trace before cutting.
Finally, lay out all your fabric pieces on a flat surface to visualize how the wallet will come together. Arranging them in order gives you a clear idea of placement, making the sewing stage much simpler. This step also allows you to make any design adjustments before committing to sewing.
Assembling the Fabric Wallet for Cards
Now comes the exciting part of the fabric wallet for cards – step by step tutorial: assembling the wallet. This stage brings all your fabric pieces together into a functional accessory. Sewing requires patience, but following each step carefully will give you excellent results.
Begin with the card slots. Take each small fabric rectangle, fold it in half, and topstitch along the folded edge. This creates a clean and durable edge for the slot opening. Arrange the slots evenly on the lining fabric, stacking them one above the other. Pin or clip them securely before sewing. Stitch along the bottom edge of each slot to hold it in place.
After attaching all the slots, sew down the sides to keep them secure. Ensure that each pocket has enough space for a card to slide in comfortably. Reinforcing the stitching at the ends helps prevent tearing when the wallet is used frequently. At this point, your lining should clearly show the organized card pockets.
Next, place the lining and outer fabric pieces together with right sides facing each other. Pin or clip them along the edges, leaving a small opening for turning the fabric inside out. Sew around the perimeter with a ¼ inch seam allowance, making sure to pivot at the corners for sharp edges. Trim any excess fabric or bulk from the corners to achieve a cleaner finish.
Turn the wallet right side out through the opening. Use a blunt tool, like a knitting needle or chopstick, to push out the corners neatly. Press the wallet flat with an iron to create crisp edges. This step is important for achieving a professional look and ensuring the wallet lies flat when folded.
If you want to add a closure, now is the time. Sew on a snap button, a piece of Velcro, or a small elastic loop with a button. This extra feature makes the wallet more secure, especially if you plan to carry it in a bag or pocket.
Finish the assembly by topstitching around the entire wallet. This not only closes the opening but also strengthens the edges and enhances durability. At this point, your fabric wallet for cards is complete and ready to use.
Personalization and Creative Variations
One of the best aspects of the fabric wallet for cards – step by step tutorial is the opportunity to personalize your creation. Handmade wallets can be customized in endless ways, making each piece unique and meaningful. By experimenting with fabric choices, embellishments, and designs, you can tailor the wallet to your taste or the recipient’s style.
Choosing different fabrics can completely change the look of your wallet. For example, floral prints create a soft and feminine style, while solid colors with bold stitching can give a minimalist and modern appearance. Mixing fabrics, such as denim with cotton lining, adds interesting textures and durability.
Embroidery and appliqué are excellent ways to personalize your wallet. You can stitch initials, small motifs, or decorative patterns on the outer fabric. This adds a handmade touch that makes the wallet feel special. Fabric paint or stamps can also be used for creative decoration.
Closures and fasteners are another area where you can experiment. Instead of a simple snap button, try adding a magnetic clasp, a decorative buckle, or even a zipper. Each option provides a different level of security and changes the overall style of the wallet.
Adding extra compartments is also a practical variation. For example, you could include a small zipper pocket for coins or a larger slot for folded bills. These additions make the wallet more versatile and useful in everyday life.
Finally, you can consider creating themed wallets for different occasions. Seasonal fabrics like Christmas prints or Halloween patterns make fun gifts. Business professionals might appreciate wallets in neutral colors, while children would love bright and playful designs. The possibilities are endless, limited only by your imagination.
FAQ – Fabric Wallet for Cards Step by Step Tutorial
1. Is this project suitable for beginners?
Yes, making a fabric wallet for cards is beginner-friendly. The steps are simple, and the materials required are basic. Even someone with minimal sewing experience can complete it successfully.
2. What fabric works best for a fabric wallet?
Cotton fabric is highly recommended because it is easy to sew and widely available. For more durability, pairing cotton with interfacing or using heavier fabrics like canvas or denim can be effective.
3. Can I sew this wallet by hand instead of using a sewing machine?
It is possible to sew by hand, but it will take more time and effort. A sewing machine ensures stronger seams and a neater finish, making it the better option if available.
4. How many card slots can I add?
You can customize the number of slots depending on your needs. Typically, three to five slots are sufficient for most people, but you can add more by cutting extra fabric pieces.
5. How do I make the wallet more durable?
Using interfacing is key to durability. Reinforcing seams and adding topstitching also helps. Choosing quality fabric ensures the wallet withstands daily use.
6. Can I wash the fabric wallet?
Yes, but it’s best to hand wash it gently with mild detergent. Machine washing may damage closures or cause fraying if the wallet is not carefully stitched.
Conclusion
In this article, we explored how to create a fabric wallet for cards – step by step tutorial, from gathering materials to assembling and personalizing the final product.
By following each stage carefully, you can craft a wallet that is practical, stylish, and unique. This project proves that handmade items can be both beautiful and functional.
Now that you know how to make your own fabric wallet, why not try it today? Share your honest opinion about this tutorial and leave your suggestions for future projects.Your feedback will help inspire even more creative sewing ideas for everyone to enjoy.