
Learning how to make a zipper bag- Step by Step Tutorial is one of the most practical and fun sewing projects for beginners and experienced makers alike. A zipper bag is not only a great way to organize small items, but it also makes a thoughtful handmade gift. With just a few pieces of fabric, a zipper, and some simple stitching techniques, you can create a useful accessory in no time. The best part is that you can customize it with different fabrics, colors, and sizes according to your style and needs.
Whether you want a small zipper pouch for coins, a medium-sized one for makeup, or a larger version for school supplies, learning this process gives you full control over the final design. The how to make a zipper bag- Step by Step Tutorial method is simple enough for beginners to follow but versatile enough for advanced sewists to experiment with. Once you understand the basic steps, you can add lining, pockets, or even embellishments like embroidery or applique to make your bag extra unique.
This tutorial will guide you through each part of the project clearly and carefully. We will discuss materials, cutting, sewing techniques, and finishing touches. By the end, you will not only know how to make a zipper bag but also feel confident in adapting the tutorial to your own creative projects. Let’s dive in and learn the joy of turning fabric and a zipper into a beautiful, functional bag!
Choosing Materials for Your Zipper Bag
When following the how to make a zipper bag- Step by Step Tutorial, the first and most important step is choosing the right materials. The fabric determines both the appearance and durability of the bag. Cotton fabric is one of the most popular choices because it is easy to work with and available in countless prints and colors. For a sturdier zipper bag, you can use canvas, denim, or even faux leather.
In addition to the fabric, you will need a good-quality zipper. The zipper length should match or slightly exceed the width of the bag. If you are making a small pouch, a 6- or 7-inch zipper works well. For larger bags, you may need a 10-inch or 12-inch zipper. Always choose zippers that slide smoothly and match or complement your fabric design.
Lining fabric is another element you may want to include. A lining not only strengthens the inside of the bag but also gives it a clean and professional look. You can use plain cotton for the lining or pick a contrasting fabric to add a stylish surprise inside the bag. Interfacing can also be added between the layers to give your bag extra structure and shape.
Don’t forget the sewing tools. A sewing machine will speed up the process, but if you prefer, you can sew the bag by hand with a strong backstitch. You will also need scissors, pins or clips, measuring tape, and thread that matches your fabric. Gathering these supplies in advance ensures your project runs smoothly.
The beauty of this project is that it can be done with fabric scraps. If you have leftover pieces from other sewing or quilting projects, this is a great way to use them up. Recycling fabric is also eco-friendly and helps reduce waste, making your handmade zipper bag even more meaningful.
Finally, before cutting into your fabric, always iron it. Pressing your fabric removes wrinkles and makes your pieces easier to measure and sew. This step is often overlooked, but it can make a big difference in the quality of the final product.
Cutting and Preparing Fabric Pieces
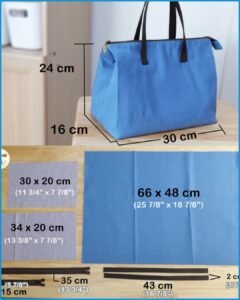
Once your materials are ready, the next stage in the how to make a zipper bag- Step by Step Tutorial is cutting the fabric pieces. Precision at this stage will ensure that your zipper bag looks neat and professional when finished. Start by measuring your desired bag size. Remember that the final size will be slightly smaller than your fabric pieces due to seam allowances.
Cut two rectangles of fabric for the outer layer of the bag. If you are adding a lining, cut two identical rectangles from the lining fabric as well. It’s best to keep the seam allowance at around half an inch. For example, if you want your finished bag to measure 6 by 8 inches, cut your fabric pieces 7 by 9 inches.
If you are adding interfacing, cut it slightly smaller than your fabric pieces and fuse it to the wrong side of the outer fabric with an iron. This will add stability to your bag and make it hold its shape better. Interfacing is especially useful when working with lightweight cotton.
Before sewing, you should also prepare your zipper. If your zipper is longer than needed, you can trim it down. Just make sure to stitch across the teeth at the new end to prevent the slider from coming off. This small step will save you a lot of frustration later.
At this point, organizing your layers is essential. Place one piece of the outer fabric right side up, position the zipper on top facing down, and then add the lining fabric on top with the right side facing down. This fabric sandwich will be what you sew together along the zipper edge.
Clips or pins will help hold the layers in place while sewing. Clips are particularly helpful when working with zippers because they don’t distort the fabric the way pins sometimes can. Preparing everything neatly now will make the sewing process much easier.
Sewing the Zipper and Bag Body
Now comes the exciting part of the how to make a zipper bag- Step by Step Tutorial: sewing the zipper and bag body. Begin by stitching along the edge of the zipper sandwich you prepared earlier. If using a sewing machine, switch to a zipper foot to get closer to the zipper teeth. If sewing by hand, use small, neat stitches to keep the fabric secure.
Once the first side is sewn, flip the fabrics so the outer layer and lining are facing outwards. Press the fabric with an iron to keep it flat and smooth. Repeat the process with the other side of the zipper by layering the remaining outer and lining fabrics, sewing them in place, and pressing afterward. At this stage, your zipper should be neatly enclosed between the fabrics.
Topstitching is an optional but recommended step. Stitching close to the edge of the fabric alongside the zipper keeps everything in place and gives your bag a polished look. It also prevents the fabric from catching in the zipper slider when opening and closing.
With the zipper installed, open it halfway before moving on. This step is very important because it allows you to turn the bag right side out later. If you forget, you may have difficulty flipping it at the end.
Next, align the outer fabric pieces together with right sides facing each other, and do the same with the lining pieces. Pin or clip them in place. Sew around the edges, leaving a small gap in the bottom of the lining for turning the bag inside out.
After stitching, trim the corners of the bag to reduce bulk. Be careful not to cut into the stitching. This will make the corners look sharper and neater once turned. Then, turn the bag right side out through the gap in the lining and push out the corners with a blunt tool like a pencil.
Finishing Touches and Personalization
The last step of the how to make a zipper bag- Step by Step Tutorial is finishing touches and adding personal style. First, close the gap in the lining. You can do this with a few hand stitches or by machine-sewing close to the edge. Once it’s closed, tuck the lining neatly inside the bag.
At this stage, your zipper bag is complete and ready to use. But if you want to take it a step further, there are many ways to personalize it. Adding decorative stitching, fabric appliqué, or embroidery can make your bag truly one of a kind. You might also consider attaching a small fabric loop to one side so you can add a key ring or wrist strap.
Another fun idea is to use patchwork techniques for the outer fabric. Sewing small fabric scraps together before cutting your rectangles gives the bag a colorful and unique design. Quilted zipper bags are especially popular because they are padded and provide extra protection for items inside.
If you prefer minimalist designs, choose solid fabrics and a zipper in a matching tone for a sleek look. On the other hand, if you love bold styles, go for vibrant prints and contrasting zippers. The possibilities are endless, and that’s what makes this project so enjoyable.
You can also experiment with size. Make tiny pouches for coins, medium bags for cosmetics, or large zipper pouches for tablets and notebooks. Once you master the basic technique, scaling up or down is easy.
Handmade zipper bags are not only useful for personal use but also make wonderful gifts. You can create a batch in different fabrics and sizes to give away during holidays, birthdays, or special occasions. They are practical, beautiful, and always appreciated.
FAQ About How to Make a Zipper Bag
1. Can I make a zipper bag without a sewing machine?
Yes, you can sew a zipper bag entirely by hand. It takes more time, but using strong stitches like the backstitch ensures durability.
2. What type of zipper is best for a zipper bag?
Nylon coil zippers are the easiest to work with and can be trimmed to size. Metal zippers also work but may be harder for beginners.
3. Do I need a lining for my zipper bag?
While optional, a lining makes the bag stronger and gives it a clean, professional finish. It also protects the fabric from fraying inside.
4. Can I use different fabrics for the outside and lining?
Absolutely! Using contrasting fabrics adds style and personality. It’s also a great way to use up fabric scraps.
5. How do I make my zipper bag sturdier?
Adding interfacing between the outer fabric and lining gives extra structure. Quilting or using heavier fabrics like canvas also increases durability.
6. What’s the easiest size for beginners to try first?
A medium-sized pouch with a 7- or 8-inch zipper is perfect for beginners. It’s large enough to handle easily but not overwhelming.
Conclusion
Now you have learned how to make a zipper bag- Step by Step Tutorial, from choosing materials to sewing the zipper and adding finishing touches.
This project is simple, practical, and highly customizable. Whether you keep your handmade bag for personal use or give it as a thoughtful gift, the satisfaction of creating something functional and beautiful with your own hands is priceless.
I hope this tutorial inspired you to start sewing your own zipper bags. If you followed along, I’d love to hear your honest opinion and suggestions. Share your experience, ideas, and creative variations—your feedback is always valuable and helps inspire even more makers!