
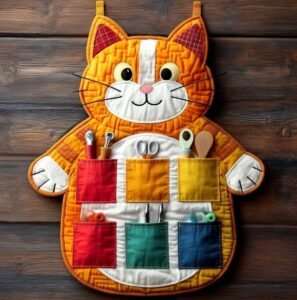
A Padded cat-shaped wall organizer- Step by Step Tutorial is the perfect creative project for anyone who loves both cats and practical home décor. This unique organizer combines functionality with charm, giving you a playful way to keep your small belongings neatly stored while adding a decorative touch to your wall. With its padded structure, it not only looks adorable but also provides a soft, cozy appearance that fits seamlessly into any room style. Whether you’re a beginner or experienced in sewing and DIY crafts, this project is approachable, fun, and highly rewarding.
Crafting your own padded cat-shaped wall organizer allows you to personalize it according to your taste. You can choose fabrics that match your interior décor, add extra compartments for more storage, and even experiment with different cat-inspired designs. This makes it an excellent gift idea for cat lovers, children, or anyone who enjoys unique handmade items. By following this step by step tutorial, you will not only learn practical sewing techniques but also gain the satisfaction of creating something beautiful and useful for your home.
Another advantage of making this organizer is that it helps with home organization in a delightful way. Instead of clutter on your desk or nightstand, you’ll have an eye-catching padded wall organizer shaped like a cat to keep things tidy. This combination of usefulness and cuteness ensures that the final product will not only brighten up your living space but also provide a constant reminder of the joy of handmade crafts. Now, let’s dive deeper into the details of this Padded cat-shaped wall organizer- Step by Step Tutorial so you can get started today.
Materials Needed for a Padded Cat-Shaped Wall Organizer
When creating your padded cat-shaped wall organizer, the materials you choose will directly affect the final look and durability of your project. High-quality fabric is recommended, as it will not only look better but also withstand daily use. Cotton, felt, or quilted fabric are excellent options for this type of project, since they are easy to work with and provide structure while still being soft to the touch.
In addition to fabric, you will need padding material to give the organizer its distinctive plush look. Polyester batting, foam, or quilt batting are common choices that will help maintain the padded structure. This padding makes the organizer sturdy enough to hold items while still appearing decorative and cozy.
Thread is another important component of this project. Matching thread provides a seamless appearance, while contrasting thread can add an extra decorative touch. Always use high-quality thread to ensure that your stitches last over time and resist daily wear and tear.
Other essential tools include scissors, pins, a sewing machine, and an iron. While the sewing machine makes the process quicker, this project can also be done by hand with some patience and careful stitching. Pins are necessary to keep the layers of fabric and padding aligned, while ironing helps achieve clean, crisp edges for a polished finish.
For the wall-hanging aspect, you will need either loops of fabric, wooden dowels, or decorative ribbons that allow the organizer to be hung securely. Choosing a strong hanging method ensures that your organizer can support small accessories, stationery, or craft supplies without slipping or tearing.
Finally, don’t forget about embellishments. Buttons, embroidery, or appliqué can bring your cat-shaped wall organizer to life, adding facial features or playful details to make it more personalized. This creative freedom is what makes this tutorial fun and versatile.
Cutting and Shaping the Cat Design
The most important part of making a padded cat-shaped wall organizer is designing and cutting the fabric into the shape of a cat. Start by sketching a simple cat outline on paper. This can include rounded ears, a curved head, and a slightly elongated body to provide enough space for storage pockets. If you are not comfortable drawing freehand, you can use printed templates as a guide.
Once you have your sketch, transfer it onto your chosen fabric. It’s a good idea to cut two identical pieces of fabric for the front and back, along with the padding that will go between them. Ensure that your cut is neat and symmetrical, as this will make sewing easier and the final product more balanced.
The padding should be cut slightly smaller than the fabric pieces to avoid bulk in the seams. This makes it easier to sew the layers together and ensures smooth, rounded edges once the project is turned right side out. Carefully aligning the padding with the fabric is crucial to maintaining the shape.
To create pockets, cut additional fabric pieces in rectangular or rounded shapes. These will be sewn onto the front of the cat’s body to act as compartments for storage. Be sure to size them appropriately depending on what you intend to store in the organizer. For example, smaller pockets are perfect for pens, scissors, or notes, while larger ones can hold mail, keys, or craft supplies.
Adding design elements such as a stitched nose, whiskers, or fabric eyes can be done before assembling the entire piece. This makes it easier to decorate and ensures that your padded cat-shaped wall organizer looks charming from the start.
Taking your time during this cutting and shaping stage will make the next steps much smoother. The more precise your cuts, the more professional and polished your final result will appear.
Sewing and Assembling the Organizer
Once your fabric and padding are cut, it’s time to assemble your padded cat-shaped wall organizer. Start by layering the front fabric piece, padding, and back fabric piece together. Pin them securely in place so they don’t shift while sewing. This step ensures that the organizer maintains its padded structure throughout.
Using a sewing machine or hand stitching, carefully sew around the outline of the cat, leaving a small opening to turn the piece inside out. After stitching, trim any excess fabric and clip the curved edges slightly to prevent bulk. This will help the cat shape look smoother once turned.
Turn the fabric right side out through the opening and press it with an iron for crisp edges. Then, close the opening with an invisible stitch. At this stage, your base padded cat shape is complete and ready for the addition of pockets.
Next, position the pocket pieces on the cat’s body where you want them to be. Pin them in place, ensuring that they are aligned and evenly spaced. Sew along the sides and bottom of each pocket, leaving the top open. This creates functional compartments without compromising the overall design.
If you want multiple divisions in a single pocket, you can add vertical stitches to create smaller slots. This is especially useful for organizing pens, crochet hooks, or brushes in a neat way.
Finally, attach loops or ribbons to the back of the organizer to make it hangable. Reinforce the stitches in these areas, as they will bear the weight of the organizer and its contents. With this step, your padded cat-shaped wall organizer is fully assembled and ready for use.
Decorating and Finishing Touches
The most enjoyable part of this Padded cat-shaped wall organizer- Step by Step Tutorial is adding decorations that bring your cat to life. Simple embroidered whiskers, button eyes, or a stitched smile can instantly give character to your wall organizer. If you prefer a minimalist look, you can keep the design clean with just the silhouette of the cat.
Fabric paint is another option to enhance the appearance. You can paint small details such as stripes, spots, or even a bow tie for a playful personality. This creative step makes each organizer unique, as no two will look exactly the same.
Adding trims or lace around the pockets can give the organizer a more decorative, handmade feel. These finishing touches not only enhance the design but also help strengthen the edges of the pockets.
If you want your organizer to stand out even more, consider using patterned fabrics. For example, a polka-dot body with solid-colored pockets creates a bold contrast, while floral fabrics make the cat look soft and whimsical.
This is also the time to check the sturdiness of your stitches. Reinforce any areas that may feel loose and ensure that the organizer can support the weight of stored items. Durability is just as important as design, especially if the organizer will be used daily.
Once everything is finished, hang your organizer on the wall and admire your creation. At this point, you have completed a project that is not only decorative but also practical, making your living space more organized and enjoyable.
FAQ about Padded Cat-Shaped Wall Organizer
1. Can I make a padded cat-shaped wall organizer without a sewing machine?
Yes, it is possible to make this organizer using hand stitching. It may take more time, but with patience and neat stitches, you can achieve the same result.
2. What kind of fabric works best for this project?
Cotton, felt, and quilted fabrics are great options because they are easy to sew, durable, and hold the padding well. Avoid fabrics that are too slippery or stretchy.
3. How do I make the organizer sturdy enough to hold items?
Using a good padding material and strong stitches ensures durability. Reinforcing pocket seams and using high-quality thread will help the organizer support small objects.
4. Can I customize the shape of the organizer?
Absolutely. While this tutorial focuses on a cat shape, you can adapt the steps to create other animal shapes or even abstract designs, depending on your creativity.
5. Is this a good project for beginners?
Yes, this project is beginner-friendly because it involves simple cutting, sewing, and decorating techniques. It’s a great way to practice sewing while making something useful.
6. What items can I store in the organizer?
The organizer is perfect for holding pens, scissors, notes, keys, or even craft supplies. You can adjust pocket sizes depending on your needs.
Conclusion
In this Padded cat-shaped wall organizer- Step by Step Tutorial, you learned how to choose materials, cut and shape the design, assemble the organizer, and add fun decorations to personalize it.
This project is not only practical but also adds a touch of cuteness to any room, making it a perfect handmade item for your home or as a gift.
Now that you have all the steps, it’s your turn to create a beautiful padded organizer shaped like a cat. Don’t forget to share your opinion and suggestions, as your feedback helps inspire new creative projects. What would you like to see in the next tutorial?