
Starting a creative journey with a crochet headband for hair – Step by Step Tutorial is both exciting and rewarding. These handmade accessories are not only functional but also fashionable, offering a perfect blend of comfort and style. Whether you are new to crochet or already have some experience, making a crochet headband allows you to express creativity while crafting something practical that can be worn every day. The versatility of yarn and patterns makes this project enjoyable for all skill levels.
One of the most wonderful aspects of crocheting a headband is its adaptability. A crochet headband for hair can be worn in all seasons. In winter, thicker yarns provide warmth and coziness, while lighter yarns in cotton or bamboo keep your hair stylishly tamed during spring and summer. This simple accessory can also be customized with buttons, flowers, or even beads, giving each piece a personal touch. The process is not only relaxing but also results in a piece you will love to wear or gift.
The beauty of this step by step tutorial is that it breaks down each stage into easy instructions, guiding you from choosing the right yarn to the final finishing touches. With patience and practice, you will soon be able to make multiple variations of crochet headbands, adjusting size, color, and design depending on your preference. Handmade headbands are also fantastic gifts, especially for friends and family who appreciate the thought and care behind something uniquely crafted.
Materials and Tools Needed for Crochet Headband
To begin your crochet headband for hair – step by step tutorial, it is essential to gather the right materials. You do not need a large collection of supplies, but having quality tools will ensure a smooth experience and a polished final result. Selecting the correct yarn is a crucial first step. Cotton yarn is an excellent choice for warmer weather, as it is breathable and soft, while acrylic or wool blends are great for colder climates since they provide warmth and elasticity.
Next, you need the right crochet hook size. The size will depend on the yarn thickness, but for most headbands, a 4.0 mm to 5.0 mm hook works well. Beginners often prefer ergonomic hooks, as they make the process more comfortable for longer projects. It is also recommended to keep scissors, a yarn needle, and stitch markers nearby. These small accessories make the crocheting process much more efficient and organized.
Once your materials are ready, you can begin practicing basic stitches. Most crochet headbands use simple stitches like single crochet, half double crochet, or double crochet. These are beginner-friendly and create a solid structure that is durable and flexible. If you are new, take a few minutes to practice these stitches on a scrap piece of yarn before starting your headband project.
Another optional but useful addition is elastic thread. Adding elastic can help your headband maintain shape and fit comfortably on different head sizes. This is especially helpful if you are making headbands for children or planning to wear them during active days. The elastic ensures the headband stays in place without slipping.
Color choice is also an exciting part of the process. You may choose a single solid shade for a minimalistic look, or mix multiple yarn colors for a striped or patterned style. Neutral tones like beige, gray, or black are versatile and go well with most outfits, while bold colors like red, pink, or yellow can add a playful pop to your wardrobe.
By preparing your materials and tools carefully, you set the foundation for a smooth and enjoyable experience. With the right supplies in hand, you are ready to move on to the exciting part – crocheting your very own headband.
Step by Step Instructions to Crochet a Headband
Now comes the core of this step by step tutorial – creating your crochet headband. The first step is to measure the head size of the person who will wear the headband. A standard adult headband measures between 18 to 20 inches in length, but it should always be slightly smaller than the actual head size to allow for stretching. This ensures a snug and comfortable fit.
Start with a foundation chain. Depending on the stitch you will use, make a chain that matches the desired length of the headband. For example, if you want a wider headband to cover your ears, chain more stitches to increase the height. If you prefer a slim and delicate band, chain fewer stitches. Always make sure your chain is neither too tight nor too loose.
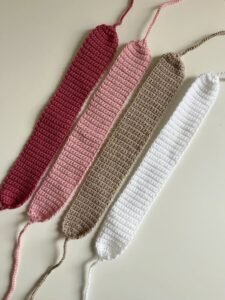
Once the chain is complete, work back across the row using your chosen stitch, such as single crochet. Continue building row by row until the headband reaches the desired thickness. This repetitive process is calming and gives you control over the overall texture and style of the piece. For a different effect, try alternating stitches like double crochet or adding a textured stitch like the shell pattern.
When your headband reaches the correct width, it is time to join the ends. You can either sew them together using a yarn needle or slip stitch them with your crochet hook. This step transforms your flat piece into a wearable circular band. Make sure the seam is neat and secure so it remains strong over time.
To add personality, you can decorate the headband. Many crocheters enjoy attaching small appliqués such as crochet flowers, bows, or leaves. Buttons, pearls, or beads can also be sewn onto the surface for an elegant touch. These small details make your crochet headband for hair unique and stylish.
Finally, weave in all the loose ends with a yarn needle. This gives your project a clean and professional finish. Once completed, try on your headband and admire your handmade creation – you have successfully followed this tutorial from start to finish.
Styling and Customization Ideas
One of the most enjoyable aspects of making a crochet headband for hair is the ability to personalize it according to your taste. Headbands can be slim and minimal or wide and cozy, depending on your preferences. Some people like to make them in neutral shades that match everything in their wardrobe, while others prefer bold colors and playful designs that make a statement.
For a romantic touch, try adding a crochet flower to the side of your headband. This design is particularly popular in spring and summer when floral fashion is trending. You can crochet flowers separately and sew them onto the headband or even crochet them directly into the pattern as you go.
If you prefer a more modern look, consider making a twisted or knotted style headband. This variation creates a stylish focal point in the front, making the accessory look chic and sophisticated. The knot effect is surprisingly easy to achieve by folding and sewing the headband in a certain way.
Seasonal variations also provide endless possibilities. In winter, you might want to make a wide ear warmer headband using chunky yarn for extra warmth. In summer, lightweight cotton yarn creates a breathable headband perfect for keeping hair in place without overheating. Matching your headband to the season ensures practicality while keeping style intact.
Children’s headbands can be customized with fun decorations such as animal ears, bows, or bright patterns. These playful designs make great gifts and are loved by kids. For adults, more subtle designs like lace-inspired stitches or elegant color choices work beautifully.
The customization options are truly endless. With practice, you can design headbands that suit every outfit, occasion, and personality, making this project one of the most versatile crochet accessories to create.
Care and Maintenance of Crochet Headbands
After completing your crochet headband for hair – step by step tutorial, it is important to know how to care for your handmade accessory to ensure its durability. Since crochet items are made with yarn, they require gentle handling and proper washing to maintain their shape and color.
The best way to wash a crochet headband is by hand using cold water and a mild detergent. Avoid hot water, as it can shrink or damage certain yarn fibers. Gently squeeze out the water instead of wringing it, as twisting may stretch or distort the stitches.
If you prefer machine washing, place the headband inside a mesh laundry bag to protect it. Use the delicate cycle with cold water. After washing, lay the headband flat on a clean towel to air dry. Avoid using a dryer, as heat can cause yarn to shrink or lose elasticity.
Storing crochet headbands is also simple. Keep them in a dry place away from direct sunlight to prevent fading. Fold them neatly or hang them to maintain their shape. Adding a lavender sachet in your storage drawer can keep them smelling fresh and deter moths if you used natural fibers like wool.
Over time, some headbands may stretch slightly. If this happens, you can re-shape them by wetting lightly and laying flat to dry, adjusting the shape with your hands. This technique helps restore the original form without damaging the fibers.
By following these simple care tips, your crochet headbands will remain soft, beautiful, and wearable for many years.
FAQ about Crochet Headbands
1. How long does it take to make a crochet headband?
For beginners, it may take around 2–3 hours to complete a headband, while experienced crocheters can finish one in less than an hour.
2. What is the best yarn for crochet headbands?
Cotton yarn is perfect for lightweight summer headbands, while acrylic or wool blends are great for warmth in winter.
3. Can I make a crochet headband without elastic?
Yes, elastic is optional. A properly measured headband made with the right stitches will fit snugly without slipping.
4. Are crochet headbands good for beginners?
Absolutely! Headbands are one of the easiest crochet projects, making them ideal for learning basic stitches and building confidence.
5. Can I sell handmade crochet headbands?
Yes, crochet headbands are popular at craft fairs and online shops. Since they are quick to make and customizable, they are a profitable handmade item.
6. How do I make my crochet headband unique?
You can customize with colors, appliqués, beads, or different stitch patterns to create one-of-a-kind designs.
Conclusion
Making a crochet headband for hair – step by step tutorial is a creative and fulfilling project that combines style with functionality.
From gathering materials to following simple stitches, and from customizing designs to learning how to care for them, this guide has shown you everything you need to make beautiful and practical headbands. These accessories are versatile, beginner-friendly, and perfect as gifts or personal fashion statements.
Now that you have learned the entire process, why not try making your own version today? Share your experience, leave a sincere opinion, and suggest new ideas for future projects. Your creativity can inspire others to pick up a crochet hook and start crafting too!