
If you are looking for a creative and functional crochet project, this Crochet Cat Coaster 😺- Step by Step Tutorial is the perfect choice. These coasters are not only adorable but also practical, protecting your tables from scratches and stains while adding a handmade touch to your home décor. Whether you are a beginner or someone with experience in crochet, this tutorial will guide you through every step of making your very own cat-themed coasters.
Creating a Crochet Cat Coaster 😺 is also a fun way to personalize your home accessories or even make unique gifts for cat lovers. The process is simple enough to complete in a short time, and the end result is a coaster that is both charming and useful. Plus, crocheting is a relaxing hobby that helps reduce stress and boosts creativity, making this project a win-win situation for everyone.
In this Step by Step Tutorial, we will explain all the materials you need, guide you through the basic stitches, and show you how to customize your cat coasters with different colors and designs. By the end of this tutorial, you will be able to create coasters that look professional while keeping the handmade charm that makes them so special.
Materials Needed for Crochet Cat Coaster 😺- Step by Step Tutorial
Before we start crocheting, it’s important to gather the right materials. Having everything prepared in advance makes the process smoother and more enjoyable. This Crochet Cat Coaster 😺- Step by Step Tutorial uses simple supplies that you may already have at home or can easily find in any craft store.
You will need medium-weight cotton yarn in the colors of your choice. Cotton is ideal for coasters because it is absorbent, durable, and easy to clean. The Crochet Cat Coaster 😺- Step by Step Tutorial suggests using neutral colors for the coaster base and bright or pastel shades for the cat’s ears, nose, and eyes.
A standard crochet hook, usually 4mm or 5mm, works best for this project. The size of the hook will slightly affect the size of your coaster, so follow the Crochet Cat Coaster 😺- Step by Step Tutorial recommendations if you want the coaster to hold standard mugs and cups.
You will also need a pair of sharp scissors to cut the yarn neatly and a yarn needle for weaving in the loose ends once your project is complete. This Step by Step Tutorial also recommends having some stitch markers if you are a beginner since they help keep track of your rounds.
For decorating the cat’s face, small amounts of black or pink yarn are perfect for embroidery. You can also use small safety eyes or buttons if you prefer a three-dimensional effect. The Crochet Cat Coaster 😺- Step by Step Tutorial emphasizes choosing washable materials to make the coasters easy to care for.
Finally, keep a measuring tape handy to ensure your coaster reaches the desired size. Once you have all these materials ready, you can move on to the fun part: crocheting your cat coaster.
Step by Step Instructions for Crochet Cat Coaster 😺
Now let’s get into the actual process of making the Crochet Cat Coaster 😺- Step by Step Tutorial. These instructions are beginner-friendly but also detailed enough to help you achieve a neat and professional finish.
Start by making a magic ring. This technique allows you to create a tight center for the coaster base. The Crochet Cat Coaster 😺- Step by Step Tutorial explains that a magic ring prevents holes in the middle, which makes the coaster look cleaner and more polished.
Next, crochet a series of double crochets into the magic ring to form a circle. This will be the main part of your coaster. According to the Step by Step Tutorial, you should continue working in rounds, increasing evenly so the circle lies flat.
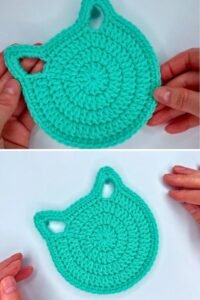
As you reach the desired diameter, stop increasing stitches to maintain the circular shape. The Crochet Cat Coaster 😺- Step by Step Tutorial suggests a size of about 4–5 inches, which is perfect for most mugs and cups.
Now it’s time to create the cat ears. Chain a small number of stitches at the edge of the coaster, then work back with single crochets and slip stitches to shape the ear. The Step by Step Tutorial recommends making two ears opposite each other for a balanced design.
Once the base and ears are complete, use embroidery or small yarn pieces to add eyes, a nose, and whiskers. The Crochet Cat Coaster 😺- Step by Step Tutorial allows you to customize the expressions—sleepy, happy, or playful cats all work beautifully.
Finally, weave in all the loose ends with a yarn needle to secure the stitches. The Step by Step Tutorial suggests blocking the coaster lightly with water and letting it dry flat for a professional finish.
Creative Ideas to Customize Your Crochet Cat Coaster 😺
One of the most enjoyable parts of this Crochet Cat Coaster 😺- Step by Step Tutorial is the freedom to personalize your design. With just a few changes in color or embroidery, you can create completely different looks for each coaster.
For example, try using gray yarn with black ears to make a Siamese-style coaster or orange and white yarn for a tabby cat look. The Crochet Cat Coaster 😺- Step by Step Tutorial encourages you to experiment with colors to represent your favorite cat breeds.
You can also add accessories like a tiny crocheted bow or a little collar around the cat’s neck. This Step by Step Tutorial explains that small details like these make the coasters even cuter and more gift-worthy.
Another fun idea is to create themed coasters for holidays. Use red and green yarn for Christmas, black and orange for Halloween, or pastel colors for Easter. The Crochet Cat Coaster 😺- Step by Step Tutorial suggests adding simple embroidery like stars or hearts to match the occasion.
If you enjoy working with texture, consider using different stitch patterns for the coaster base. The Step by Step Tutorial recommends trying half double crochet or puff stitches for a thicker, more decorative coaster.
You can even make sets of coasters with various cat expressions—happy, winking, or surprised faces—to add personality and variety to your collection. The Crochet Cat Coaster 😺- Step by Step Tutorial assures that these small changes make your projects unique and fun.
Caring for Your Crochet Cat Coaster 😺
Once you’ve completed your Crochet Cat Coaster 😺- Step by Step Tutorial, you’ll want to keep your coasters looking fresh and new for as long as possible. Proper care is essential, especially if you plan to use them daily.
The Crochet Cat Coaster 😺- Step by Step Tutorial recommends hand-washing coasters with mild detergent to preserve their shape and colors. If you used durable cotton yarn, machine washing on a gentle cycle is also safe.
Always air dry your coasters flat to prevent them from stretching or warping. The Step by Step Tutorial warns against using a dryer since heat may damage the fibers or shrink the yarn.
If your coaster edges start to curl over time, lightly steam them or block them again with water. According to the Crochet Cat Coaster 😺- Step by Step Tutorial, this will restore the original flat shape.
Store your coasters in a clean, dry place when not in use. Keeping them stacked neatly prevents bending or creasing, ensuring they stay in perfect condition.
Finally, if you give these coasters as gifts, consider including a small care instruction card. The Step by Step Tutorial explains that this simple gesture helps recipients keep the coasters looking beautiful for years.
FAQ About Crochet Cat Coaster 😺- Step by Step Tutorial
1. Can beginners make the Crochet Cat Coaster easily?
Yes, the Crochet Cat Coaster 😺- Step by Step Tutorial is beginner-friendly and uses only basic stitches.
2. How long does it take to finish one coaster?
Most people complete a coaster in 30–40 minutes, depending on their skill level.
3. What type of yarn is best for this project?
Cotton yarn works best because it is durable, absorbent, and easy to wash.
4. Can I sell the coasters I make using this tutorial?
Absolutely! Handmade coasters are popular at craft fairs and online stores.
5. How can I make different cat expressions?
Simply change the embroidery style for the eyes and mouth to create playful, sleepy, or happy cats.
6. Are these coasters heat-resistant?
Yes, cotton yarn coasters protect surfaces from heat and scratches effectively.
Conclusion
We hope this Crochet Cat Coaster 😺- Step by Step Tutorial has inspired you to start your own crochet project.
From gathering materials to learning the stitches and customizing designs, this guide provides everything you need to create beautiful and practical coasters. Try making a few for yourself or as gifts for friends and family.
We would love to hear your honest opinions and suggestions in the comments—share your experiences and ideas to help others enjoy this fun and creative hobby!