
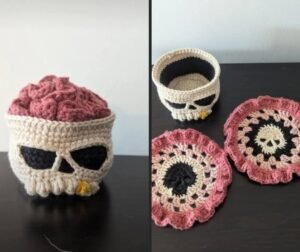
If you are searching for a Crochet Skull Coaster Set- Step by Step Tutorial, you are in the right place. This tutorial will guide you through the entire process of creating a spooky yet fun crochet project that is perfect for Halloween or for anyone who loves gothic-inspired home décor. The Crochet Skull Coaster Set- Step by Step Tutorial will help you learn the basics of creating coasters that are both practical and stylish while teaching you new techniques along the way. This project is beginner-friendly, but even experienced crocheters will love making these charming coasters.
The beauty of this project is its versatility. The Crochet Skull Coaster Set- Step by Step Tutorial can be adapted for different color schemes, sizes, and themes, making it perfect for various occasions. You can create a single coaster or an entire set as a gift for friends and family. Handmade coasters always bring a personal touch to home décor, and these skull-shaped ones will definitely spark conversations at your table.
Moreover, the Crochet Skull Coaster Set- Step by Step Tutorial allows you to improve your crochet skills while working on a fun project. From learning how to start with a magic ring to shaping the skull’s eyes and nose, you will gain hands-on experience that can be applied to other crochet patterns. Let’s dive into the step-by-step instructions to help you create your own crochet skull coaster set with ease.
Materials and Tools Needed
To begin the Crochet Skull Coaster Set- Step by Step Tutorial, it is important to gather all the necessary materials and tools. Having everything prepared before starting will make the process smoother and more enjoyable. Here is a detailed guide on what you need:
First, you will need cotton yarn in your preferred color. White or cream is perfect for a classic skull look, but you can also use black, gray, or even bright colors for a fun twist. Cotton yarn is recommended because it is durable, absorbent, and easy to wash, making it perfect for coasters.
Next, choose a crochet hook that matches the yarn weight. For most cotton yarns, a 3.5mm or 4mm crochet hook works well. Using the correct hook size ensures your stitches are even and the coaster maintains the right shape and texture.
You will also need scissors to cut the yarn and a yarn needle to weave in the ends. A stitch marker can be helpful for keeping track of rounds, especially if you are new to crocheting in the round.
Having a printed pattern or keeping this Crochet Skull Coaster Set- Step by Step Tutorial open on your device will make it easier to follow along. It is always a good idea to read the entire pattern before starting so you know what to expect at each stage.
Finally, keep a measuring tape handy. While coaster sizes can vary, measuring ensures they turn out uniform if you are making a set. Consistency is key when gifting or selling handmade items.
Once all your materials are ready, you can start working on your project without unnecessary interruptions. Preparation saves time and helps you focus on enjoying the creative process.
Step-by-Step Instructions
The most exciting part of the Crochet Skull Coaster Set- Step by Step Tutorial is learning how to bring the skull shape to life with simple crochet stitches. Follow these instructions carefully to create your first coaster.
Start with a magic ring, a common technique used to create a tightly closed center. If you are not familiar with the magic ring, practice a few times before starting the actual coaster. It gives a neat and professional finish to circular projects.
Work a series of single crochets into the ring. This forms the foundation of your coaster. The number of stitches will determine the coaster’s size, so adjust according to your preference.
As you continue crocheting in rounds, use increases to gradually expand the circle. This is where the coaster starts taking shape. Keep your stitches even to maintain a smooth edge.
Once the main circle is complete, it is time to shape the skull features. Create small openings for the eyes and nose by strategically placing chain spaces. These give the coaster its unique skull appearance.
After finishing the skull’s face, crochet a final round around the entire piece to give it a neat border. This not only improves the look but also adds stability to the coaster.
Finally, use your yarn needle to weave in all ends securely. Blocking the coaster lightly with water or steam can help it lay flat and look more polished.
Tips for Perfect Results
Even though the Crochet Skull Coaster Set- Step by Step Tutorial is beginner-friendly, a few tips can make your work look more professional and polished.
First, maintain consistent tension throughout the project. Uneven tension can lead to a wavy or lopsided coaster. Practicing on scrap yarn before starting your main piece can help achieve even stitches.
Secondly, don’t skip the blocking process. Lightly blocking your coasters helps them stay flat and enhances the stitch definition. This step might seem optional, but it makes a big difference in the final look.
Experiment with different yarn colors for a unique touch. For example, black coasters with white eyes create a dramatic effect, while pastel colors give a playful, less spooky vibe.
Consider adding a border in a contrasting color for extra flair. A simple round of single crochet in a different color can completely transform the look of your coasters.
If gifting the coaster set, make a matching set of four or six. Bundling them with a ribbon or placing them in a handmade pouch adds a thoughtful touch.
Lastly, remember that practice makes perfect. The first coaster might not be flawless, but each one will get better as you refine your technique.
Creative Variations
The Crochet Skull Coaster Set- Step by Step Tutorial is a great foundation for exploring your creativity. You can customize the pattern in many ways to suit different themes and occasions.
One fun idea is to add embroidery details like colorful flowers or patterns on the skull. This creates a Day of the Dead-inspired design, giving the coasters a festive look.
You can also turn the coaster into a small hanging ornament by adding a loop at the top. This way, it can be used as Halloween décor or even as a car accessory.
Another variation is to use chunky yarn and a larger hook to create a bigger skull shape. This can work as a placemat or a decorative piece for your table.
For those who love sparkle, try using metallic or glitter yarn. It adds a fun, eye-catching element while keeping the coaster functional.
Consider combining the skull coasters with plain round coasters in matching colors. This creates a balanced set for everyday use and special occasions.
Lastly, you can use the same skull motif on other projects like tote bags, blankets, or wall hangings. The versatility of this design makes it a great addition to your crochet skills.
FAQ about Crochet Skull Coaster Set- Step by Step Tutorial
1. Is this project suitable for beginners?
Yes, the Crochet Skull Coaster Set- Step by Step Tutorial is beginner-friendly, especially if you are comfortable with basic stitches like single crochet and working in the round.
2. How long does it take to make one coaster?
On average, it takes about 1–2 hours to complete one coaster, depending on your crochet speed and experience.
3. Can I use acrylic yarn instead of cotton?
Yes, but cotton yarn is preferred for coasters because it is heat-resistant and absorbent, making it ideal for protecting surfaces from hot or cold drinks.
4. How do I wash the crochet coasters?
Hand wash them gently with mild soap and lay flat to dry. Avoid wringing them out to maintain their shape.
5. Can I sell the coasters I make from this tutorial?
Absolutely! Handmade coasters are popular at craft fairs and online shops. Just be sure to credit the original pattern if required.
Conclusion
The Crochet Skull Coaster Set- Step by Step Tutorial provides everything you need to create fun, functional, and stylish coasters.
From gathering materials to learning new techniques and exploring creative variations, this project is perfect for crochet enthusiasts of all levels.
We hope this tutorial inspires you to try new designs and expand your crochet skills. Share your thoughts and suggestions in the comments—we would love to hear about your experience and ideas for future projects!