
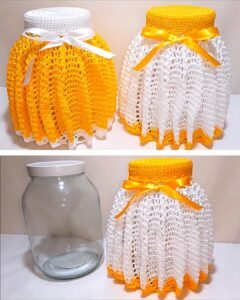
If you are looking for a creative way to give a personal and handmade touch to your home decor, a crochet cover for glass jar- Step by Step Tutorial is the perfect solution. Crochet projects like this are beginner-friendly, eco-friendly, and offer countless customization options. Whether you want to turn an ordinary glass jar into a beautiful vase, a candle holder, or a storage container, this guide will teach you exactly how to do it.
One of the best things about creating a crochet cover for glass jar- Step by Step Tutorial is that you can use leftover yarn from previous projects, making it affordable and sustainable. Plus, the process is relaxing and enjoyable, allowing you to improve your crochet skills while creating something functional and decorative. With the right stitches and a little creativity, your simple jar will soon transform into a charming piece of handmade art.
In this article, we will guide you through every detail of making a crochet cover for glass jar- Step by Step Tutorial. From choosing the right yarn and hook size to understanding basic stitches and customizing your design, you will learn everything you need to complete this project successfully. By the end, you will have a beautiful crochet cover that not only protects your jar but also enhances your home’s aesthetic.
Materials and Preparation for the Crochet Cover
Before starting your crochet cover for glass jar- Step by Step Tutorial, you need to gather all necessary materials. Choosing the right yarn is essential because it affects both the look and durability of your project. Cotton yarn is highly recommended since it provides a neat finish and is easy to clean, especially if your jar will be used in the kitchen or as a vase.
Next, selecting the correct hook size is equally important. A hook that is too large will create loose stitches, while one that is too small will make the fabric too stiff. For most crochet cover for glass jar- Step by Step Tutorial projects, a medium-sized hook works perfectly. It gives you good stitch definition without making the fabric overly tight.
You will also need scissors, a tapestry needle for weaving in ends, and, of course, the glass jar itself. Make sure the jar is clean and dry before starting the project. A jar with a smooth surface works better because it allows the crochet cover to fit nicely without interruptions from raised designs or labels.
When preparing your yarn, consider using bright colors for a cheerful look or neutral shades for a minimalist style. The beauty of a crochet cover for glass jar- Step by Step Tutorial is that it can match any home decor theme simply by changing the yarn color or stitch pattern.
Some people like to add decorative elements such as ribbons, buttons, or small crochet flowers to their covers. This step is optional but can give your project a unique and personalized touch. Think about where the jar will be used when deciding on these extra embellishments.
Finally, ensure you have a comfortable working space with good lighting. Crocheting requires attention to detail, and having a pleasant environment helps you stay focused and enjoy the creative process.
Step-by-Step Instructions for Beginners
Now let’s move on to the most exciting part of the crochet cover for glass jar- Step by Step Tutorial—learning how to make it from start to finish. Even if you are a complete beginner, you can follow these steps easily and create a beautiful cover in no time.
First, start by making a slip knot and chaining enough stitches to fit around the base of your glass jar. This chain will form the foundation of your crochet cover, so make sure it is not too tight or too loose. Join the ends of the chain with a slip stitch to form a circle.
The next step is to work single crochet stitches into each chain around the circle. This will create the base of your crochet cover for glass jar- Step by Step Tutorial. Keep working in rounds, increasing the number of stitches as needed to make sure the cover lies flat at the bottom.
Once the base is complete, you can start building the sides of the jar cover. This is done by crocheting in rounds without increasing stitches. Depending on your preference, you can use single crochet for a solid look or double crochet for a more open, lacy effect.
As you continue crocheting, keep trying the cover on your jar to ensure it fits properly. If it feels too tight, you can add a few extra stitches; if it’s too loose, reduce the stitches in the next round.
When the cover reaches the desired height, finish with a decorative edge. A scalloped border or picot stitches work beautifully for this purpose and add a charming detail to your crochet cover for glass jar- Step by Step Tutorial.
Lastly, weave in all loose ends with your tapestry needle, and your crochet cover is complete! You can now slip it onto your jar and admire your handmade creation.
Creative Ways to Customize Your Crochet Cover
One of the biggest advantages of a crochet cover for glass jar- Step by Step Tutorial is the opportunity for creativity. You can make each project unique by experimenting with different yarns, stitches, and decorative elements.
For example, you can use multicolored yarn for a vibrant, cheerful look or solid colors for a modern, minimalist style. Adding stripes or alternating colors every few rows creates a fun and eye-catching pattern.
You can also try different stitches to change the texture of the cover. A basic single crochet gives a simple, classic finish, while shell stitches or puff stitches add depth and visual interest to the design.
Some people like to add small crochet appliqués such as flowers, hearts, or stars to their jar covers. These embellishments make your crochet cover for glass jar- Step by Step Tutorial even more special and can be changed according to the season or occasion.
If you want your crochet cover to be functional as well as decorative, consider adding a drawstring at the top. This will allow you to secure the cover tightly and prevent it from slipping off the jar.
Finally, you can make sets of matching covers for different jar sizes. This creates a coordinated look in your kitchen, living room, or craft space and makes your handmade decor even more impressive.
Tips for Maintaining and Using Crochet Jar Covers
After finishing your crochet cover for glass jar- Step by Step Tutorial, you may wonder how to take care of it so it lasts a long time. The good news is that maintaining crochet jar covers is easy and hassle-free.
If you used cotton yarn, most covers can be washed by hand or in a gentle machine cycle. Always use cold water to prevent shrinking and lay the cover flat to dry so it keeps its shape.
For decorative covers that are not exposed to food or water, simple dusting or occasional spot cleaning is usually enough to keep them looking fresh and beautiful.
Another tip is to avoid placing crochet covers near open flames if you are using the jar as a candle holder. While it adds a cozy look, safety should always come first, so use battery-operated candles instead of real ones.
Crochet covers also make wonderful gifts. Handmade items have a personal touch that store-bought products can’t match. Consider making sets of jar covers in different colors and packaging them nicely for birthdays, holidays, or housewarming presents.
Lastly, if you enjoy selling handmade crafts, crochet cover for glass jar- Step by Step Tutorial projects can be a great addition to your product line. They are quick to make, customizable, and always in demand for home decor enthusiasts.
FAQ About Crochet Cover for Glass Jar
1. Can beginners make a crochet cover for a glass jar?
Yes! This project is perfect for beginners because it uses basic stitches and simple techniques.
2. What type of yarn works best for jar covers?
Cotton yarn is ideal because it is durable, washable, and provides a neat finish.
3. How long does it take to make one crochet jar cover?
Most covers can be completed in 1–2 hours, depending on your skill level and the size of the jar.
4. Can I wash crochet jar covers?
Yes, most covers made with cotton yarn are machine-washable on a gentle cycle.
5. Do I need a specific jar size for this tutorial?
No, you can adjust the number of stitches to fit any jar size.
6. Are crochet jar covers only for decoration?
Not at all! They can also protect jars from scratches and help you grip them better.
Conclusion
Making a crochet cover for glass jar- Step by Step Tutorial is a fun, creative, and practical project that anyone can try. We have covered everything from materials and preparation to step-by-step instructions, customization ideas, and care tips.
Now it’s your turn to create your own crochet jar covers and bring a touch of handmade charm to your home.
We would love to hear your honest opinions and suggestions in the comments—share your experiences and creative ideas with us!