
Creating an Alcohol Gel Holder made of fabric- Step by Step Tutorial is a fun and practical sewing project that combines creativity with functionality. Whether you are new to sewing or already have experience, this project is simple enough for beginners yet customizable for advanced crafters. A fabric holder keeps your hand sanitizer bottle handy and stylish, making it perfect for everyday use at home, school, work, or travel.
One of the biggest advantages of making an Alcohol Gel Holder made of fabric- Step by Step Tutorial is that you can choose any fabric you like, from colorful prints to neutral tones, and even match it with your outfit or bag. Plus, since it’s reusable and washable, it’s an eco-friendly alternative to plastic covers. You can also adjust the size depending on your bottle, making it a versatile project for personal use or as a thoughtful handmade gift.
In this guide, we’ll explain everything step by step so that you can confidently create your own Alcohol Gel Holder made of fabric- Step by Step Tutorial. From choosing the right materials to sewing tips and customization ideas, you’ll find all the information you need to complete this project successfully and enjoy the creative process.
Materials and Preparation for the Alcohol Gel Holder
To start your Alcohol Gel Holder made of fabric- Step by Step Tutorial, you will need some basic sewing supplies. The most important item is, of course, the fabric. Cotton fabric is a popular choice because it is durable, easy to sew, and available in countless patterns and colors. You can also use waterproof fabric if you want extra protection in case the bottle leaks.
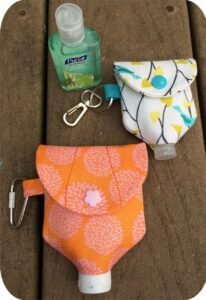
Next, you will need a sewing machine, scissors, thread, pins, and a measuring tape. A snap button or a small piece of Velcro will be necessary to keep the holder securely closed. If you want to attach the holder to your bag or belt, a small carabiner or keyring will be helpful.
Before cutting the fabric, measure the height and circumference of your sanitizer bottle. Add extra fabric for seam allowances and for the flap that will close over the top of the bottle. This ensures the holder fits perfectly and keeps the bottle in place.
It is also a good idea to iron the fabric before cutting it. Wrinkle-free fabric is easier to handle and results in cleaner, more professional-looking seams.
Choosing the right thread color can make a big difference in the final look of your project. Matching thread creates a subtle finish, while contrasting thread adds a decorative element to your Alcohol Gel Holder made of fabric- Step by Step Tutorial.
Lastly, make sure you have a comfortable workspace with good lighting. Organize your tools so that everything you need is within reach. Preparing your materials and space before starting will make the process smoother and more enjoyable.
Step-by-Step Sewing Instructions
Now that you have your materials ready, let’s move on to the practical part of the Alcohol Gel Holder made of fabric- Step by Step Tutorial. Even if you are a beginner, you can follow these simple instructions to create a functional and beautiful holder.
Start by cutting two identical pieces of fabric: one for the outer layer and one for the lining. The lining helps protect the fabric and gives the holder a neat finish on the inside.
Place the two pieces of fabric together with the right sides facing each other. Sew around the edges, leaving a small opening so you can turn the fabric right side out later. Clip the corners to reduce bulk before turning it right side out.
Once turned, press the fabric with an iron to flatten the seams. Then, topstitch around the edges to close the opening and give the piece a professional finish.
Next, fold the bottom part of the fabric upward to create a pocket for the bottle. Pin it in place and sew the sides to form the body of the holder. This step creates the main compartment where the sanitizer bottle will sit securely.
Now, create a flap by folding down the top part of the fabric. Attach a snap button, Velcro, or even a decorative button with an elastic loop to keep the holder closed when the bottle is inside.
Finally, sew a small loop on the back or side of the holder for attaching a keyring or carabiner. This allows you to clip the holder to your bag, backpack, or belt loop for easy access.
Creative Customization Ideas
One of the best things about the Alcohol Gel Holder made of fabric- Step by Step Tutorial is how easy it is to customize. You can make each holder unique by choosing different fabrics, closures, and decorative elements.
For a fun and colorful look, choose fabrics with bold prints or seasonal patterns. For example, floral prints are perfect for spring, while red and green fabrics are great for Christmas-themed holders.
You can also personalize the holder by adding embroidery or iron-on patches with initials, names, or cute designs. This makes your Alcohol Gel Holder made of fabric- Step by Step Tutorial truly one of a kind and an excellent gift idea.
Another option is to use contrasting fabric for the lining or the flap. This small detail adds visual interest and makes the project more stylish.
If you prefer a minimalist design, stick to neutral colors like black, beige, or gray. These holders will match any outfit or bag while still keeping your sanitizer handy.
Finally, consider making a set of holders in different sizes for various bottles, including hand lotion or sunscreen. Having a collection of fabric holders keeps your essentials organized and coordinated.
Practical Tips for Using and Maintaining Your Fabric Holder
After completing your Alcohol Gel Holder made of fabric- Step by Step Tutorial, it is essential to know how to care for it so it lasts a long time. The good news is that fabric holders are easy to clean and maintain.
Most fabric holders can be machine-washed on a gentle cycle. If you used waterproof fabric, check the manufacturer’s instructions before washing to avoid damaging the protective layer.
Allow the holder to air dry completely before using it again. This prevents moisture from getting trapped inside, which could lead to unpleasant odors or mildew.
When using the holder, always close it properly to prevent the bottle from falling out. The snap button or Velcro closure keeps the sanitizer secure, even when the holder is attached to your bag or belt loop.
If you carry the holder in your purse or backpack, consider using a waterproof lining to protect against accidental leaks. This simple step will keep your bag clean and prevent messes.
Lastly, inspect the seams occasionally to make sure they remain strong. If you notice any loose threads, reinforce the stitches to maintain the durability of your Alcohol Gel Holder made of fabric- Step by Step Tutorial.
FAQ About Alcohol Gel Holder Made of Fabric
1. Can beginners make an Alcohol Gel Holder made of fabric?
Yes, this project is beginner-friendly and requires only basic sewing skills.
2. What type of fabric is best for the holder?
Cotton is the most common choice, but waterproof fabric can add extra protection.
3. How do I adjust the size for different bottles?
Simply measure your bottle and add extra fabric for seam allowances before cutting.
4. Can the holder be washed?
Yes, most fabric holders can be hand-washed or machine-washed on a gentle cycle.
5. How do I attach the holder to my bag or belt?
Add a loop with a keyring or carabiner to clip the holder wherever you want.
6. Can I make the holder more decorative?
Absolutely! Use colorful fabrics, embroidery, or appliqués to personalize your holder.
Conclusion
Making an Alcohol Gel Holder made of fabric- Step by Step Tutorial is a creative and practical project that combines style with functionality.
In this article, we covered materials, step-by-step sewing instructions, customization ideas, and maintenance tips to help you create the perfect holder.
Now it’s your turn to try this tutorial and make your own unique sanitizer holder. We would love to hear your honest opinions and suggestions—share your experiences and creative ideas in the comments!