
If you are a Harry Potter fan and love creative DIY projects, making your own Harry Potter Sorting Hat- Step by Step Tutorial will be a magical experience. This iconic hat is one of the most recognized symbols from the wizarding world, known for sorting Hogwarts students into their houses. Creating it yourself not only brings a touch of magic to your home but also allows you to craft a fun decoration for parties, cosplay events, or as a special gift for any Potterhead.
The best part is that this project does not require advanced crafting skills. With some basic materials and a bit of patience, anyone can follow the Harry Potter Sorting Hat- Step by Step Tutorial to create a realistic and charming hat. The process is enjoyable and allows you to explore your creativity while learning new crafting techniques.
In this tutorial, we will go through every detail carefully so that even beginners can confidently make their own Sorting Hat. From choosing materials to shaping the hat and adding details that bring it to life, this Harry Potter Sorting Hat- Step by Step Tutorial will guide you through the entire process.
Materials and Preparation for the Harry Potter Sorting Hat
To start the Harry Potter Sorting Hat- Step by Step Tutorial, you will need a few essential supplies. The main materials are brown fabric, preferably felt or similar sturdy material, to give the hat its characteristic texture and structure. Felt is easy to work with and holds its shape well, making it perfect for this project.
You will also need a hot glue gun, scissors, thread, and a sewing needle. Some people prefer to use a sewing machine for extra durability, but hand sewing works just as well for this project.
Wire is another helpful material for shaping the brim and top of the hat. It allows you to create the iconic droopy look that makes the Harry Potter Sorting Hat- Step by Step Tutorial so recognizable. Lightweight craft wire works best, as it is flexible yet strong enough to hold the shape.
For the inside of the hat, you might want to use a lining fabric or even some cardboard reinforcement to make it more comfortable to wear. If the hat will be used as a decoration rather than a costume piece, cardboard can help it keep its shape without adding too much weight.
Gather all materials in one place before you begin. Having everything ready will make the crafting process smoother and more enjoyable.
Lastly, prepare your workspace with good lighting and enough room to spread out your materials. A clean, organized space makes crafting more relaxing and helps you follow the Harry Potter Sorting Hat- Step by Step Tutorial with ease.
Step-by-Step Instructions for Making the Sorting Hat
Now that your materials are ready, let’s begin the Harry Potter Sorting Hat- Step by Step Tutorial with easy-to-follow instructions. Each step will help you build the hat’s shape and unique character.
First, cut a large circle from your brown felt to form the brim of the hat. The size will depend on how big you want the final hat to be. For a child-sized hat, a smaller circle works, while adults may need a larger one for a comfortable fit.
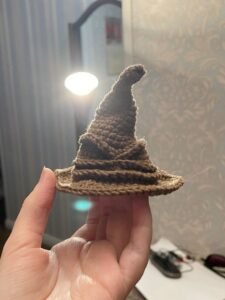
Next, cut out a cone-shaped piece for the main body of the hat. This cone will be sewn or glued to the center of the brim to create the classic pointed shape. Don’t worry about making it perfect; the Sorting Hat is meant to look old and wrinkled, so imperfections add character.
Attach the cone to the brim using hot glue or by sewing. If you are using wire, insert it around the edge of the brim before securing it. This wire will allow you to bend and shape the brim to give it that authentic, worn-out look.
Now, stuff the tip of the cone lightly with some fabric scraps or cotton to give it a bit of volume. The Sorting Hat’s tip usually bends slightly to one side, so adding stuffing helps you control its final shape.
After assembling the basic structure, start shaping the hat to give it personality. Create folds, wrinkles, and the signature mouth-like opening where the Sorting Hat “speaks.” Secure these shapes with stitches or small dabs of glue.
Finally, check the entire hat for any loose edges or seams. Reinforce as needed so the Harry Potter Sorting Hat- Step by Step Tutorial results in a sturdy, long-lasting project you can proudly display or wear.
Adding Details to Bring the Sorting Hat to Life
One of the most exciting parts of the Harry Potter Sorting Hat- Step by Step Tutorial is adding details that make the hat come alive. These finishing touches transform it from a simple brown hat into a magical, story-filled accessory.
Use dark brown or black fabric paint to add shading to the wrinkles and folds. This creates depth and makes the hat look aged, just like in the movies. Lightly brushing on paint gives it a weathered, realistic effect.
If you want the Sorting Hat to talk like in the films, you can create a small opening in the front and sew it to resemble a mouth. Adding stitches around the edges of the mouth gives it a more dramatic expression.
Some crafters like to add a bit of personality by giving the hat eyes made from fabric scraps or buttons. While not movie-accurate, this can be fun if the hat is meant for children or parties.
You can also sew or glue on small patches of different brown fabrics to make it look like the hat has been repaired over the centuries, matching the lore of the Harry Potter Sorting Hat- Step by Step Tutorial.
For a magical finishing touch, sprinkle a tiny bit of gold or bronze glitter on the hat’s surface. This gives it a subtle sparkle under the light, perfect for themed parties or decorations.
Finally, let all paint and glue dry completely before handling or wearing the hat. This ensures your hard work stays intact and the details remain sharp and beautiful.
Tips for Using and Displaying the Sorting Hat
Once your Harry Potter Sorting Hat- Step by Step Tutorial is complete, there are many creative ways to use or display it. Whether for costume purposes or decoration, this handmade hat will surely impress fellow fans.
For cosplay events, wear the hat as part of a full Hogwarts-themed costume. Pair it with robes, wands, and other accessories for an authentic wizard look.
At parties, use the Sorting Hat as a centerpiece. You can even recreate the sorting ceremony by placing slips of paper with house names inside and letting guests draw one at random.
Teachers and librarians often use handmade Sorting Hats during reading events or Harry Potter-themed activities. It makes storytelling sessions more interactive and fun.
If you prefer decoration, place the hat on a shelf alongside your Harry Potter books and collectibles. It instantly adds a magical touch to any room.
Another idea is to make multiple hats in different sizes. Smaller ones can be used as ornaments or party favors for themed gatherings.
No matter how you use it, the Harry Potter Sorting Hat- Step by Step Tutorial allows you to bring a piece of the wizarding world into your life in a creative, personal way.
FAQ About the Harry Potter Sorting Hat
1. Is the Harry Potter Sorting Hat hard to make for beginners?
Not at all. The steps are simple, and even first-time crafters can follow them easily.
2. What fabric works best for the Sorting Hat?
Felt or any thick, durable fabric is ideal because it holds its shape well.
3. Can I make the Sorting Hat without sewing?
Yes, hot glue can replace sewing in most steps, though stitching adds durability.
4. How can I make the hat look old and realistic?
Adding wrinkles, dark shading with paint, and irregular stitching creates an aged effect.
5. Can the Sorting Hat be made in different sizes?
Absolutely. Just adjust the measurements of the brim and cone to fit children or adults.
6. How long does it take to finish the project?
Most people can complete it in a few hours, depending on how detailed they want it to be.
Conclusion
The Harry Potter Sorting Hat- Step by Step Tutorial brings creativity and magic together in one fun project.
We covered everything from materials and basic construction to adding realistic details and creative uses for your finished hat.
Now it’s your turn to create this iconic piece from the wizarding world. We’d love to hear your honest opinions and suggestions in the comments—share your ideas and let us know how your Sorting Hat turned out!